Rather than bore you with a bunch of introductory garbage and photos talking about colorful packaging and poorly written instructions, I think that I'll just jump right into things.
Testing Methodology and Information:
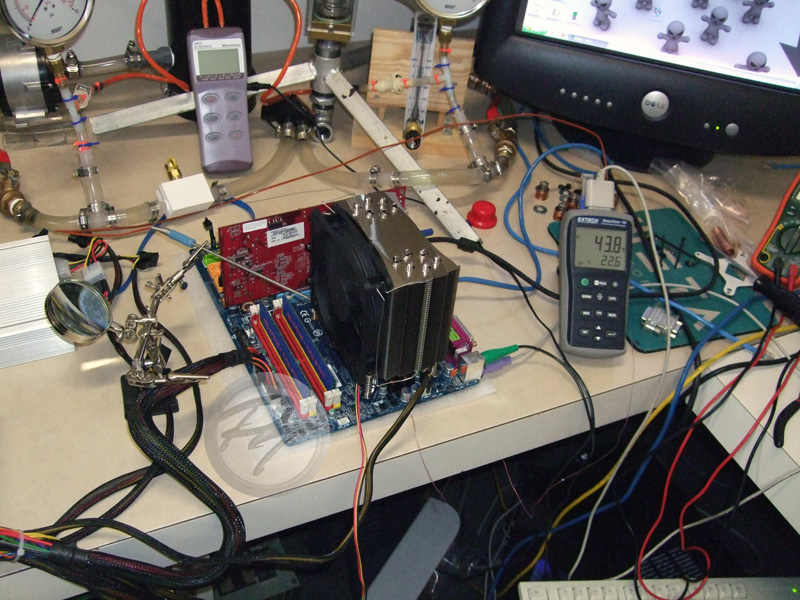
I'm using a modified E6400 as a heat source (basically, I've had the IHS milled according to Intel's TTV specifications and embedded a very tiny T-type thermocouple into the IHS). The thermocouple that's embedded in the CPU's IHS provides me with what Intel defines as a Tcase temperature (which is the temperature of the geometric center of the IHS, a certain distance below the surface). Now, this temperature is always lower than the measured "die temperature" (partially because it's not taking into account the temperature rise incurred by the TIM joint between the die and inside of the IHS) but I'm able to calibrate the thermocouple with all of my other probes. I like this approach because it doesn't feel like I'm flying blind--all data is coming from known, calibrated probes that all behave in the same, predictable manner and can be logged by the same measuring device. Plus, I've had issues with temperature deltas obtained with TAT being adversely affected by ambient temperature...which isn't something that should happen and, when it does, it wreaks havoc on repeatability and accuracy (I've mentioned this on XS before and will be looking into the matter further before moving on to waterblock evaluation).
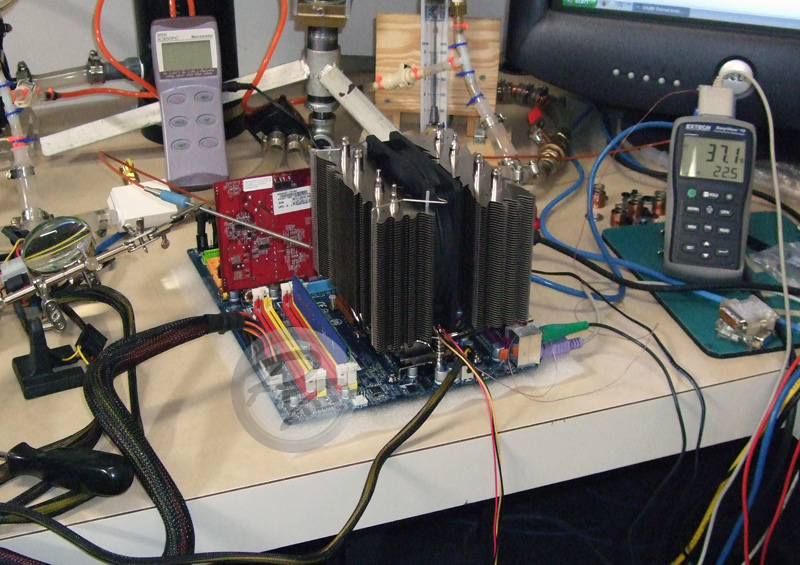
In addition to the Franken-E6400, an Omega T-type thermocouple (that nice, long probe that can be seen in the photo below) is being used to measure what I'll refer to as the 'air inlet' temperature. This probe is positioned one inch from the center of the fan's hub (or hestsink surface, in the case of the IFX-14), on the inlet side for all tests. Both the air inlet probe and "TTV" probe are connected to an Extech EA15 data logging thermometer, which is configured to simultaneously record data from each probe and calculate the temperature difference between the probes (deltaT) every two seconds. Each heatsink was mounted three times and tested with two fans (the Scythe S-Flex SFF21D and SFF21F, rated at 33.5 CFM (8.7 dBA) and 63.7 CFM (28 dBA) respectively). The Scythe S-Flex "D" and "F" fans were chosen due to their fantastic noise to airflow ratio, minimal bearing noise, and long MTBF rating.

With the CPU set to 1.55V in BIOS (1.504V after droop, at load) and running at 2133MHz, each heatsink was allowed a 30 minute warm-up period (using Intel's TAT to load the CPU) before I began the 15 minute data collection runs (the first five minutes of which being removed before averaging data). The heatsinks were allowed to cool between trials and the fan mounted to the heatsink was kept at 12.00V throughout testing with the use of our trusty HP 6264B variable DC PSU. As a result of all of this, each of the bars on the results graph below represents the mean of 900 points of data spread across three trials (three mounts).
While this test setup is adequate, it's far from perfect. Some of the unknowns/variables include the following:
• Airflow: The fans, while kept at 12.00V, are not providing the same amount of airflow through each heatsink tested (for those who don't know, the volumetric airflow output of a cooling fan, just like a water pump, is dependent upon the pressure at which the fan operates and each heatsink, like a waterblock, will incur a different operating pressure). To actually get the same volume of air through a heatsink during a given test, like I would do with water through a waterblock, I'd need to construct some sort of chamber around the heatsink which would allow me to measure airflow (when combined with the proper equipment) and make adjustments by altering fan voltage.
• Mounting hardware and the pressure applied by said hardware: Unlike waterblocks, for which it's rather easy to put together a uniform mounting system, air coolers are very difficult to work with when it comes to controlling mounting load and making sure that the load is equal across all heatsinks tested--much of this comes from how radically different the basic mounting hardware design can be from unit to unit. As such, I had to test each heatsink with whatever mounting hardware the manufacturer included...and it definitely appeared like Thermalright took the cake as far as applied mounting load is concerned.
• Heat applied to the device under test (DUT): While it isn't terribly important from a comparative standpoint (since approximately the same amount of heat should have been produced by the CPU during each trial), I don't actually know how much heat was being applied to each heatsink during testing, especially if you take secondary losses into account. Based on some research that Swiftech did a while back, I'd guesstimate the heat applied to the DUT during each trial to be around 62W (69W less 10% to account for secondary losses, with the percentage being little more than a guess). For waterblock testing, I should be able to bring the system up to somewhere around 100W but I found the settings to be poorly suited to heatsink testing due to system instability. Granted, all of this doesn't take into account potential thermal output differences between the Conroe and Allendale cores, despite them having the same Intel-rated TDP... and I'm assuming that Swiftech got things right ;-)
• General mount variation and differences in TIM application: An issue with all heatsink/waterblock testing, carefully mounting each unit three times and averaging the data from each test should help to provide a somewhat accurate depiction of performance despite these variables. It also helps that I've gotten quite good at applying ArcticSilver's Ceramique TIM in layers so thin that they're semi-translucent and very similar in quantity and distribution each time--repeatability is more important than TIM performance, for those of you who would question the use of Ceramique on the grounds of it not being the best performing.
Testing Results, Analysis, and Commentary:
Well, I said that I wouldn't bore you with introductory stuff... instead, I went for technical junk :P
At this point, I think that I'll grant you a reprieve and present unto you a pretty bar graph:
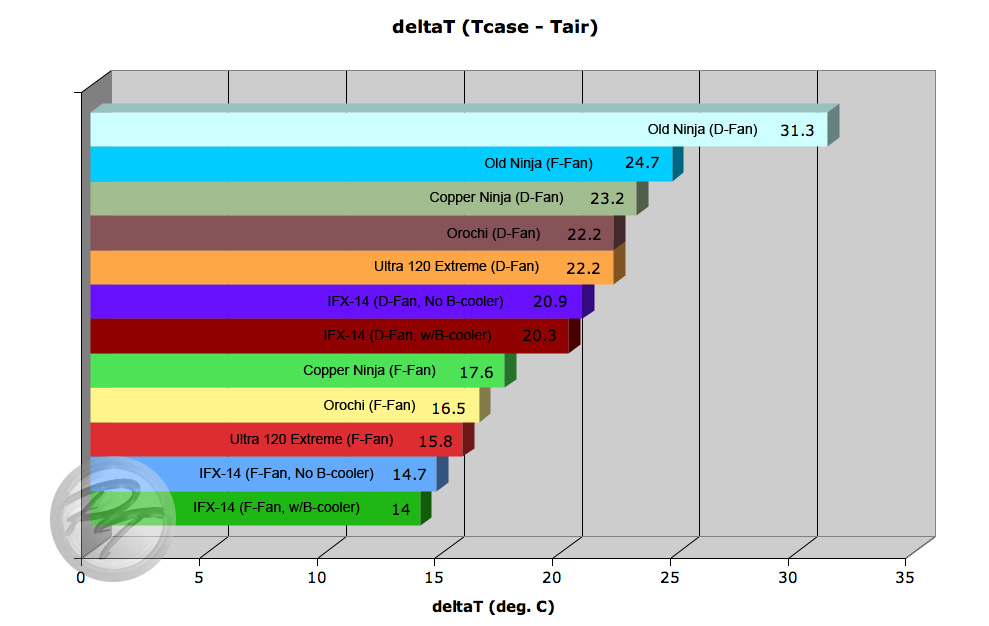
Now, as you can see above, the Thermalright IFX-14 is the clear performance leader, with the old Ninja trailing a lot farther behind than I would have hoped. It's pretty safe to assume that the performance rankings would be about the same if a higher heat load were to be applied, with the performance gap between the coolers increasing proportionally. If all of this deltaT stuff is confusing you and you find yourself banging your head on a table pleading for "real numbers" from TAT, then just add your current room temperature to the above temperature delta and tack on about ten degrees to the total. The fun does not end there, though! I still have to rant about what's wrong with all of these coolers (aside from them being air coolers).
The Old Scythe Ninja (Rev. B street price: ~$37): When it was released, it was a pretty spiffy heatsink... however, time has marched on and heatsink design progressed. I have to say that I'm rather disappointed, especially considering that something as simple as increasing the mounting pressure/quality (take a hint from Thermalright) and spacing the heatpipes out (like was done to the Ninja Mini and Copper Ninja) would likely yield a substantial performance boost. To clarify, I was using the older Scythe Ninja with the 4-clip mount and backplate rather than the "newer" version that employs those damn stupid plastic push-pins (identical to the stock Intel cooler). Seriously, there are few better ways to molest a motherboard than to use plastic push-pins to attach a large cooler. They have no place on a performance-oriented product--make them disappear. Plastic push-pin mounts are the reason that I did not test the Infinity/Mugen, despite it being an otherwise fine cooler. Anyway, overall, the Scythe Ninja isn't that bad of a cooler when you take into consideration its <$40 price tag.
Scythe Copper Ninja (street price: ~$65): The Copper Ninja did a fine job of keeping up with the rest of the pack and, as I pointed out above, I attribute much of the performance gain over the old Ninja to the spaced heatpipes--all that copper does look cool, though. I don't really have any complaints about the cooler that I haven't already gone over, aside from the typical Scythe backplate-o-doom. Tip: do NOT remove the protective backing from the adhesive side of a Scythe backplate before use. If you do, then you will likely never be able to remove the backplate from your motherboard without causing damage.
Scythe Orochi (street price: ~$65-$80): With 'Orochi', if I remember correctly, meaning 'serpent' in Japanese, I can't help but find myself wondering whether 'Anaconda' would have been more appropriate. Simply put, this heatsink is enormous--so large, I would have hoped it to be a good rival for the IFX-14. Alas, the Orochi just could not keep up with Thermalright's flagship mess of fire extinguishing pointiness. The Orochi does have some redeeming qualities, though... it appears to be a fantastic passive/semi-passive cooler for those of you who aren't really overclocking. In a random fit of curiosity, I attempted to bring my test CPU up to its thermal shutdown point using the heatsink without a fan and the only way that I was able to succeed within a reasonable amount of time was to cover the whole heatsink in cardboard and aim a heat gun into my newly constructed cardboard shack. It probably would have overheated eventually without the help of my heat gun... but I didn't feel like waiting. An important thing to note, however, would be that this heatsink covers your RAM. While that may not be an issue for some, those of us who change our RAM out a lot or use abnormally large DIMMs (Corsair Dominators, anyone?) are up a creek without a paddle--the size of the cooler could also pose a problem in some computer cases (especially if you have long optical drives).

Thermalright Ultra 120 Extreme (street price: ~$57): Clean, minimalist design, fantastic performance, and a price point to die for--this heatsink has it all. Granted, I should probably mention the bit about the mounting hardware dumping little metal flakes on my motherboard and the top fin breaking loose due to repeated installation and fan mounting. I really can't think of much more to say about this great, no-nonsense, performance heatsink.
Thermalright Inferno Fire Extinguisher [IFX] 14 (street price: ~$70): It may be the performance leader, but I have a few complaints... Aside from it being big, gaudy (I can't stand the flame-fin thing), and somewhat irritating to work with, it has some compatibility and possible QC issues. As shown in the photos below, the mounting hardware collided with my test board's northbridge heatsink and a capacitor near the CPU socket (tweaking both), the backplate could only be installed in an orientation that caused the backside cooler to extend beyond the board's I/O cluster (not only do you have to worry about case compatibility with that backside cooler, but motherboard layout as well), the unit visibly bows the motherboard when the backside cooler is installed, and the base of this heatsink is so far from flat that it was laughable (though, I think that it may have helped the performance a bit...my issue is with whether or not it was intentional).
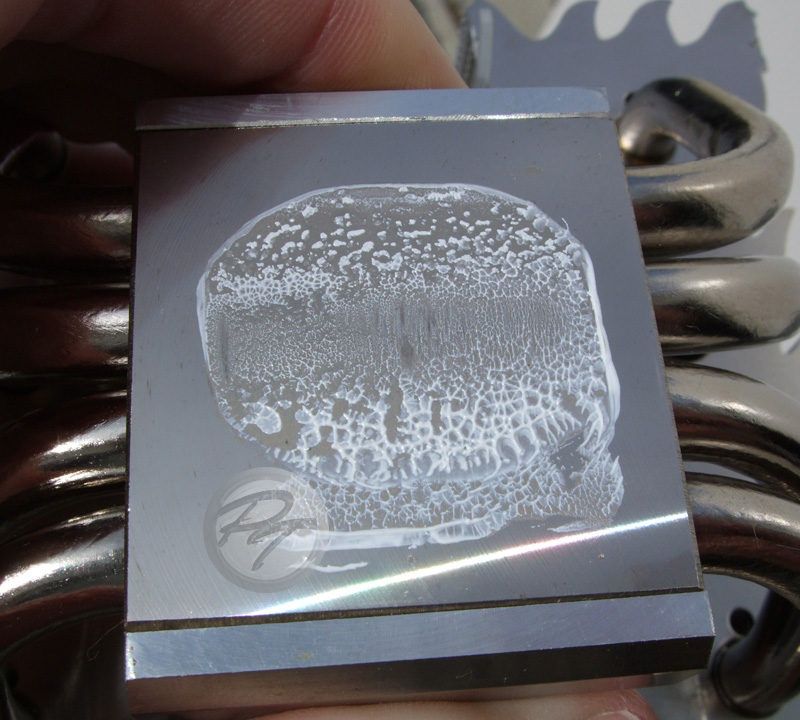
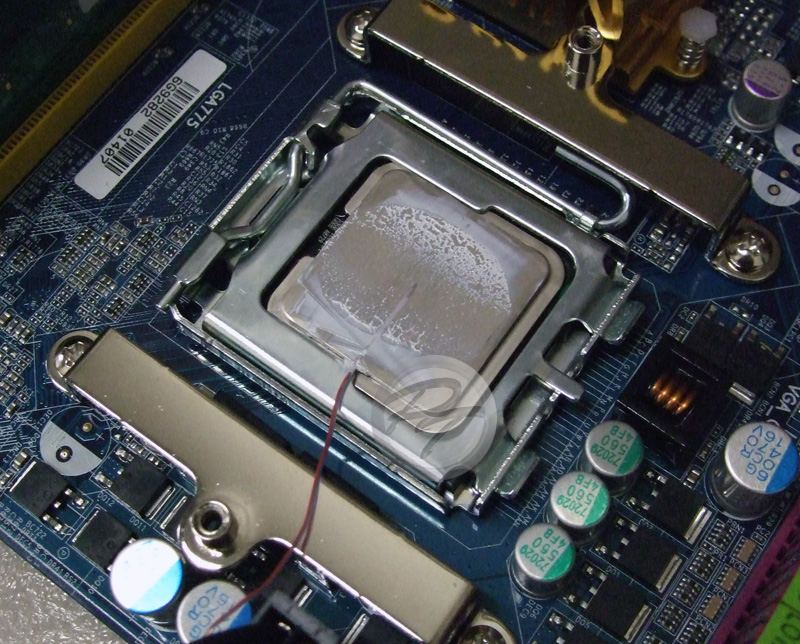
The base of this heatsink is bad enough to where I can rock a razor blade across its surface... However, based on the TIM and contact distribution examples above, it appears that the deformity (high spot) ran right down the center of the heatsink's base and, coincidentally, right across the center of the CPU package. Now, I don't think that the deformity was intentional since no other reviews that I came across mentioned it, but it may have helped the overall performance of the unit similar to the gains that have been seen by bowing/stepping CPU waterblocks. It almost makes me want to have the shop lap the heatsink's base flat so that I can re-test it and see what sort of performance difference results... almost. Anyway, I suppose that the moral of the story is that you shouldn't use the IFX-14 with a Gigabyte 965P-DS3.
Conclusion:
Everybody already knows this but I'm going to say it anyway... Of the performance heatsinks available, the Thermalright Ultra 120 Extreme represents what is likely the best value for the money. Having both best performing heatsink and the best price:performance heatsink in their pocket, Thermalright can now go back to updating their HR-09 MOSFET cooler compatibility charts.
Scythe, on the other hand, needs to decide what market segment they're trying to cater to. Looking at their heatsink offerings and the compromises that keep being made which, frankly, water down their more performance-oriented parts (e.g. mounting hardware), they seem to be straddling the fence with one leg dangling in the novelty cooler segment and the other desperately seeking the sweet solidity of terra firma in the performance cooler market segment. The result of this indecision being a few solid but somewhat identity-confused products and a few products, like the Kama Cross, which should have never been allowed to see the light of day. I must say, though, the build quality of their coolers is always fantastic and the standard deviation of the data collected for the Scythe heatsinks was lower and more consistent than that of the Thermalright heatsinks.