Showing posts with label reviews. Show all posts

Monday, May 3, 2010

[Forum Archive '08] Quick Pump Test: Laing D4 vs. Laing D5-B

In late 2008, I was contacted by an employee of Corsair Memory and we worked out a deal for PTS to take some excess inventory off their hands for a very attractive price. The excess inventory in question consisted of 300 Laing D4 pumps which had been purchased by accident sometime in either late 2004 or 2005 as well as 350+ steel Rev. 1 Swiftech RadBoxes. Naturally, I had to run a quick performance comparison test against a pump that people were familiar with, since the D4 is old enough to where many had no experience with it. Total forum thread views: 1,574 (as of 5/03/2010). As a side note, all images have been re-sized via HTML, rather than my usual two image (preview & full image via link) approach, to speed along the archiving process. You can still right-click on the images and view them at full-size in a new tab/window. Also note that all vBulletin emoticons and their associated code have been removed from the archive entry.

!--Start of Archive--!

So, how many of you guys remember the Laing D4/MCP650? ...anybody?

Okay, well, anyway, I was curious as to how the 'ole D4 would stack up against the D5 Basic... so, onetwothreego!

Equipment and Methodology:

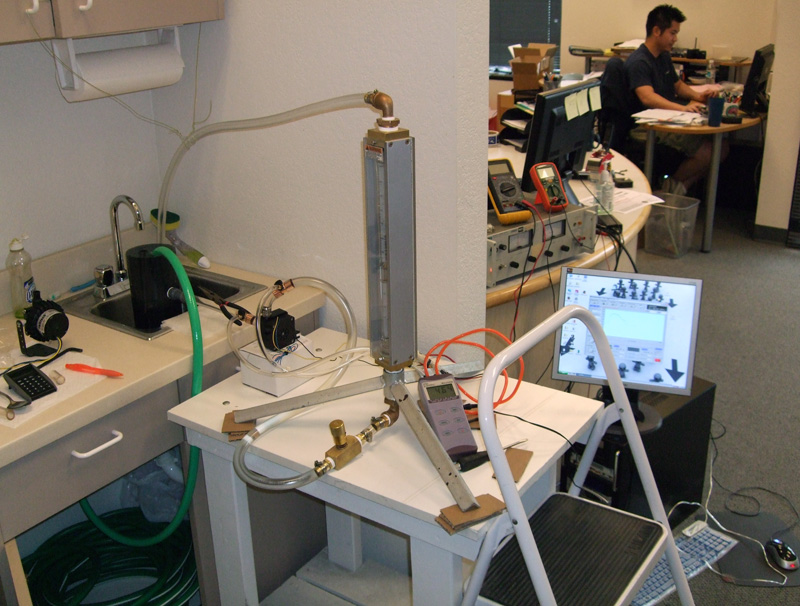
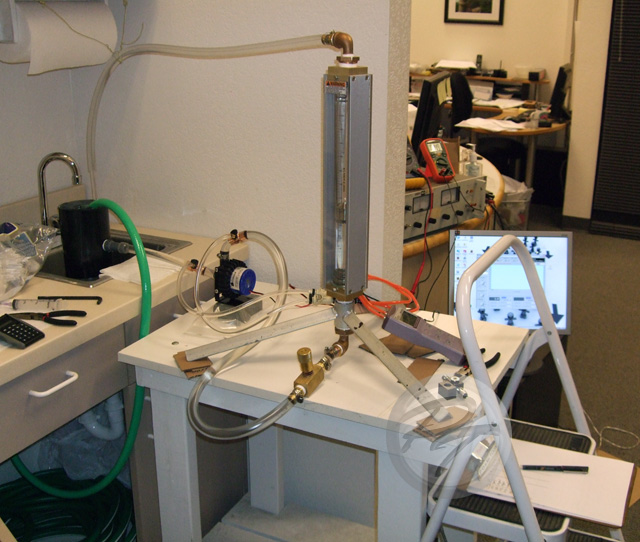
This time around, I'm using an Omega FL-1504A-B flow meter, borrowed from the waterblock test system, to monitor flow (0.628-6.28GPM, +/- 2% full scale accuracy, +/- 0.5% repeatability, graduated every 2% of scale) and a Sper Scientific 840081 manometer, also borrowed from the waterblock test system, hooked up to a computer for dynamic head pressure data logging (-15 to 15PSI, 0.01PSI resolution, +/- 0.3% full scale accuracy, +/- 0.2% repeatability, and combined linearity & hysteresis of +/- 0.2%). The pumps being tested were kept at 12.00V (measured at the pump's power connector) throughout testing with my trusty HP 6264B variable DC PSU.

A quick photo of the test setup:


Each data point collected represents the mean of three trials, with 30 seconds of pressure data logged and averaged per trial (for a total of 90 samples per final data point). The reason for multiple trials and somewhat excessive data logging was to help mitigate any fluctuations in pump output and issues with the nut on the handlebars (e.g. anthropogenic flowmeter read error).

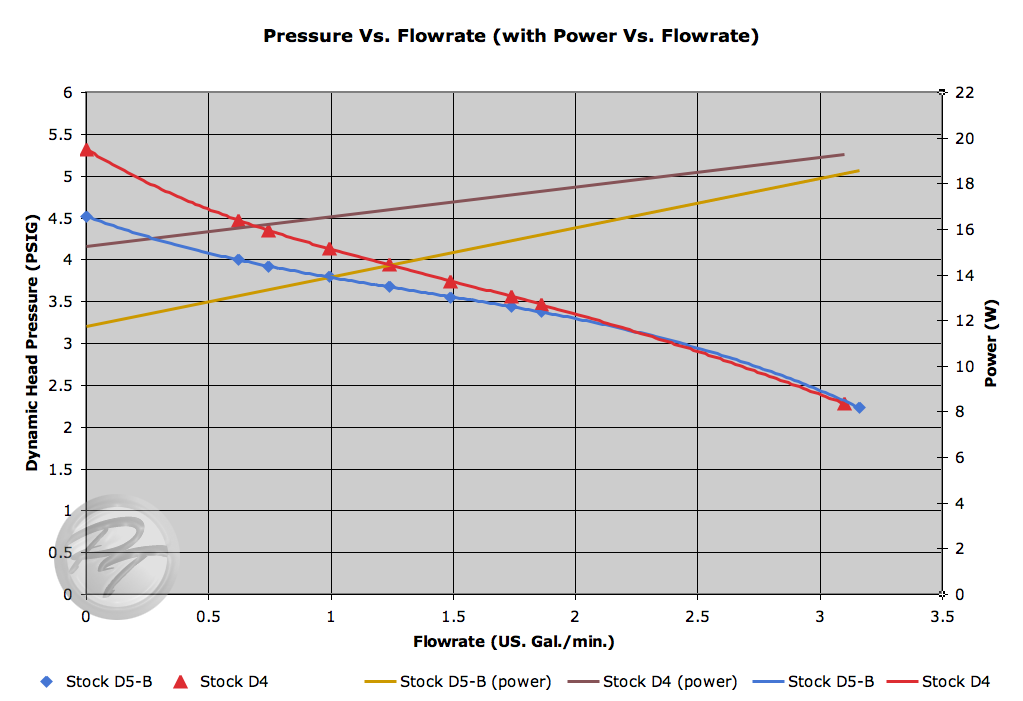
...and here's the resulting performance curve with power consumption:


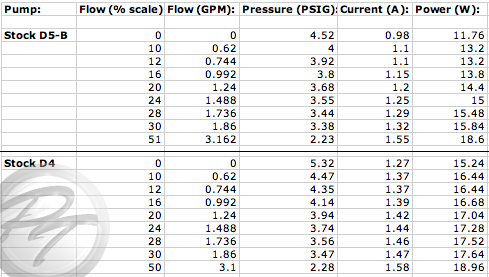
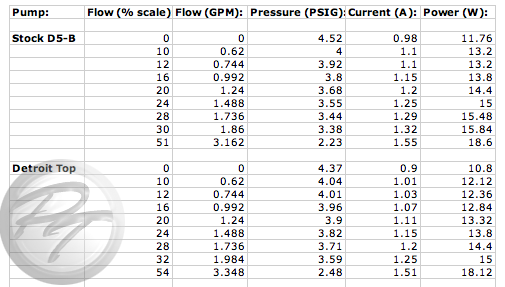
...the chart that the data for the graph was pulled from:


With Laing's & Swiftech's specs for the D4 putting it so close to the current D5 Vario, I can't say that I'm terribly surprised the D5 Basic got walked over. I did, however, note a noticeable difference in the acoustic quality of the two pumps--the D4 has a much more pronounced electronic 'buzz' and is a bit louder than the D5.

!--End of Archive--!

Sunday, May 2, 2010

[Forum Archive '08] Quick Pump Test: Detroit Thermo D5 Top

I managed to scrape together the funds for some fresh test equipment in 2008 and, for the first couple of test runs, rather than fire up the CPU test system, I ran PQ curves for a couple pumps and an aftermarket top. Total forum thread views: 1,474 (as of 5/02/2010). As a side note, all images have been re-sized via HTML, rather than my usual two image (preview & full image via link) approach, to speed along the archiving process. You can still right-click on the images and view them at full-size in a new tab/window. Also note that all vBulletin emoticons and their associated code have been removed from the archive entry.

!--Start of Archive--!

Hey everybody... I know that it has been a while since I posted some actual test results (beyond that little stint with the fan controllers a couple days ago and a few other random things) but I felt like giving a new setup a try in preparation for some other testing that I should be moving onto somewhat soon. Anyway, I'm going to keep this short, so... onetwothree, go!

Equipment and Methodology:

This time around, I'm using an Omega FL-1504A-B flow meter, borrowed from the waterblock test system, to monitor flow (0.628-6.28GPM, +/- 2% full scale accuracy, +/- 0.5% repeatability, graduated every 2% of scale) and a Sper Scientific 840081 manometer, also borrowed from the waterblock test system, hooked up to a computer for dynamic head pressure data logging (-15 to 15PSI, 0.01PSI resolution, +/- 0.3% full scale accuracy, +/- 0.2% repeatability, and combined linearity & hysteresis of +/- 0.2%). The Laing D5-B pump being tested was kept at 12.00V (measured at the pump's power connector) throughout testing with my trusty HP 6264B variable DC PSU.

Now, all of the above equipment is going to be re-integrated into the most recent revision of the setup that I used for this roundup from a while ago--all that goodness together should provide for some interesting waterblock evaluations.

A quick photo of the test setup:


Note: the drain line configuration was changed after this photo was taken to eliminate the siphoning effect which occurred.

Each data point collected represents the mean of three trials, with 30 seconds of pressure data logged and averaged per trial (for a total of 90 samples per final data point). The reason for multiple trials and somewhat excessive data logging was to help mitigate any fluctuations in pump output and issues with the nut on the handlebars (e.g. anthropogenic flowmeter read error).

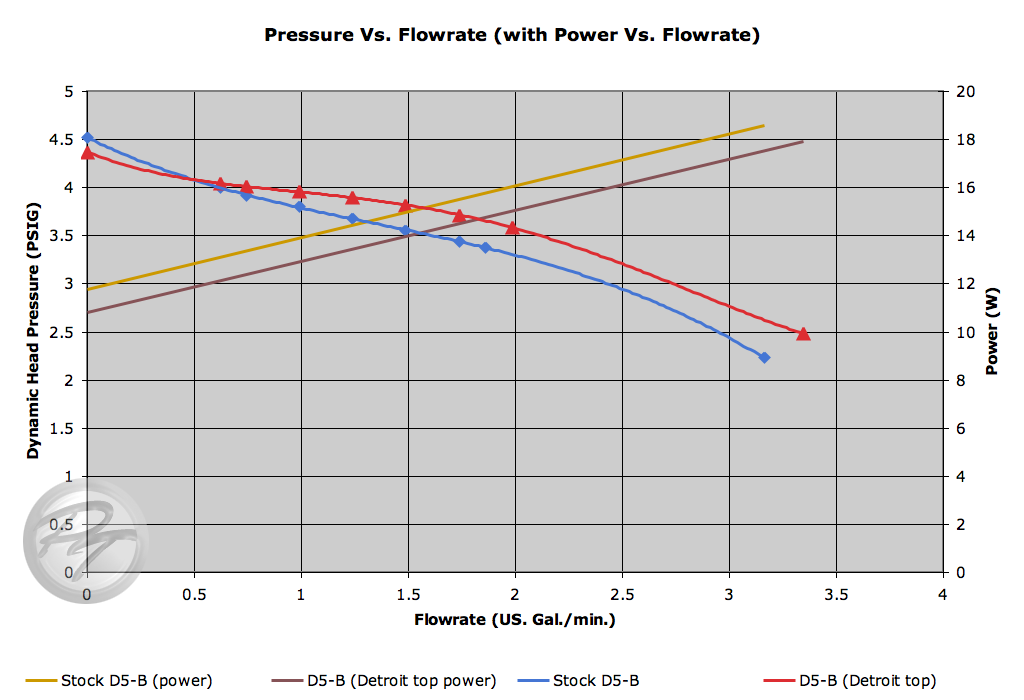
...and you guys are probably getting bored already... so here's the resulting performance curve with power consumption (yes, I changed from current draw in Amps to power consumption in Watts because people complained last time):


...the chart that the data for the graph was pulled from:


All in all, the Detroit Thermo top resulted in a slight increase in performance within a useful range for water cooling while, at the same time, causing a slight drop in power consumption. Not bad, but I'm still not really convinced that D5 tops, in general, are really worth purchasing based solely on performance. Would anyone happen to have an EK D5 top that I could borrow for a bit?

I think I'm gonna go home now...

!--End of Archive--!

Thursday, April 29, 2010

[Forum Archive '07] More DDC Top & Pump Performance Testing

In March of 2007, I announced a minor revision to my DDCT-01 performance enhancing DDC pump top and with that revision, of course, came more testing. Total forum thread views: 11,926 (as of 4/29/2010). As a side note, all images have been re-sized via HTML, rather than my usual two image (preview & full image via link) approach, to speed along the archiving process. You can still right-click on the images and view them at full-size in a new tab/window. Also note that all vBulletin emoticons and their associated code have been removed from the archive entry.

!--Start of Archive--!

Hey everyone... I'm back with another round of DDC testing for your viewing enjoyment. However, this time, rather than doing somewhat crude comparative testing, I've gathered some more equipment and decided to go for some spiffy pressure vs. flow curves with power consumption. This will, hopefully, provide a clearer picture of overall pump performance for everyone.

Now, before I get started, let me just say that I've already run my data past my Laing contact and they indicated that my data is good (I say this now because I'm sure that a few of you won't be too happy with the data). Additionally, I'll have to wait 'till early next week to post photos of pumps and stuff because I have to take off early today.

So, here we go!

The Contenders:

18W DDC-2TPMP - This is the standard, red impellered DDC-2 that's available in the US. It'll be tested stock, with my DDCT-01 top, my new DDCT-01s top, and as Frankenpump (see below).

18W DDC-3.2VCTP - This is one of the new 18W, blue impellered pumps that's readily available in Europe but hasn't really hit the US market yet. In case you're wondering about the model number, this pump started life as a volume compensating DDC, but it has been modified by Laing to remove the volume compensator. Despite utilizing a v3.3 motor control board, the official name for the pump is the DDC-3.2 (more on this later). The blue impeller does have a smaller inlet (~9mm vs. the red impeller's 12mm inlet) and it is also slightly smaller in diameter (~36mm vs. ~36.75mm). Some other changes include the lengthening of the pump's startup procedure, a newly redesigned motor, RoHS compatibility, and the elimination of the DDC-2's nasty 4A overshoot at startup (which I happen to think may be, at least in part, responsible for the very early death suffered by several DDC-2's...but I still have some research and a lot of testing to do to see if this is the case). This pump will be tested stock and with my new DDCT-01s top.

The Frankenpump - Frankenpump is basically a DDC-2TPMP with a DDCT-01s top and a blue impeller, borrowed from the DDC-3.2VCTP. Please don't jump to try this at home as Frankenpump wasn't a very happy monster...

The DDCT-01s Top - This top is a very small revision to my original DDCT-01 design, which was mainly done to provide compatibility with the blue impellered DDC pumps. I was also able to eek a tiny bit of extra performance outta the old design in this revision. Make no mistake, this is not the DDCT-02 (that's something that's still in development). The DDCT-01s should be available by sometime next week as they're at the shop being made right now. However, if you're interested in making your current DDCT-01 top compatible with the blue impellered pumps, then all you have to do is remove the inlet ring with a Dremel (I'd advise using a flat-tipped tungsten-carbide bit and cleaning any burrs up with an X-Acto knife).

Testing Procedures:

Lacking an appropriate flow meter, I filled a container of known volume (verified very slowly with a graduated cylinder meeting ASTM Class B, E1272 spec.) from 0.5 Gal. to 4.5 Gal. and carefully measured the filling time at various head pressures (each data point collected the mean average of 3 trials, head pressure/flow was controlled with a gate valve just after the pump's outlet, and head pressure was monitored with one of my new pressure gauges [4" gauge face, glycerine filled to eliminate/reduce needle jitter, + or - 1% full scale accuracy, 0.2psig markings (pretty easily approximated to 0.1psig)]). All tests were carried out at 12.00V (measured at the pump's power connector, so it doesn't take into account the minimal resistance presented by the pump's 22ga. power wires) utilizing an HP 6264B variable DC power supply. Oh, yeah, and the charts may look a little cluttered but they're not nearly as bad as the chart with all of the data that I collected (and am still collecting) on it.

The Test Results:

Raw Max. Data:

- 18W DDC-2TPMP (stock) -
Max. Head Pressure: 8.7psig (~20' -- ~6.1m)
Max. Discharge (flow): 2.24 GPM

- 18W DDC-3.2VCTP (stock) -
Max. Head Pressure: 6psig (~13.84' -- ~4.22m)
Max. Discharge (flow): 2.2 GPM

- 18W DDC-2TPMP w/DDCT-01 top -
Max. Head Pressure: 8psig (~18.45' -- ~5.62m)
Max. Discharge (flow): 3.84 GPM

- 18W DDC-2TPMP w/DDCT-01s top -
Max. Head Pressure: 8.2psig (~18.91' -- ~5.76m)
Max. Discharge (flow): 4.11 GPM

- 18W DDC-3.2VCTP w/DDCT-01s top -
Max. Head Pressure: 5.6psig (~12.92' -- ~3.94m)
Max. Discharge (flow): 4.19 GPM

- 18W Frankenpump -
Max. Head Pressure: 8.4psig (~19.37' -- ~5.9m)
Max. Discharge (flow): 3.87 GPM

The Curves w/Power Consumption:

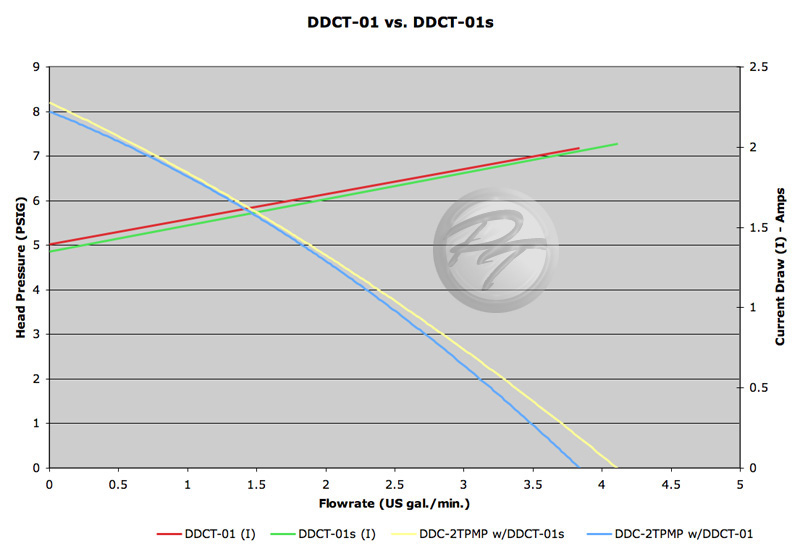
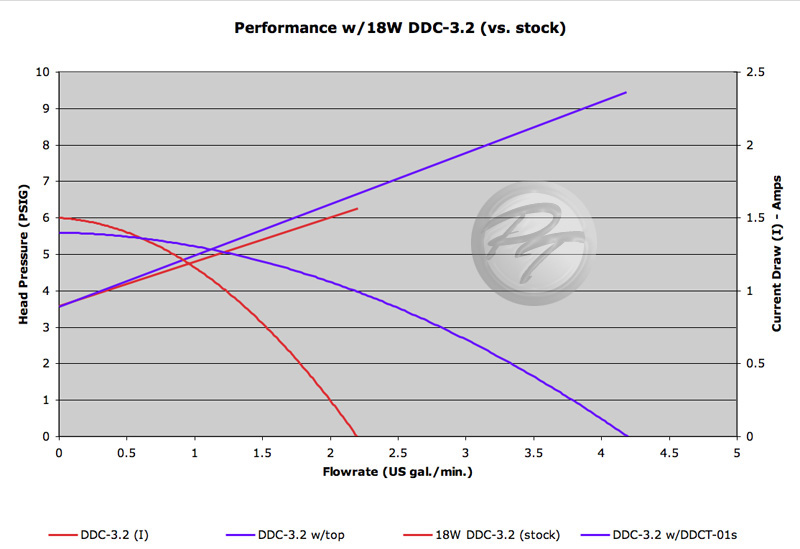
First up, a comparison of the DDCT-01 and DDCT-01s tops (both on the same DDC-2TPMP).


Slightly lower power consumption, slightly higher max. head, and slightly higher max. flow... yup, that's the DDCT-01s in a nutshell.

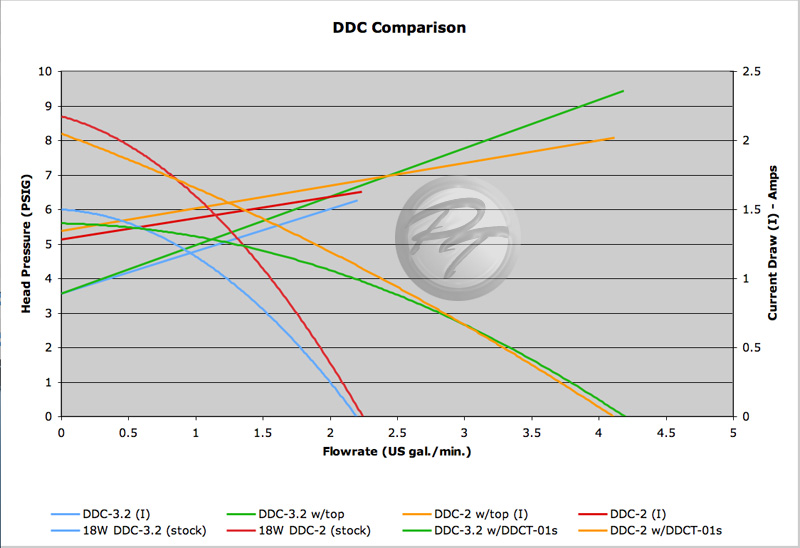
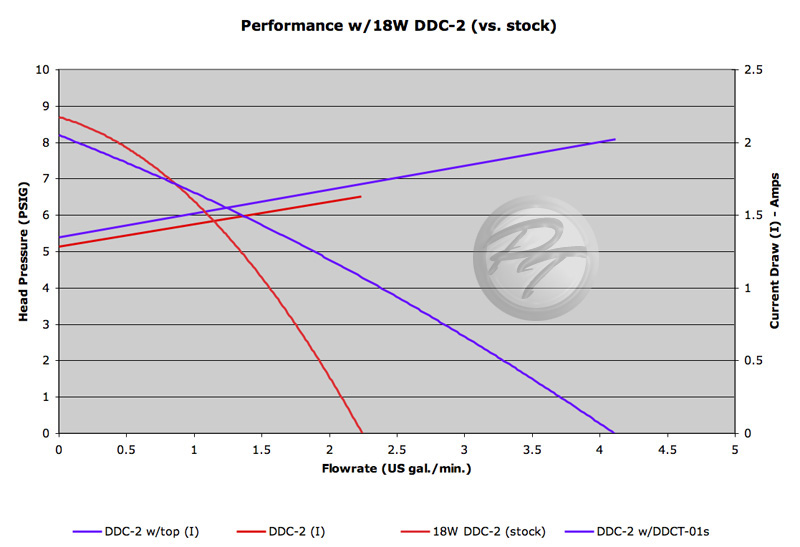
Moving on, here's a comparison of the DDC-2TPMP and the DDC-3.2VCTP in their stock form and with the DDCT-01s top. This one is a little messy but it's pretty clear that the newer DDC isn't doing so hot, with its substantially lower max. head pressure. Interesting to note the power consumption of the new pump, though--it starts a lot lower and ends higher than that of the DDC-2TPMP. Granted, with very low pressure drop waterblocks on the market now (like the D-Tek FuZion), the DDC-3.2 still stands as a good little pump for our purposes.


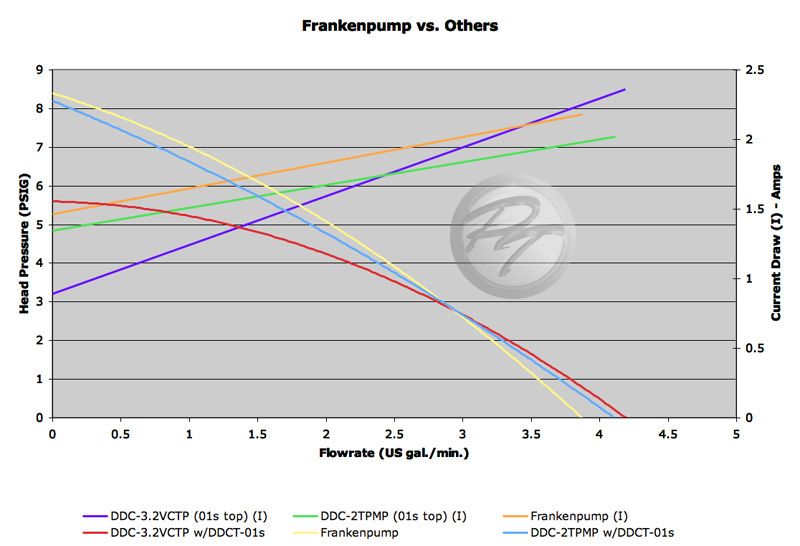
Since that's a rather confusing chart, here it is broken into two charts (one for the DDC-2 and one for the DDC-3.2):


...and now to Frankenpump.

Now, the reason I decided to do the Frankenpump test is because I wanted to drive home the point that I had made previously: the majority of the changes and the reason for the performance difference both lie in the new pump's motor, not the impeller. Drop the blue impeller into a DDC-2TPMP and you get higher head pressure and marginally better flow...and a lot of angry noises & vibrations. Interestingly, power consumption also went up considerably.

A lot of you are probably somewhat disappointed with the performance of the new 18W DDC-3.2 and, honestly, so am I. However, we likely won't be seeing them show up in the US through retail channels for about another 6 months or so. In the meantime, however, Laing is scrambling to make a version of the new DDC with performance equivalent to that of the DDC-2. Only time will tell whether they manage to get a production commitment, but, if it does go into production, it'll likely surface as the DDC-3.3.

I have more information, commentary, and photos to add to this but it'll have to wait until next week as I'm going to be out of town this weekend... and, speaking of which, I'm already an hour behind schedule (go figure).

-Later

Update!

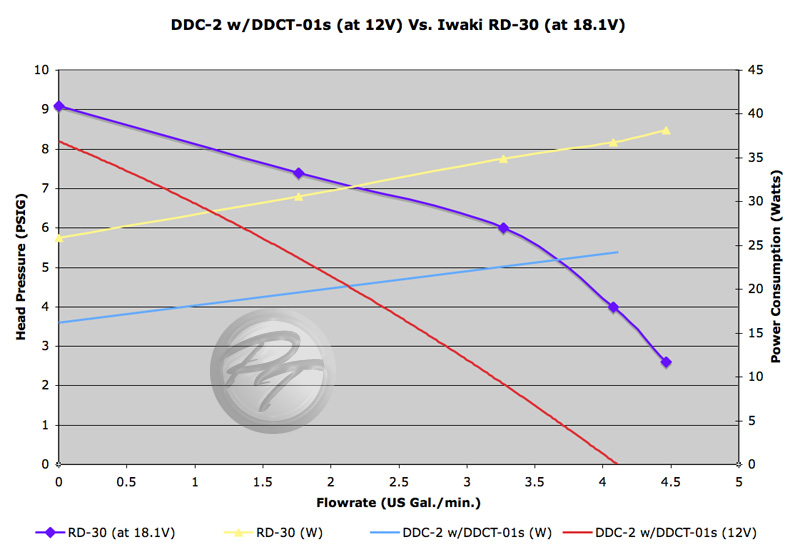
Okay, I mentioned in another thread that I was going to post some data for the Iwaki RD-30 at 18.1V and, well, here it is!

Keep in mind that this is just a graph of the raw RD-30 data vs. the refined data for the DDC-2 w/top. The reason that I'm presenting the RD-30 data this way is due to the irregular shape of the curve and how difficult it would have been to create an accurate fitted curve for the data set (the data for the DDC's all came out to be pretty parabolic, so an accurate fitted curve was a snap). Additional tests only worked to confirm the linearity of the performance curve at higher head pressures, so this is how I'm presenting it to you. Also, power consumption in this chart is presented in Watts, instead of Amps, because the pumps were running at different voltages.


As you can see, even at 18.1V, it's substantially more powerful than the DDC-2... but its power consumption is also quite a bit higher than the DDC-2's. At 18.1V, the RD-30's head pressure topped out at 9.1 PSIG (~21 feet -- 6.4m) and the flow was pretty impressive. Honestly, though, comparing that to Iwaki's performance curve for the RD-20 at 24V (found HERE), the RD-20 at 24V may be a better choice in pump than an undervolted RD-30 (especially if you're running the pump above 6 psig). Granted, I don't have any power consumption information for the RD-20 but, if it proves to use less power than the undervolted RD-30... really, it depends on what you want to do with the pump, though.

UPDATE (again): After getting the RD-30 onto my testbed, I've noticed a couple oddities that I'll have to investigate further... the results of which may cause me to redo the above performance curve.

!--End of Archive--!

Wednesday, April 28, 2010

[Forum Archive '06] Early DDC Top & Pump Performance Comparison

September 2006 saw the debut of my custom, performance enhancing DDC pump tops. Yes, the testing was, by my current standards, quite crude... but it was the best that I could do with the resources I had at the time. Please keep in mind that "DDC+" actually refers to the old orange-impellered 18W DDC-2. Total forum thread views: 60,346 (as of 4/28/2010). As a side note, all images have been re-sized via HTML, rather than my usual two image (preview & full image via link) approach, to speed along the archiving process. You can still right-click on the images and view them at full-size in a new tab/window. Also note that all vBulletin emoticons and their associated code have been removed from the archive entry.

!--Start of Archive--!

Okay everyone, I finally got my prototypes back from the machine shop and I also managed to finish the pump testing that I was working on. Feel free to repost this test data where ever you wish as I'll only be posting it in XS and [H]. So, yeah...on with the show!

The Contenders:

I've included the AqX 50Z-DC12, the stock (18W) DDC+, and the Laing D5/MCP655 in the tests for comparison purposes and, as a result, I won't really talk about them in this section.

The Alphacool DDC Top (unmodded) - I didn't bother taking photos of this one because everyone is already pretty familiar with it. In short, it's somewhat large, utilizes 7mm inlets (tested with top inlet) and outlet, is tapped for use with 1/4" BSPP (G1/4) fittings, has a rather sharp outlet curve, and it has additional mounting points integrated into it. This design also retains the 'inlet ring' in the top of the impeller housing.

The Alphacool DDC Top (modded) - Again, no photos... but it's basically the same as the stock Alphacool top. Only differences being that the inlet channel has been enlarged from 7mm to approx. 10-10.5mm (I was going for something more representative of the average modder, as opposed to crazed perfectionist) and, as a result of the enlargement, the inlet ring has been removed.

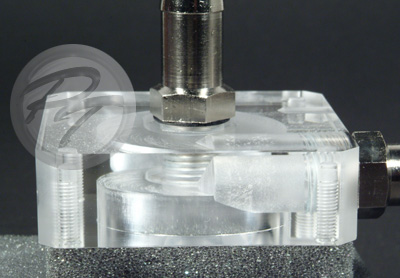
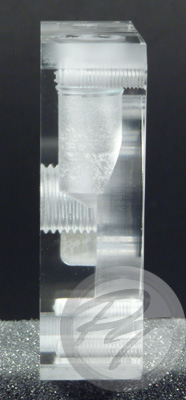
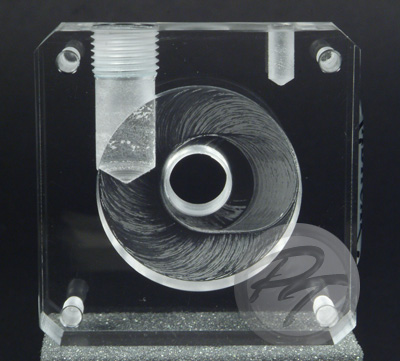
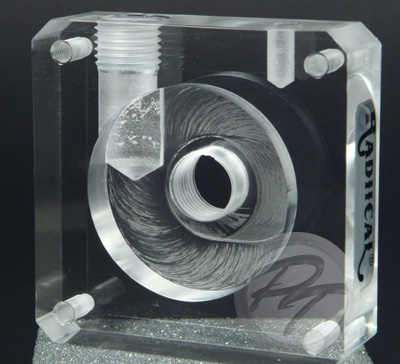
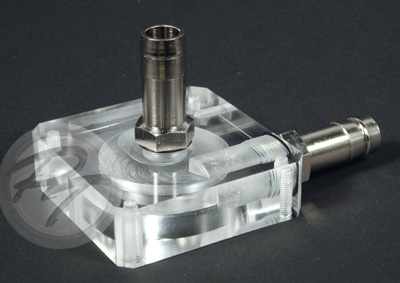
The Radiical DDC Top - A rather crude design overall, this DDC top consists of a block of acrylic (or Delrin) that has had a shallow cylinder machined into the bottom and, essentially, 1/2" holes drilled to intersect the cylinder, acting as inlet and outlet. The result is a large inlet (with no inlet ring) and an outlet that compromises a large portion of the impeller housing's ceiling. The photos illustrate this best...

Radiical top photos (in acrylic):


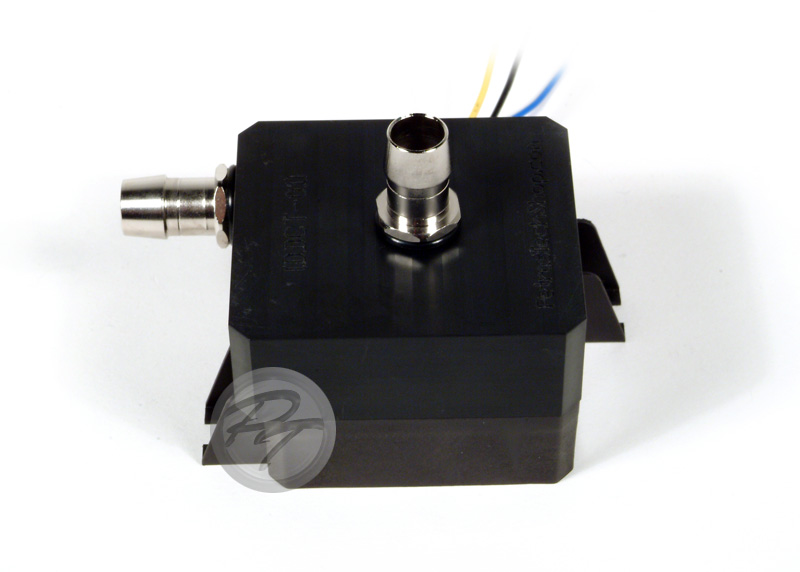
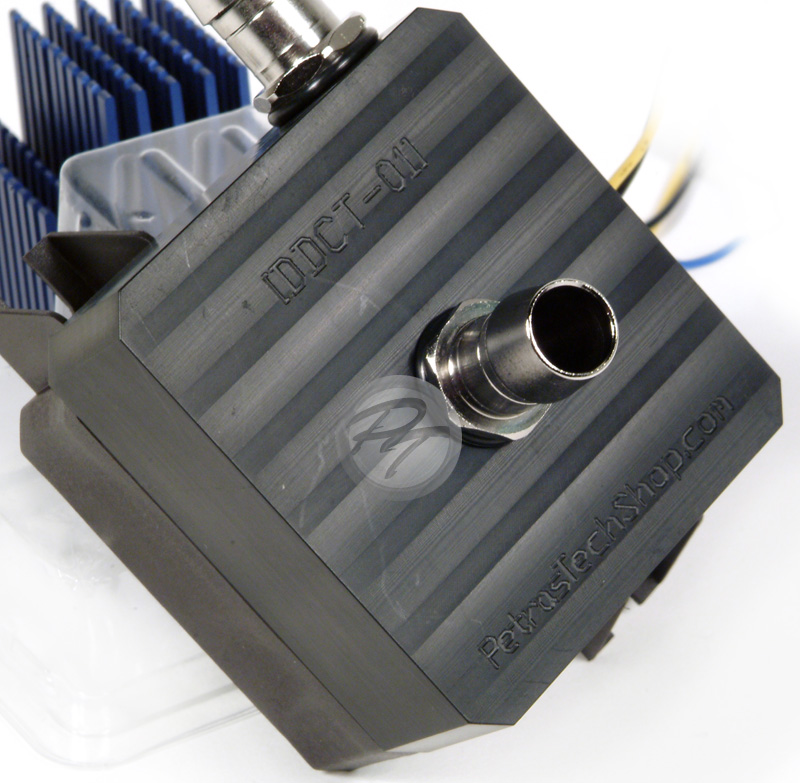
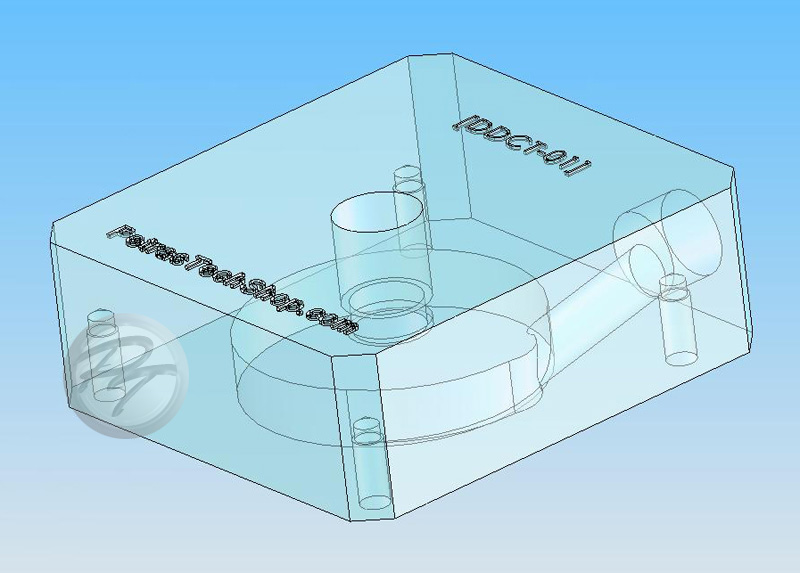
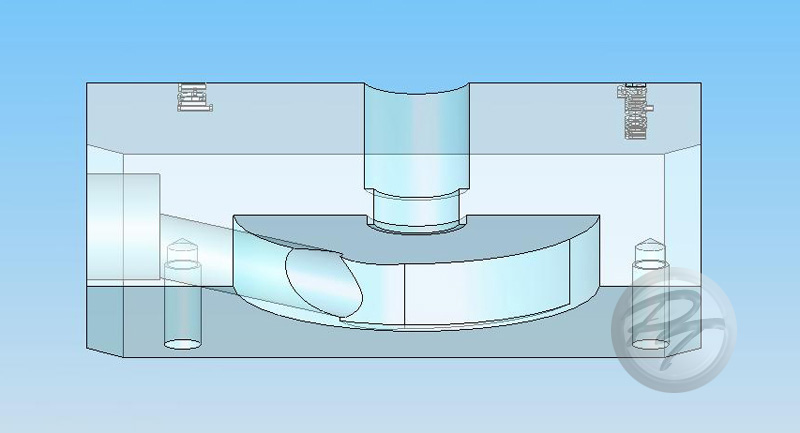
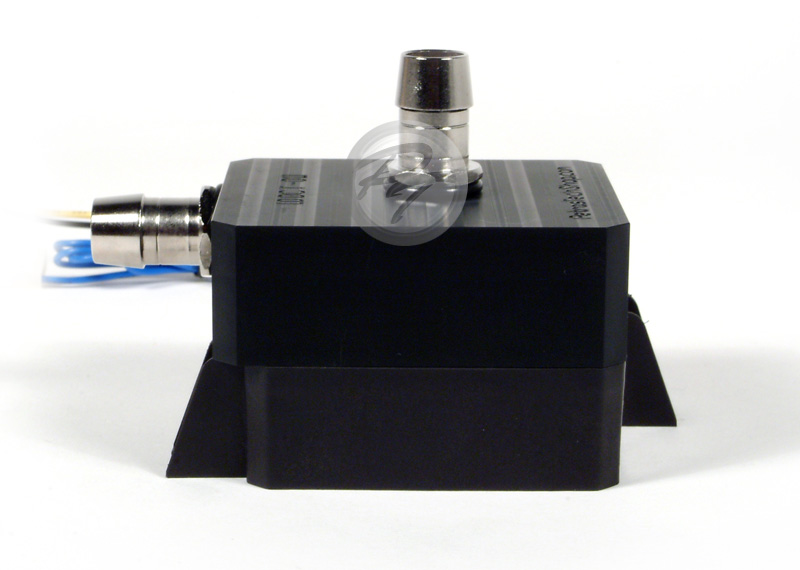
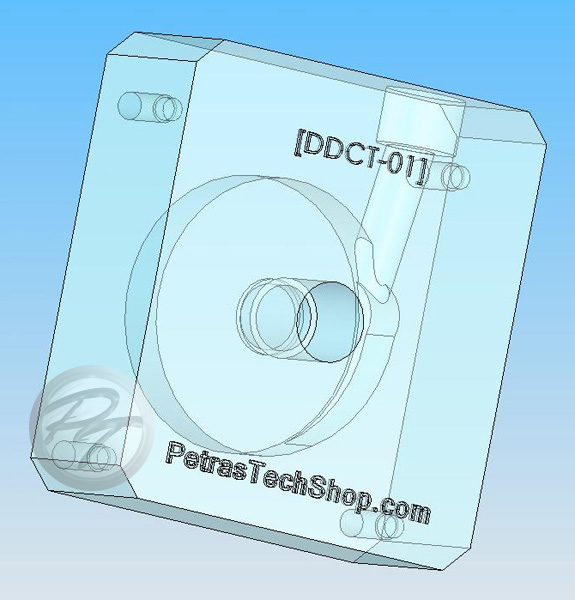
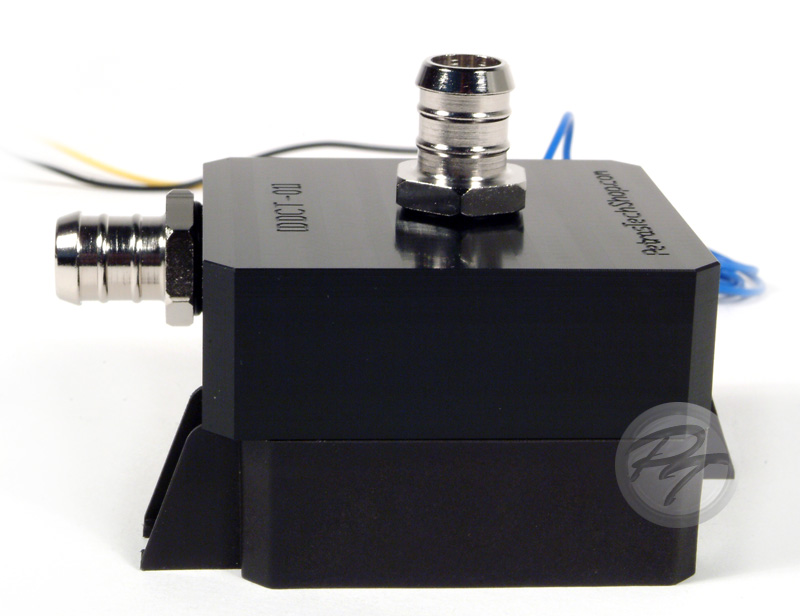
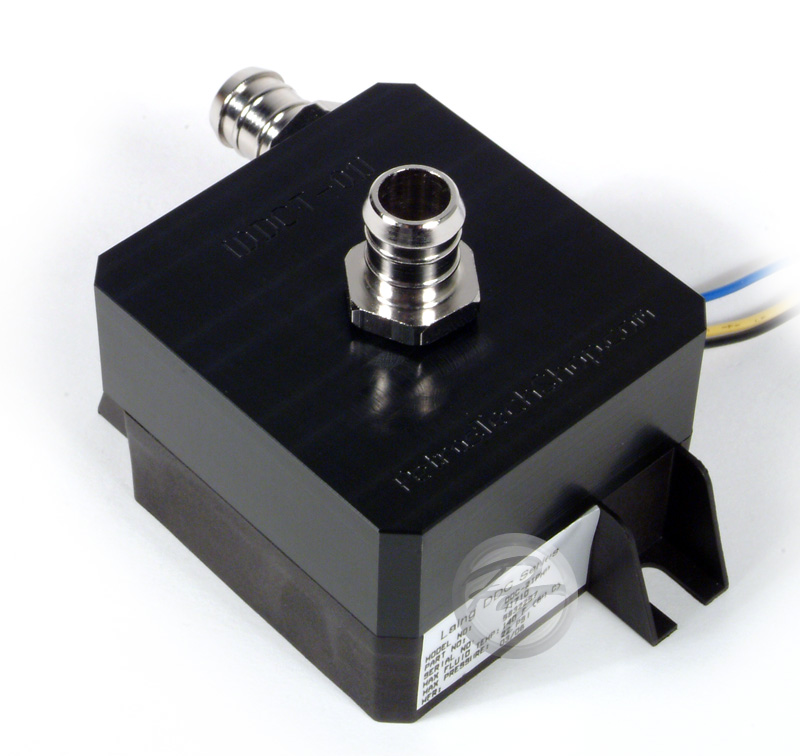
The Petra'sTech DDCT-01 (a.k.a. Petra's Top/The Petra Top/whatever) DDC Top - Designed by me and produced by the machine shop that's right next-door (in California, no less! Take that, Swiftech < /joke > )... This DDC top is machined from black Delrin and features a 9.5mm top inlet (with inlet ring), 7mm outlet, a gradual outlet curve, inlet and outlet tapped for use with 1/4" BSPP (G1/4) fittings, and a size/shape/profile which is meant to closely match the footprint of the DDC pump (granted, one end had to be made 4mm longer to allow the threaded portion of the outlet to clear one of the mounting screw holes...it doesn't protrude beyond the top portion of the front integrated mounting bracket). BTW, the 'DDCT-01' naming system will be used to denote revision numbers later in time (e.g. DDCT-01, DDCT-02, DDCT-03, etc.).

Photos:


Internals:


Testing:

Testing & Procedures:

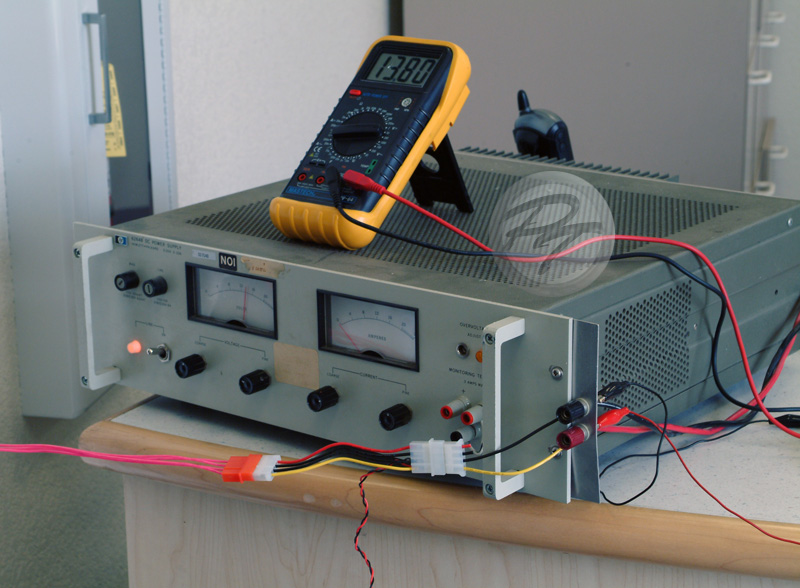
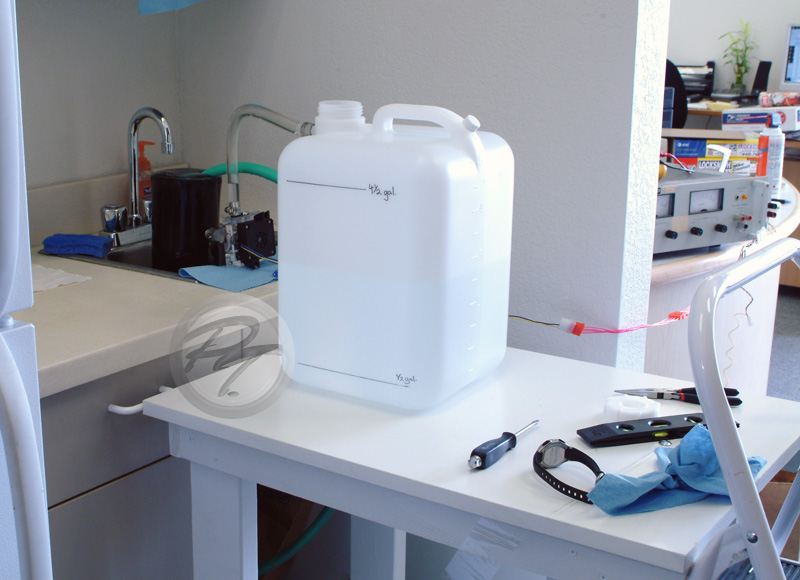
A max head pressure test and several forms of flow testing were performed for each pump at both 12.00V and 13.80V. Each flow test consisted of three timed trials wherein a 5 US gallon Fort-Pak (with 0.5 gallons marked as a start point and 4.5 gallons as the end point) was filled--the results of these trials were averaged and the flowrate calculated. The Fort-Pak was tapped and a barbed fitting inserted to allow for easily repeatable filling conditions and the height of the Fort-Pak's inlet was adjusted so that it was approx. 4.5" above the water level in the reservoir that the pumps were drawing from (to negate any gravitational effects such as siphoning). Power for the pumps was controlled with a rather large, older HP model 6264B variable DC power supply and voltages were monitored using a digital multimeter (below).
Max Head Pressure Testing:

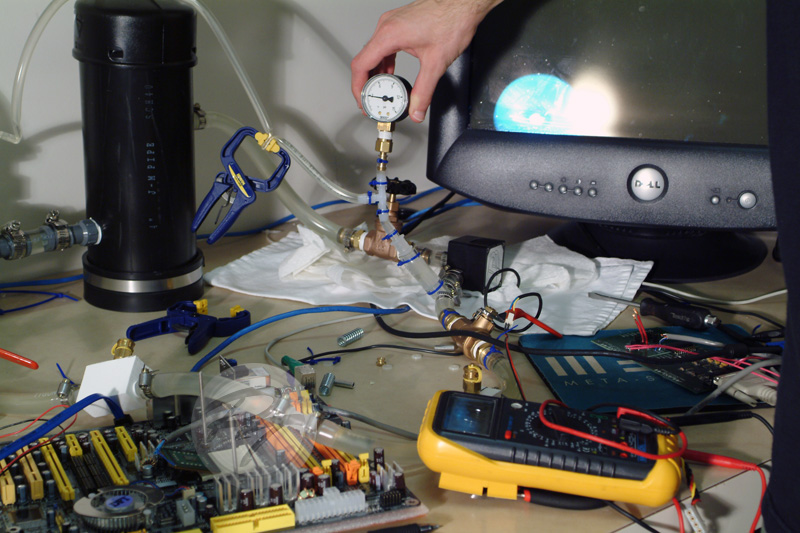
The head pressure tests were carried out using the same setup as I used for my previous round of head pressure tests (shown below).
Test Results:

AqX 50z: 12.00V -- 5.2psig (11.99 feet) | 13.80V -- 6.2psig (14.3 feet)

Laing D5: 12.00V -- 6psig (13.84 feet) | 13.80V -- 6psig (13.84 feet)

Laing DDC+: 12.00V -- 8.5psig (19.61 feet) | 13.80V -- 11.1psig (25.6 feet)

DDC+ w/ stock Alphacool: 12.00V -- 8.1psig (18.68 feet) | 13.80V -- 10.1psig (23.3 feet)

DDC+ w/ modded Alphacool: 12.00V -- 7.8psig (17.99 feet) | 13.80V -- 9.4psig (21.68 feet)

DDC+ w/ Radiical Top: 12.00V -- 5.6psig (12.92 feet) | 13.80V -- 6.8psig (15.68 feet)

DDC+ w/ Petra's Top: 12.00V -- 8.1psig (18.68 feet) | 13.80V -- 10.1psig (23.3 feet)

...and a more graphical representation:
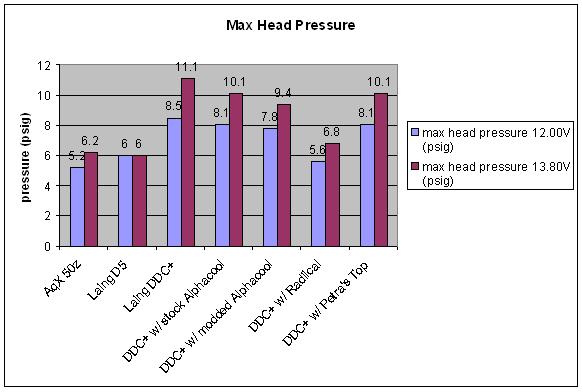
Comments: Now, I'm still not quite sure how the D5 managed to sustain a max head pressure that high...but everything else seems to be about right (and I got that same result with multiple D5's). To be honest, I found the pressure loss due to the Radiical top rather surprising as I didn't think that it would do that poorly.

Max Flowrate Testing:

The max flowrate tests were carried out per the testing procedures described above. A 2.5" section of 1/2" ID tubing was used to link the pump's inlet to the reservoir inlet and a 1' 3.25" section of 1/2" ID tubing was used to join the pump's outlet with the Fort-Pak's inlet (below).
Test Results:

AqX 50z: 12.00V -- 2.83 Gal./min. | 13.80V -- 3.24 Gal./min.

Laing D5: 12.00V -- 3.89 Gal./min. | 13.80V -- 4.28 Gal./min.

Laing DDC+: 12.00V -- 2.25 Gal./min. | 13.80V -- 2.49 Gal./min.

DDC+ w/ stock Alphacool: 12.00V -- 3.19 Gal./min. | 13.80V -- 3.48 Gal./min.

DDC+ w/ modded Alphacool: 12.00V -- 3.61 Gal./min. | 13.80V -- 3.94 Gal./min.

DDC+ w/ Radiical Top: 12.00V -- 3.49 Gal./min. | 13.80V -- 3.82 Gal./min.

DDC+ w/ Petra's Top: 12.00V -- 3.5 Gal./min. | 13.80V -- 3.99 Gal./min.

...and a more graphical representation:
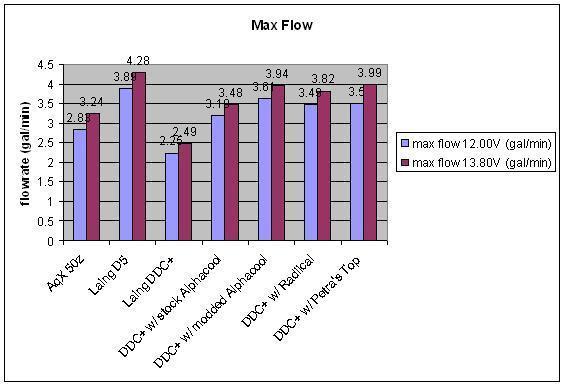
Comments: It's interesting, but somewhat perplexing, that increasing the voltage to the D5 yielded an increase in flowrate but no measurable increase in head pressure.

Experimental Cooling Loop 1 (average restriction):

This was the first of two "real world" flowrate tests--mainly done out of curiosity. This particular test loop consisted of the following:
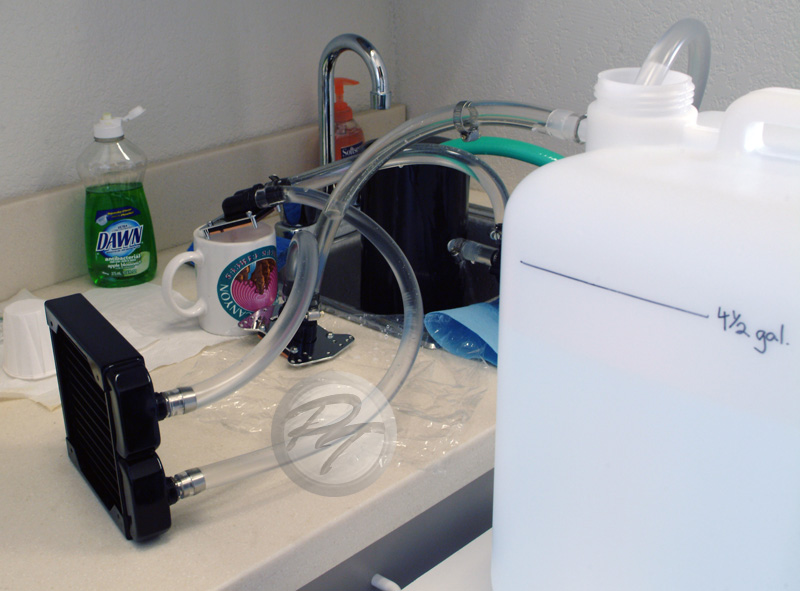
Reservoir --> 2.5" section of 1/2" ID Tygon --> Pump --> 1' section of 1/2" ID Tygon --> Swiftech MCW60 --> 1' 8.25" section of 7/16" ID Masterkleer --> HW Labs Black Ice Pro Radiator --> 1' 3" section of 7/16" ID Masterkleer --> Swiftech Apogee --> 1' 3.25" section of 1/2" ID Tygon --> Fort-Pak
Photo of setup (with Fort-Pak being drained):
Test Results:

AqX 50z: 12.00V -- 1.71 Gal./min. | 13.80V -- 1.96 Gal./min.

Laing D5: 12.00V -- 2.03 Gal./min. | 13.80V -- 2.12 Gal./min.

Laing DDC+: 12.00V -- 1.8 Gal./min. | 13.80V -- 1.99 Gal./min.

DDC+ w/ stock Alphacool: 12.00V -- 2.2 Gal./min. | 13.80V -- 2.44 Gal./min.

DDC+ w/ modded Alphacool: 12.00V -- 2.34 Gal./min. | 13.80V -- 2.58 Gal./min.

DDC+ w/ Radiical Top: 12.00V -- 1.93 Gal./min. | 13.80V -- 2.13 Gal./min.

DDC+ w/ Petra's Top: 12.00V -- 2.32 Gal./min. | 13.80V -- 2.58 Gal./min.

...and a more graphical representation:
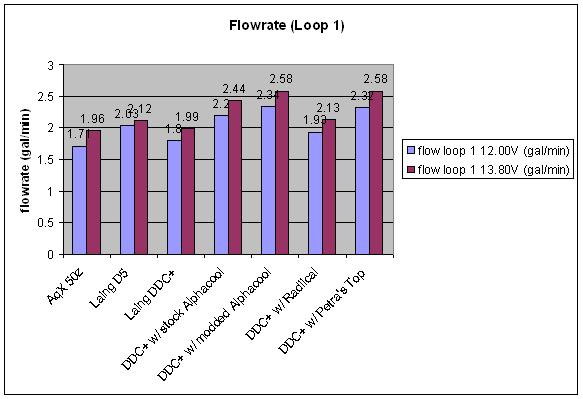
Comments: As the max head pressure data suggested would happen, here you can see the Radiical top losing ground to the Laing D5 (which is kind of sad, considering that the top costs about $48 total to the US...plus the cost of a DDC+). Here you can also see that my top is sitting right about where I thought it would in this sort of loop--between the stock and modded Alphacool tops. Though, really, it ended up performing a lot closer, in terms of flowrate, to the modded Alphacool top than I expected.

Experimental Cooling Loop 2 (high restriction):

This was the second of two "real world" flowrate tests--mainly done out of curiosity. This particular test loop consisted of the following:
Reservoir --> 2.5" section of 1/2" ID Tygon --> Pump --> 1' section of 1/2" ID Tygon --> AqX MP-1 GPU --> 1' 8.25" section of 7/16" ID Masterkleer --> HW Labs Black Ice Pro Radiator --> 1' 3" section of 7/16" ID Masterkleer --> AqX MP-05 SP LE --> 1' 3.25" section of 1/2" ID Tygon --> Fort-Pak
I don't have a photo for this one... but it was set up in the same way that the previous test loop was.

Test Results:

AqX 50z: 12.00V -- 1.08 Gal./min. | 13.80V -- 1.22 Gal./min.

Laing D5: 12.00V -- 1.18 Gal./min. | 13.80V -- No Data.

Laing DDC+: 12.00V -- 1.29 Gal./min. | 13.80V -- 1.48 Gal./min.

DDC+ w/ stock Alphacool: 12.00V -- 1.36 Gal./min. | 13.80V -- 1.57 Gal./min.

DDC+ w/ modded Alphacool: 12.00V -- 1.38 Gal./min. | 13.80V -- 1.59 Gal./min.

DDC+ w/ Radiical Top: 12.00V -- 1.12 Gal./min. | 13.80V -- 1.29 Gal./min.

DDC+ w/ Petra's Top: 12.00V -- 1.36 Gal./min. | 13.80V -- 1.55 Gal./min.

...and a more graphical representation:
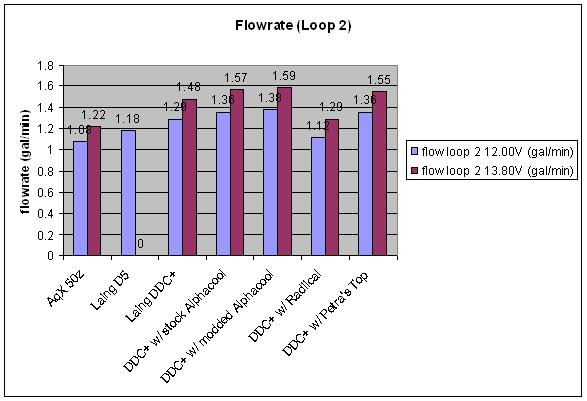
Comments: Now, this test I don't really consider that accurate, as far as my own top is concerned, because it was the first test done with the prototype and it was carried out late in the evening, several days after all of the other testing (i.e. human error). Though, really, the results between both Alphacool tops and my own are so close that the differences could easily fall under 'margin of error.' At higher restriction, I would expect my top to perform a tiny bit better than the stock Alphacool top and the modded Alphacool top due to it matching the max head of the stock Alphacool top and exceeding the max flow. Granted, the differences I'm talking about here are so small that they would likely never be noticed in an actual cooling loop.

Anyway, you can see the Radiical top is, yet again, bested by the D5... However, this time the stock DDC+ has also joined the D5 in out-flowing the Radiical top. Speaking of the D5, you're likely wondering why there's no 13.80V data for that test. Well, as we were finishing up the D5's 12V testing, it had the misfortune of ingesting a small rock which, even after removal and cleaning, resulted in the pump being no longer able to produce consistent results and occasionally failing.

Random Photos & Comments:

Take what you will from all of that... but I think that things went pretty well. Also, thanks to Margaret for helping out with refining/helping with the tests and providing that spiffy power supply. I'll work on getting pricing and such figured out for our DDC tops this week as I need to speak with the guys at the machine shop to see what can be done. Also, I likely won't be able to address any questions until Monday afternoon since I'll be spending most of Monday morning driving back from SLO.

Whee! Random photos!

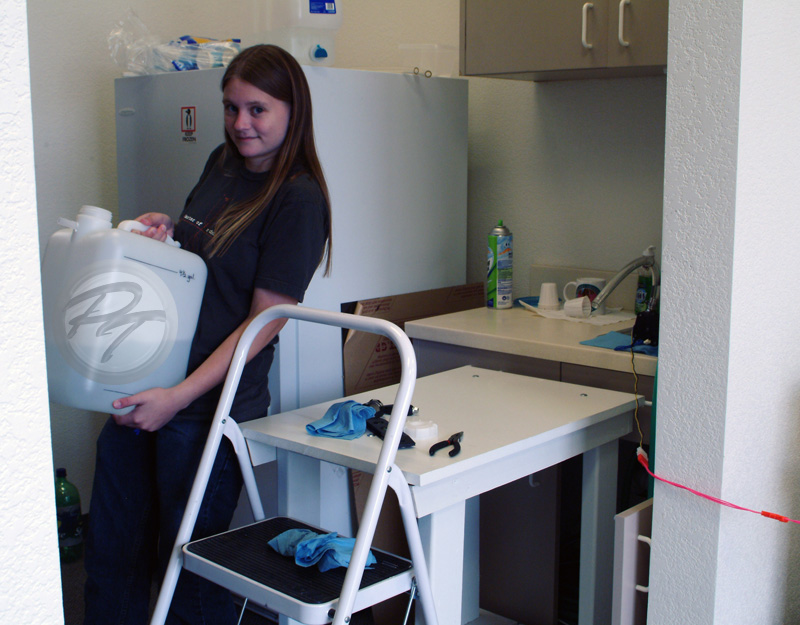
Margaret prepping between trials...while I play with the camera
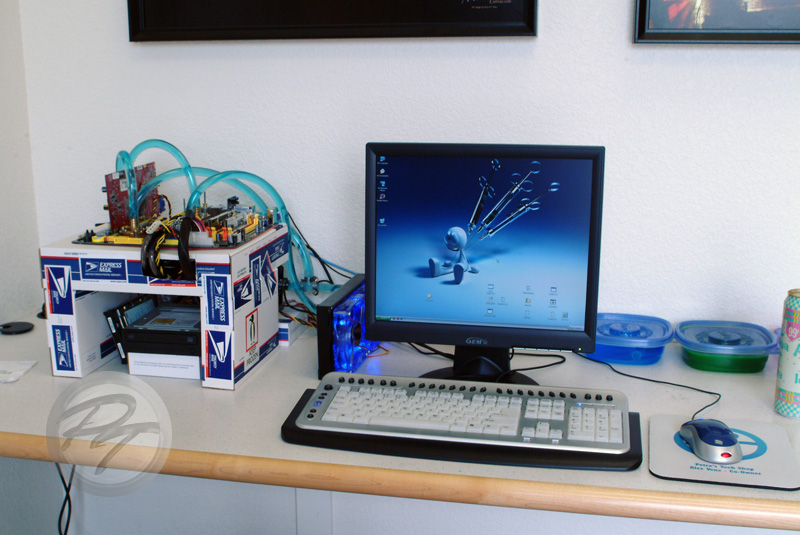
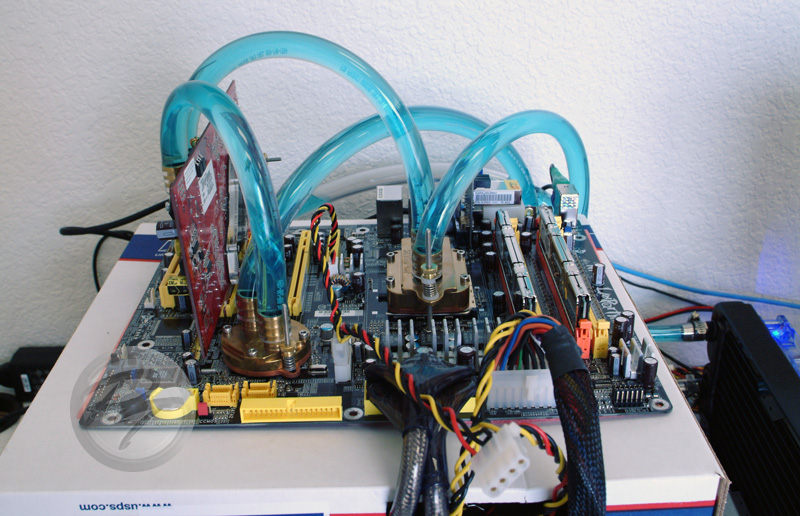
Our newly re-built water cooled Cardboard Box Computer (this time around, I went for the USPS Edition Tech Station look):
Extended Testing Results:

Series Testing:

Anyway, as I mentioned, I don't have enough of the other tops to do dual pump testing (only have one stock Alphacool, one modded Alphacool, and one Radiical) so I ran the tests with my two prototypes and compared them to the results I obtained previously for my top. There was no point in attempting to do max head pressure testing with the dual pump setup as it would likely exceed the max pressure my gauges can measure (15psig). As such, I stuck to loop testing only. The only change made to the loops for these tests was the addition of 1 foot of tubing to link the pumps.

The Twins:
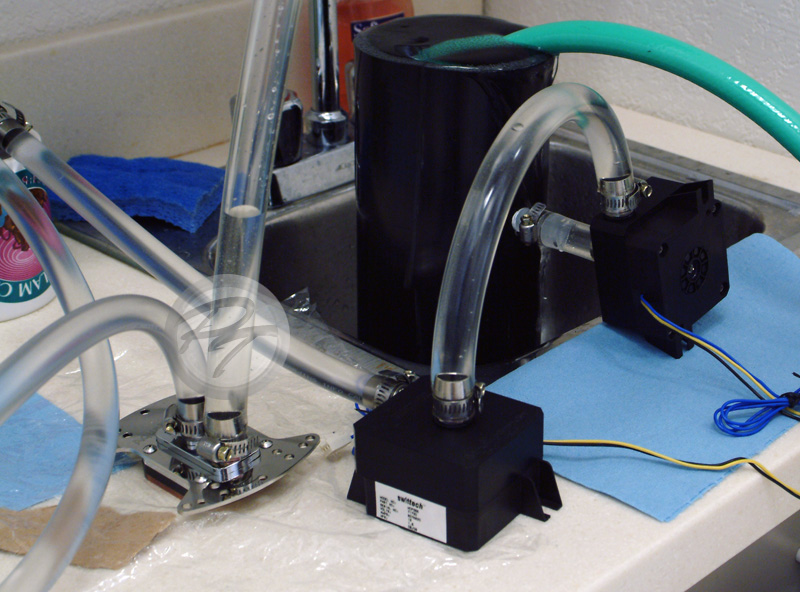
Now, I realize that I didn't join the pumps in the most ideal way... I just didn't think of it until I was finished. Anyway, it shouldn't make a detectable difference, as far as this method of testing goes.

Experimental Cooling Loop 1 (average restriction):

Test Results:

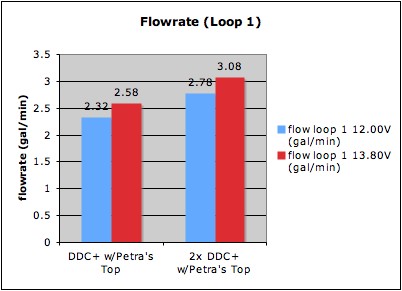
DDC+ w/ Petra's Top: 12.00V -- 2.32 Gal./min. | 13.80V -- 2.58 Gal./min.

2x DDC+ w/ Petra's Top: 12.00V -- 2.78 Gal./min. | 13.80V -- 3.08 Gal./min.

...and a more graphical representation:
Experimental Cooling Loop 2 (high restriction):

Test Results:

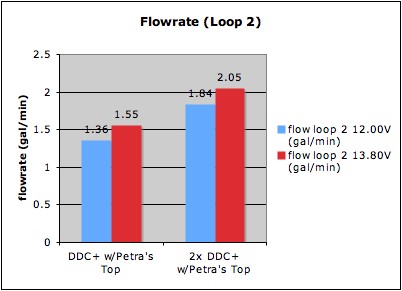
DDC+ w/ Petra's Top: 12.00V -- 1.36 Gal./min. | 13.80V -- 1.55 Gal./min.

2x DDC+ w/ Petra's Top: 12.00V -- 1.84 Gal./min. | 13.80V -- 2.05 Gal./min.

...and a more graphical representation:

Parallel Testing:

Experimental Cooling Loop 1 (average restriction):

Test Results:

DDC+ w/ Petra's Top: 12.00V -- 2.32 Gal./min. | 13.80V -- 2.58 Gal./min.

2x DDC+ w/ Petra's Top (Series): 12.00V -- 2.78 Gal./min. | 13.80V -- 3.08 Gal./min.

2x DDC+ w/ Petra's Top (Parallel): 12.00V -- 2.43 Gal./min. | 13.80V -- 2.78 Gal./min.

...and a more graphical representation:
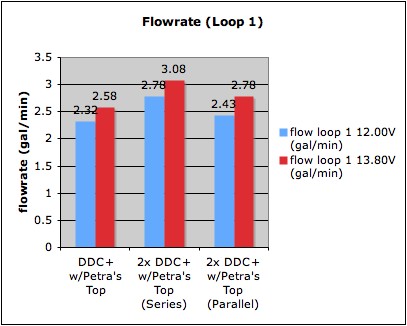
...more evidence that, even in a somewhat low restriction loop, parallel pumps don't do much.

Additionally, I fiddled around and determined that the DDC+'s will start at up to about 13.19V--to achieve anything above that, you have to start the pumps at that point (or below) and then increase the voltage to the desired amount (13.8V, in this case).

Oh, yeah, take a look at this.... (the sample barbs that Eddy was nice enough to send to me arrived yesterday)
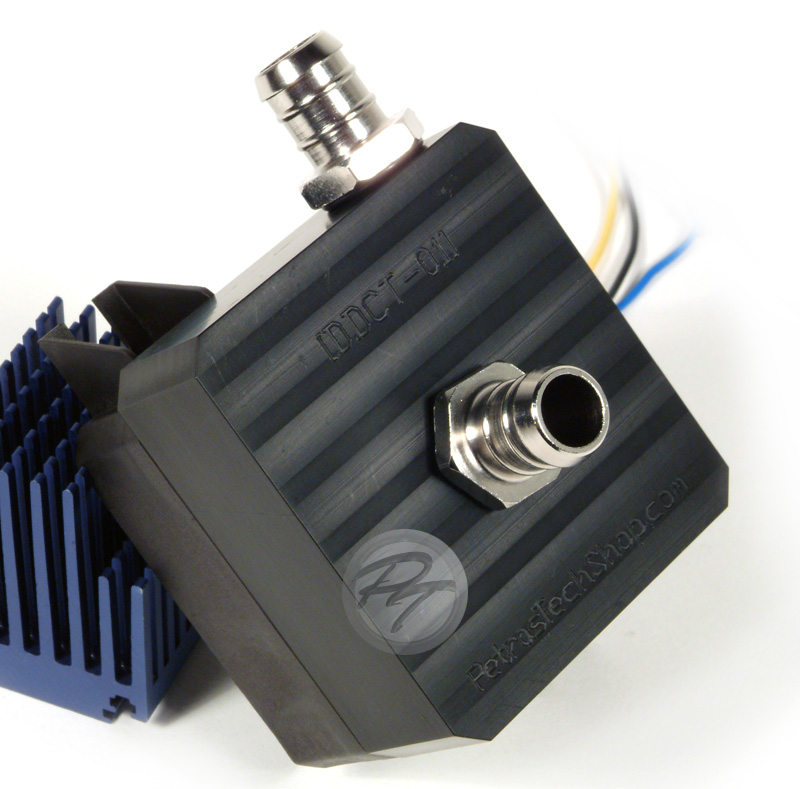
...I'm such a tease

*edit...again*Here are some updated photos:

The machine shop decided to put a MUCH nicer finish (internally and externally) on the production version than they did on the prototypes. The tops are so smooth that they're shiny and a little reflective!!! (though, tooling marks can still be seen... the photos really don't do the finish justice)
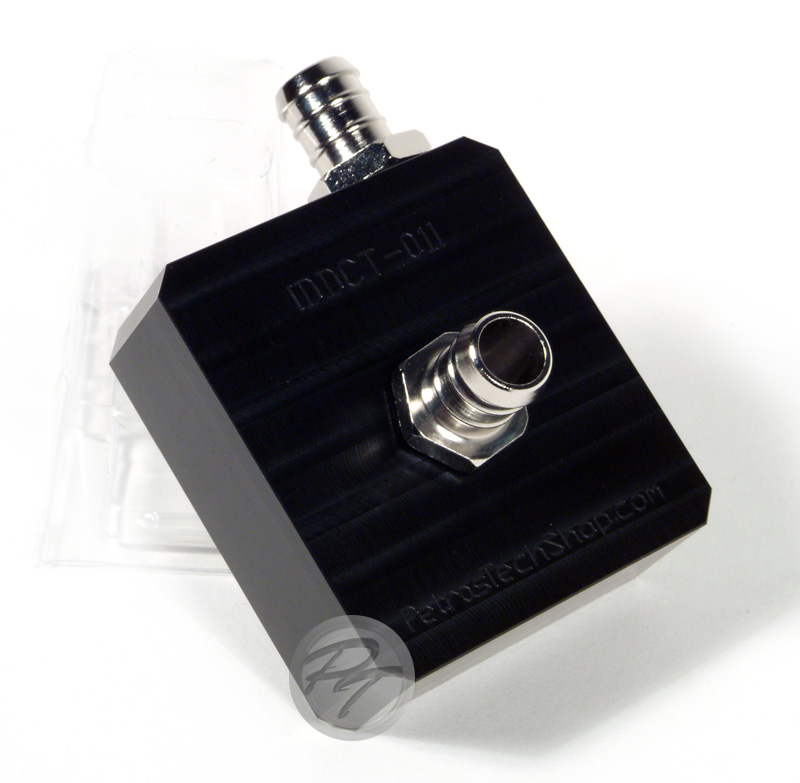
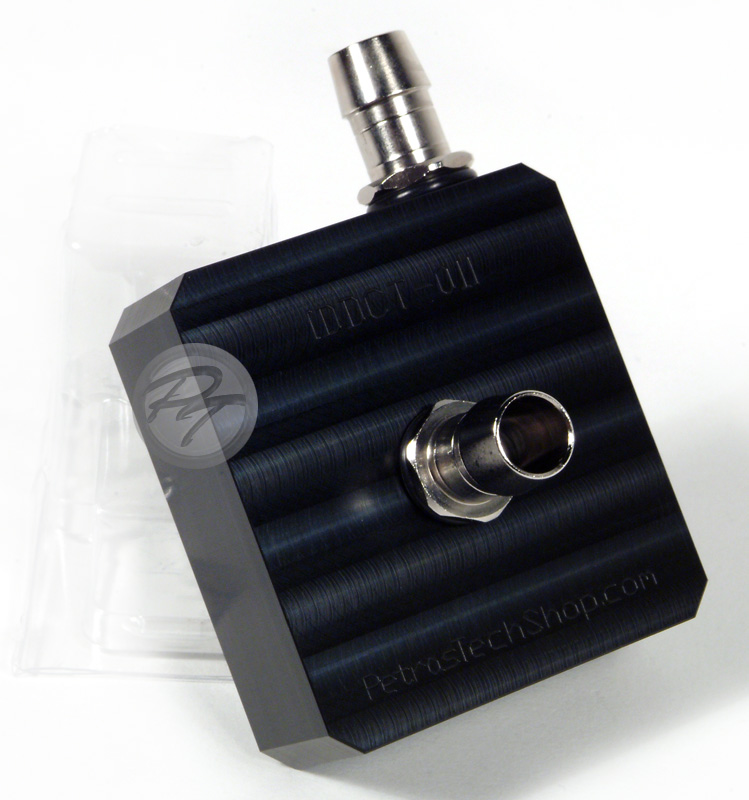
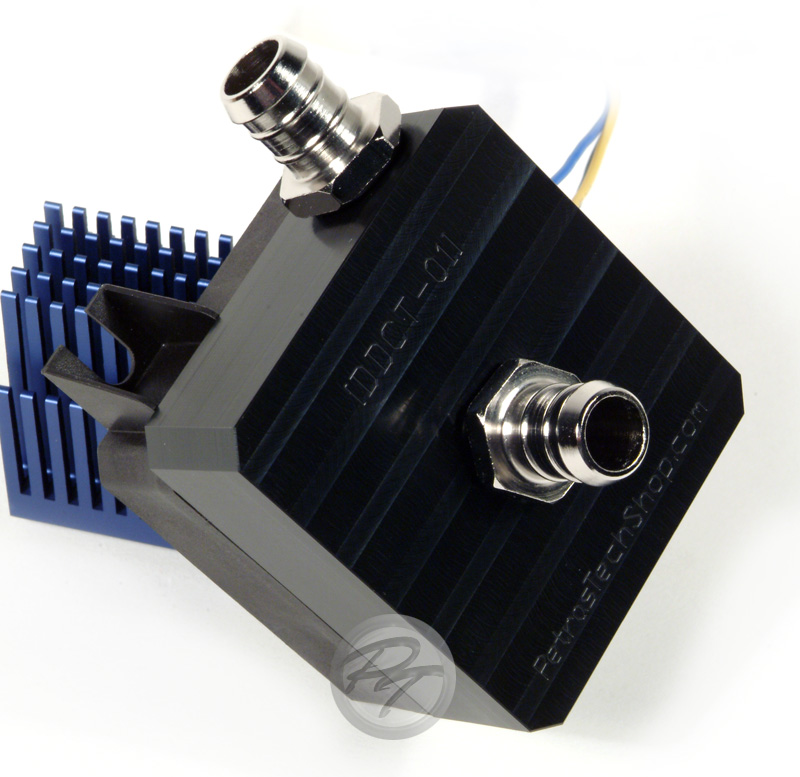


!--End of Archive--!
Friday, April 16, 2010

PQA Update: CPU Waterblock Performance Evaluation System

I know that PQA has been absent for a while... but for good reason: I've been working on putting my CPU waterblock test system back together! Below is a quick video tour of the system and here's the conversation in XS.


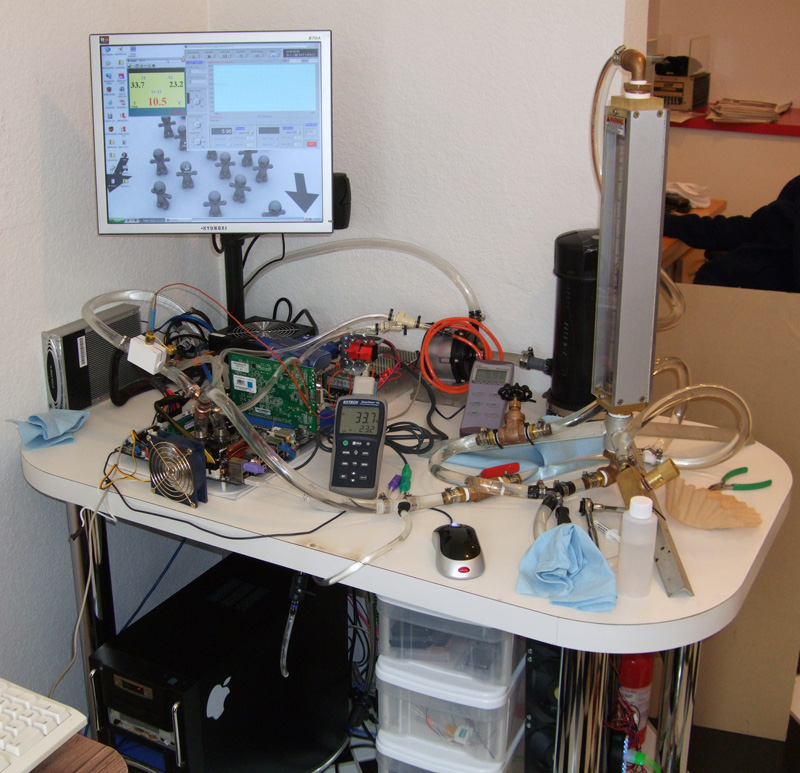
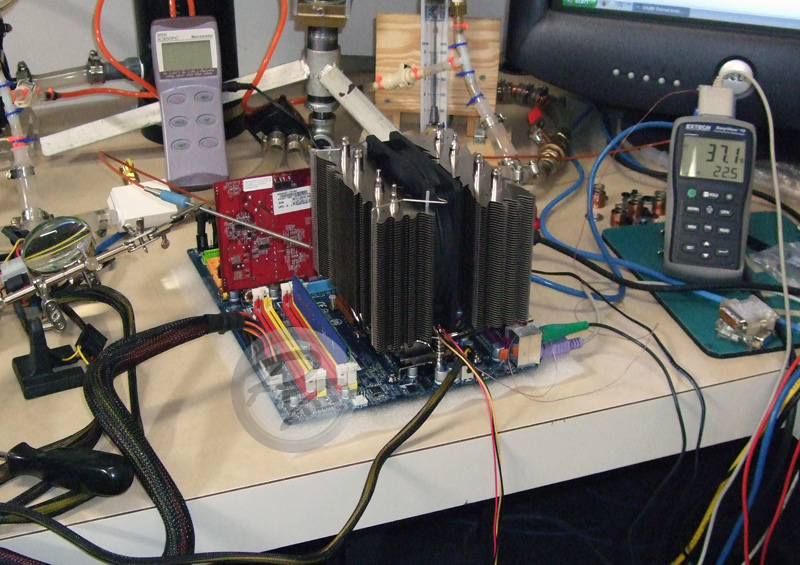
A quick photo of the test system...


Here's what's on that table covered in stuff:

- Omega FL-1504A-B flowmeter
- Sper Scientific 840081 manometer
- Extech EA15 data logging thermometer
- Volt-modded Asus P5K Deluxe
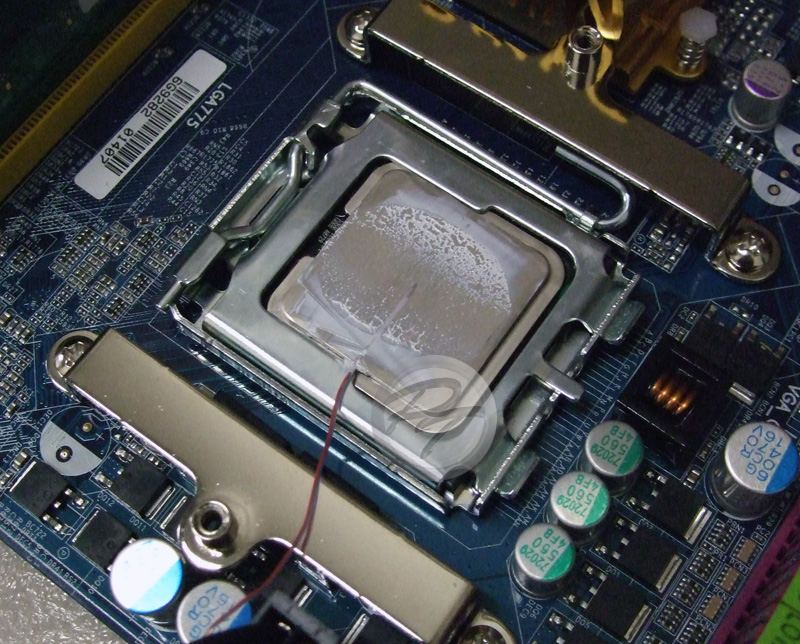
- Instrumented Intel E6400 (details on the process can be found in an early test run that I did with some heatsinks back in 2008 here...I've learned even more since then and have some new tricks up my sleeve)
- Iwaki RD-30 pump
- HW Labs BlackIce GTX480 radiator
- (8) Delta EFB1212HHF fans
...and some other junk you probably don't care about.

Anyway, this is going to be the first time I've released waterblock (cold plate) data to the public... I'll be whipping up my usual battery of pressure drop curves, deltaT (and, perhaps, thermal resistance) curves, as well as maybe gauging overall performance as a function of thermal resistance vs. pressure drop.

Saturday, October 3, 2009

[PT Archive '08]: Review: Mini Air Cooler Roundup

Hey everybody! As I've mentioned in our forums, I've been working on getting my CPU waterblock testbed together and have decided to toss some air coolers onto it for evaluation. On the bench this time around is the Thermalright Ultra 120 Extreme, IFX-14, the Scythe Orochi, Copper Ninja, and old Ninja. The results of all of this time spent testing are somewhat surprising... read on for more!
 
 
Rather than bore you with a bunch of introductory garbage and photos talking about colorful packaging and poorly written instructions, I think that I'll just jump right into things.


Testing Methodology and Information:

I'm using a modified E6400 as a heat source (basically, I've had the IHS milled according to Intel's TTV specifications and embedded a very tiny T-type thermocouple into the IHS). The thermocouple that's embedded in the CPU's IHS provides me with what Intel defines as a Tcase temperature (which is the temperature of the geometric center of the IHS, a certain distance below the surface). Now, this temperature is always lower than the measured "die temperature" (partially because it's not taking into account the temperature rise incurred by the TIM joint between the die and inside of the IHS) but I'm able to calibrate the thermocouple with all of my other probes. I like this approach because it doesn't feel like I'm flying blind--all data is coming from known, calibrated probes that all behave in the same, predictable manner and can be logged by the same measuring device. Plus, I've had issues with temperature deltas obtained with TAT being adversely affected by ambient temperature...which isn't something that should happen and, when it does, it wreaks havoc on repeatability and accuracy (I've mentioned this on XS before and will be looking into the matter further before moving on to waterblock evaluation).

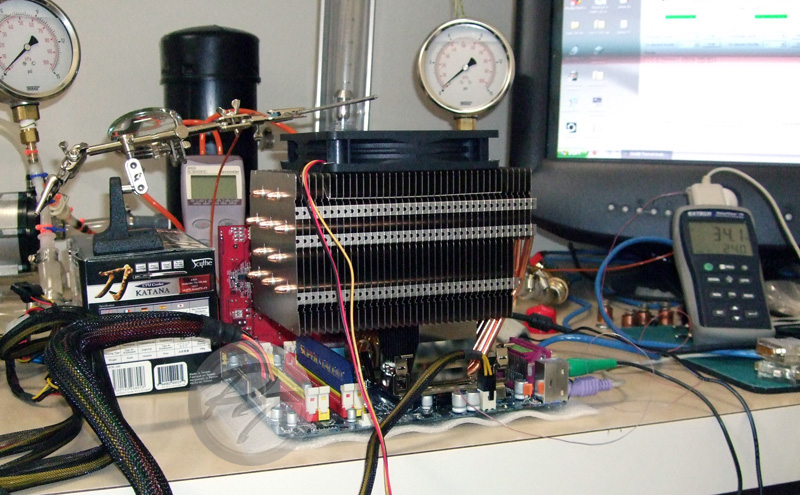
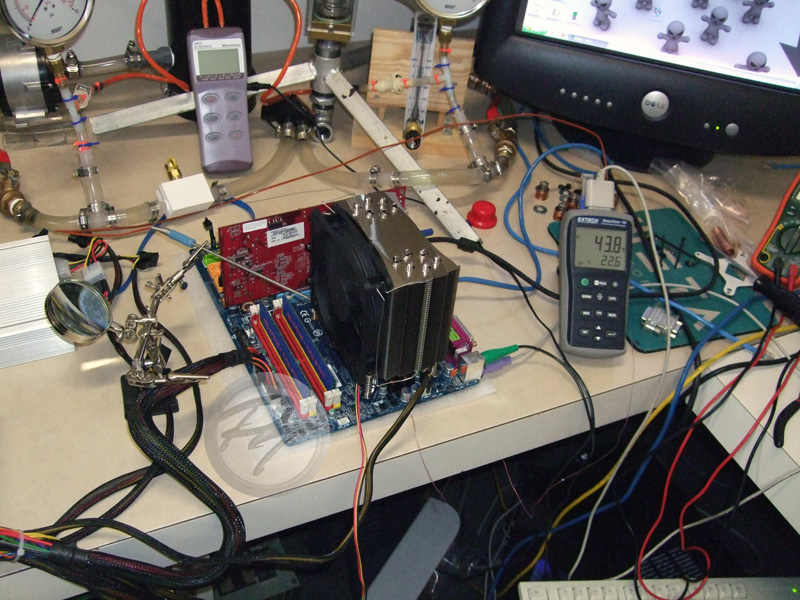
In addition to the Franken-E6400, an Omega T-type thermocouple (that nice, long probe that can be seen in the photo below) is being used to measure what I'll refer to as the 'air inlet' temperature. This probe is positioned one inch from the center of the fan's hub (or hestsink surface, in the case of the IFX-14), on the inlet side for all tests. Both the air inlet probe and "TTV" probe are connected to an Extech EA15 data logging thermometer, which is configured to simultaneously record data from each probe and calculate the temperature difference between the probes (deltaT) every two seconds. Each heatsink was mounted three times and tested with two fans (the Scythe S-Flex SFF21D and SFF21F, rated at 33.5 CFM (8.7 dBA) and 63.7 CFM (28 dBA) respectively). The Scythe S-Flex "D" and "F" fans were chosen due to their fantastic noise to airflow ratio, minimal bearing noise, and long MTBF rating.


(click to enlarge)


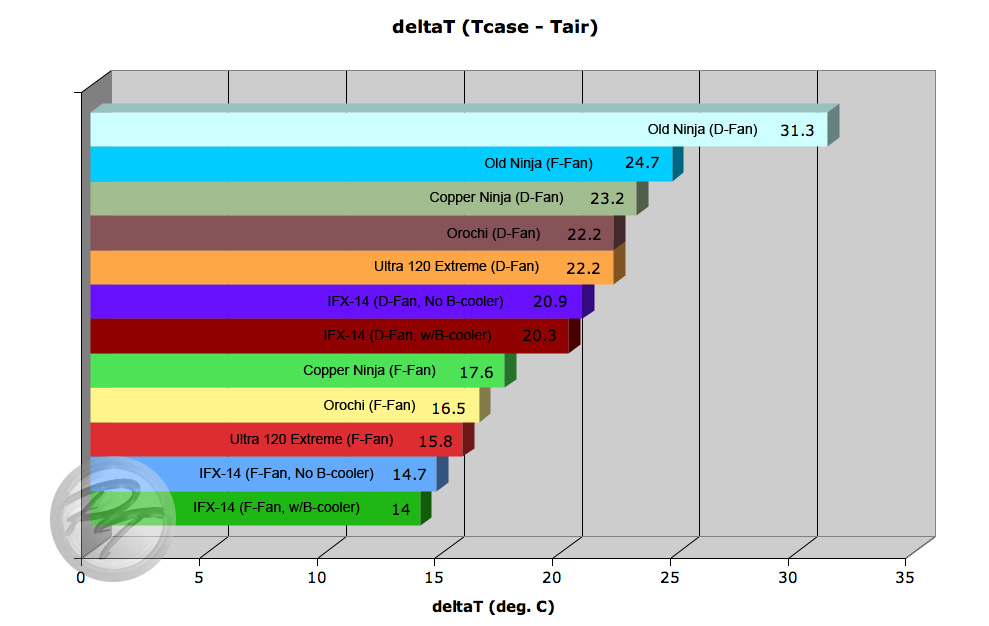
With the CPU set to 1.55V in BIOS (1.504V after droop, at load) and running at 2133MHz, each heatsink was allowed a 30 minute warm-up period (using Intel's TAT to load the CPU) before I began the 15 minute data collection runs (the first five minutes of which being removed before averaging data). The heatsinks were allowed to cool between trials and the fan mounted to the heatsink was kept at 12.00V throughout testing with the use of our trusty HP 6264B variable DC PSU. As a result of all of this, each of the bars on the results graph below represents the mean of 900 points of data spread across three trials (three mounts).

While this test setup is adequate, it's far from perfect. Some of the unknowns/variables include the following:

Airflow: The fans, while kept at 12.00V, are not providing the same amount of airflow through each heatsink tested (for those who don't know, the volumetric airflow output of a cooling fan, just like a water pump, is dependent upon the pressure at which the fan operates and each heatsink, like a waterblock, will incur a different operating pressure). To actually get the same volume of air through a heatsink during a given test, like I would do with water through a waterblock, I'd need to construct some sort of chamber around the heatsink which would allow me to measure airflow (when combined with the proper equipment) and make adjustments by altering fan voltage.

Mounting hardware and the pressure applied by said hardware: Unlike waterblocks, for which it's rather easy to put together a uniform mounting system, air coolers are very difficult to work with when it comes to controlling mounting load and making sure that the load is equal across all heatsinks tested--much of this comes from how radically different the basic mounting hardware design can be from unit to unit. As such, I had to test each heatsink with whatever mounting hardware the manufacturer included...and it definitely appeared like Thermalright took the cake as far as applied mounting load is concerned.

Heat applied to the device under test (DUT): While it isn't terribly important from a comparative standpoint (since approximately the same amount of heat should have been produced by the CPU during each trial), I don't actually know how much heat was being applied to each heatsink during testing, especially if you take secondary losses into account. Based on some research that Swiftech did a while back, I'd guesstimate the heat applied to the DUT during each trial to be around 62W (69W less 10% to account for secondary losses, with the percentage being little more than a guess). For waterblock testing, I should be able to bring the system up to somewhere around 100W but I found the settings to be poorly suited to heatsink testing due to system instability. Granted, all of this doesn't take into account potential thermal output differences between the Conroe and Allendale cores, despite them having the same Intel-rated TDP... and I'm assuming that Swiftech got things right ;-)

General mount variation and differences in TIM application: An issue with all heatsink/waterblock testing, carefully mounting each unit three times and averaging the data from each test should help to provide a somewhat accurate depiction of performance despite these variables. It also helps that I've gotten quite good at applying ArcticSilver's Ceramique TIM in layers so thin that they're semi-translucent and very similar in quantity and distribution each time--repeatability is more important than TIM performance, for those of you who would question the use of Ceramique on the grounds of it not being the best performing.


Testing Results, Analysis, and Commentary:

Well, I said that I wouldn't bore you with introductory stuff... instead, I went for technical junk :P

At this point, I think that I'll grant you a reprieve and present unto you a pretty bar graph:


(click to enlarge)


Now, as you can see above, the Thermalright IFX-14 is the clear performance leader, with the old Ninja trailing a lot farther behind than I would have hoped. It's pretty safe to assume that the performance rankings would be about the same if a higher heat load were to be applied, with the performance gap between the coolers increasing proportionally. If all of this deltaT stuff is confusing you and you find yourself banging your head on a table pleading for "real numbers" from TAT, then just add your current room temperature to the above temperature delta and tack on about ten degrees to the total. The fun does not end there, though! I still have to rant about what's wrong with all of these coolers (aside from them being air coolers).

The Old Scythe Ninja (Rev. B street price: ~$37):  When it was released, it was a pretty spiffy heatsink... however, time has marched on and heatsink design progressed. I have to say that I'm rather disappointed, especially considering that something as simple as increasing the mounting pressure/quality (take a hint from Thermalright) and spacing the heatpipes out (like was done to the Ninja Mini and Copper Ninja) would likely yield a substantial performance boost. To clarify, I was using the older Scythe Ninja with the 4-clip mount and backplate rather than the "newer" version that employs those damn stupid plastic push-pins (identical to the stock Intel cooler). Seriously, there are few better ways to molest a motherboard than to use plastic push-pins to attach a large cooler. They have no place on a performance-oriented product--make them disappear. Plastic push-pin mounts are the reason that I did not test the Infinity/Mugen, despite it being an otherwise fine cooler. Anyway, overall, the Scythe Ninja isn't that bad of a cooler when you take into consideration its <$40 price tag.

Scythe Copper Ninja (street price: ~$65):  The Copper Ninja did a fine job of keeping up with the rest of the pack and, as I pointed out above, I attribute much of the performance gain over the old Ninja to the spaced heatpipes--all that copper does look cool, though. I don't really have any complaints about the cooler that I haven't already gone over, aside from the typical Scythe backplate-o-doom. Tip: do NOT remove the protective backing from the adhesive side of a Scythe backplate before use. If you do, then you will likely never be able to remove the backplate from your motherboard without causing damage.

Scythe Orochi (street price: ~$65-$80):  With 'Orochi', if I remember correctly, meaning 'serpent' in Japanese, I can't help but find myself wondering whether 'Anaconda' would have been more appropriate. Simply put, this heatsink is enormous--so large, I would have hoped it to be a good rival for the IFX-14. Alas, the Orochi just could not keep up with Thermalright's flagship mess of fire extinguishing pointiness. The Orochi does have some redeeming qualities, though... it appears to be a fantastic passive/semi-passive cooler for those of you who aren't really overclocking. In a random fit of curiosity, I attempted to bring my test CPU up to its thermal shutdown point using the heatsink without a fan and the only way that I was able to succeed within a reasonable amount of time was to cover the whole heatsink in cardboard and aim a heat gun into my newly constructed cardboard shack. It probably would have overheated eventually without the help of my heat gun... but I didn't feel like waiting. An important thing to note, however, would be that this heatsink covers your RAM. While that may not be an issue for some, those of us who change our RAM out a lot or use abnormally large DIMMs (Corsair Dominators, anyone?) are up a creek without a paddle--the size of the cooler could also pose a problem in some computer cases (especially if you have long optical drives).


(click to enlarge)


Thermalright Ultra 120 Extreme (street price: ~$57):  Clean, minimalist design, fantastic performance, and a price point to die for--this heatsink has it all. Granted, I should probably mention the bit about the mounting hardware dumping little metal flakes on my motherboard and the top fin breaking loose due to repeated installation and fan mounting. I really can't think of much more to say about this great, no-nonsense, performance heatsink.


(click to enlarge)


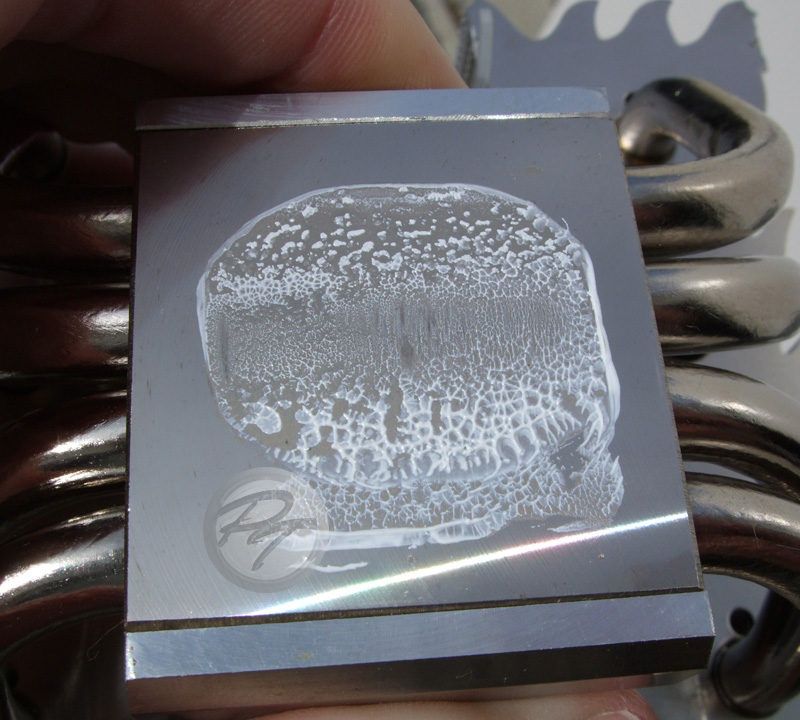
Thermalright Inferno Fire Extinguisher [IFX] 14 (street price: ~$70):  It may be the performance leader, but I have a few complaints... Aside from it being big, gaudy (I can't stand the flame-fin thing), and somewhat irritating to work with, it has some compatibility and possible QC issues. As shown in the photos below, the mounting hardware collided with my test board's northbridge heatsink and a capacitor near the CPU socket (tweaking both), the backplate could only be installed in an orientation that caused the backside cooler to extend beyond the board's I/O cluster (not only do you have to worry about case compatibility with that backside cooler, but motherboard layout as well), the unit visibly bows the motherboard when the backside cooler is installed, and the base of this heatsink is so far from flat that it was laughable (though, I think that it may have helped the performance a bit...my issue is with whether or not it was intentional).


(click to enlarge)


The base of this heatsink is bad enough to where I can rock a razor blade across its surface... However, based on the TIM and contact distribution examples above, it appears that the deformity (high spot) ran right down the center of the heatsink's base and, coincidentally, right across the center of the CPU package. Now, I don't think that the deformity was intentional since no other reviews that I came across mentioned it, but it may have helped the overall performance of the unit similar to the gains that have been seen by bowing/stepping CPU waterblocks. It almost makes me want to have the shop lap the heatsink's base flat so that I can re-test it and see what sort of performance difference results... almost. Anyway, I suppose that the moral of the story is that you shouldn't use the IFX-14 with a Gigabyte 965P-DS3.


(click to enlarge)


Conclusion:

Everybody already knows this but I'm going to say it anyway... Of the performance heatsinks available, the Thermalright Ultra 120 Extreme represents what is likely the best value for the money. Having both best performing heatsink and the best price:performance heatsink in their pocket, Thermalright can now go back to updating their HR-09 MOSFET cooler compatibility charts.

Scythe, on the other hand, needs to decide what market segment they're trying to cater to. Looking at their heatsink offerings and the compromises that keep being made which, frankly, water down their more performance-oriented parts (e.g. mounting hardware), they seem to be straddling the fence with one leg dangling in the novelty cooler segment and the other desperately seeking the sweet solidity of terra firma in the performance cooler market segment. The result of this indecision being a few solid but somewhat identity-confused products and a few products, like the Kama Cross, which should have never been allowed to see the light of day. I must say, though, the build quality of their coolers is always fantastic and the standard deviation of the data collected for the Scythe heatsinks was lower and more consistent than that of the Thermalright heatsinks.