Some of you have likely noticed the mini-explosion of content on the blog over the past week or two and are wondering what's up... especially since it's likely that you've already seen the content elsewhere. Well, simply put, I'm taking some time to collect selections of my work that have been posted in various tech forums (like XtremeSystems) and centralize it on my blog as an archive. Why, you ask? There are several very good reasons for doing this, but the most important of which is that, for my own sake, I need to put together a "portfolio" of work demonstrating my expertise, experience, some of my many skills. Having owned and operated a business for five years is great and all, but it leaves me scratching my head when it comes to providing references for prospective employers (especially pertaining to technical capabilities, since many of our customers weren't even aware of the stuff I did behind the scenes).
With any luck, this should help open some doors... and, even if it doesn't, it still makes my some of my past work easier for you guys to track down and reference.
Wednesday, May 12, 2010
Wednesday, May 5, 2010
[Forum Archive '09] Project: CES '09 LMM (Last Minute Mod)
At the very end of 2008, I was approached by Super Talent Technology (a producer of DRAM and flash memory products for the PC and consumer electronics market) and was asked to put together a display system for their booth at the upcoming Consumer Electronics Show (CES) in Las Vegas, Nevada. Not everything about the arrangement was particularly rosy, though, as I ended up shelling out somewhere in the ballpark of $300-$400 for cooling parts, modding supplies, and custom appliqués in exchange for permission to put the store's URL on the case (and, no, I didn't get to keep the system). To top it all off, I had maybe two weeks to order all of the parts necessary, build the system, and haul it off to Las Vegas while still running the store and dealing with all of the personal stuff that was going on--to do this sort of project "right" I'd usually ask for at least six to eight weeks. Total forum thread views: 11,083 (as of 5/05/2010) and the original thread can be found here. As a side note, all images have been re-sized via HTML, rather than my usual two image (preview & full image via link) approach, to speed along the archiving process. You can still right-click on the images and view them at full-size in a new tab/window. Also note that all vBulletin emoticons and their associated code have been removed from the archive entry.
!--Start of Archive--!
[Entry 1]
I usually don't post worklogs... mostly because I'm too busy actually modding but I figure that I probably should for this one (even though it isn't really a "major" mod at all).
Anyway, last week (or perhaps the week before... I really can't remember) I was contacted by Super Talent Technologies (they do memory) to put together a display machine for their CES booth. Frankly, it's a little late in the year to be asking for custom display machines but, whatever, I'm game.
They dropped off the goodies on some Friday (was either last Friday or the Friday prior) and I've spent time collecting other parts, getting custom appliqués on order, and prepping stuff. Now, the catch with this build is that I get to foot the bill for all modding-related stuffs, water cooling, and appliqués. In exchange, I can put our logo and stuff on the case.
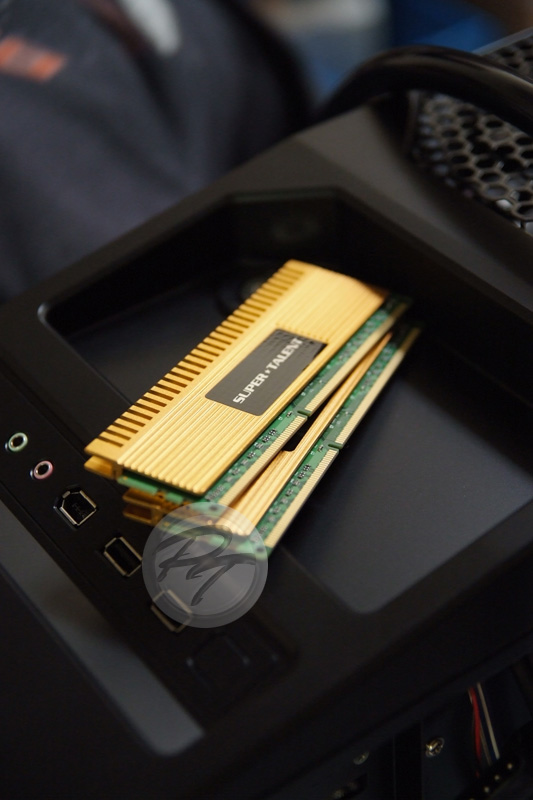
What Super Talent dropped off:
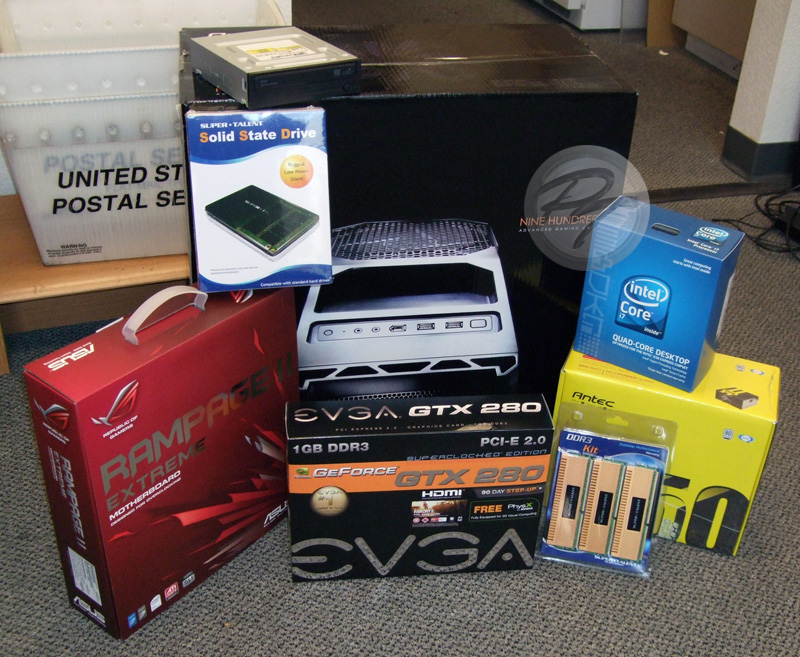
Aside from the Antec 900, not too shabby.
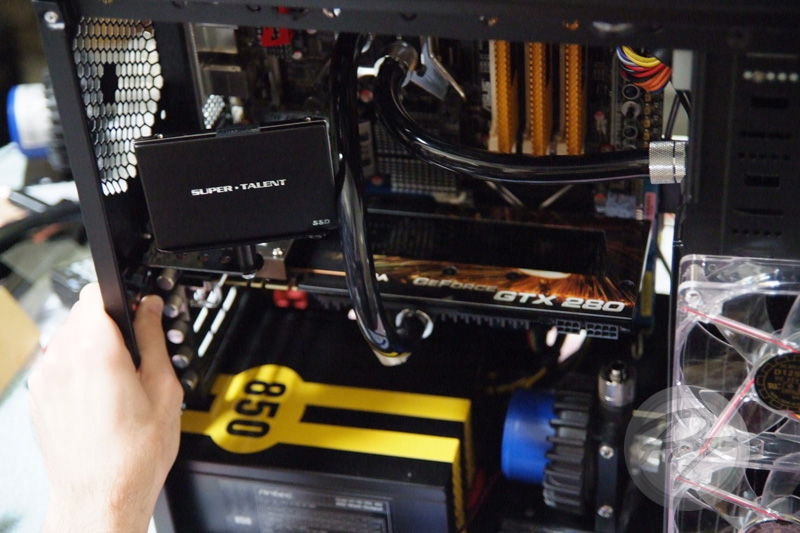
The two main items that I need to focus on 'showcasing' are the solid state drive and the 3GB DDR3 kit. I'm thinking that I'll work up some sort of bracket to mount the SSD up near a case window or something. Aside from that, I've mostly just been thinking about cooling (then again, when am I not?) and mucking about in Sketchup to see what'll fit and what won't.
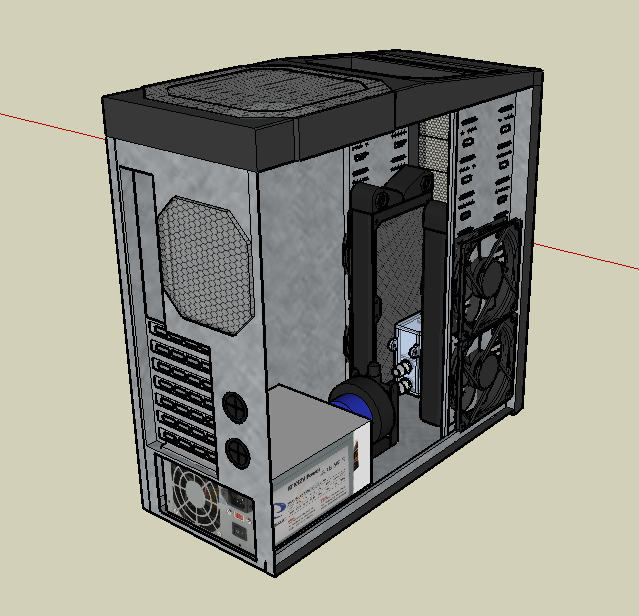
Dual MCR220's, modded drive cages, some flat black interior paint, white LED fans, a custom cut window, black tubing, compressions, and stainless radgrilles on the side panels acting as exhausts for the radiators is the current plan... with the two main issues being mounting the radiators and getting ahold of an extra right-side (blank) panel for the 900. I can't get particularly wild with this build not only because I don't have the time to do so, but also because they want the case easily transportable/shippable (so, no external craziness).
Cutting should commence tomorrow.
Would anyone in the bay area happen to have a spare Antec 900 side panel?
[/Entry 1]
[Entry 2]
Sorry for the lack of updates, but I've been busy juggling this project, the store, and personal stuff.
Anyway, I leave for CES in two days... and, boy, do I have my work cut out for me.
Here's a quick summary of where I'm at and how I got there:
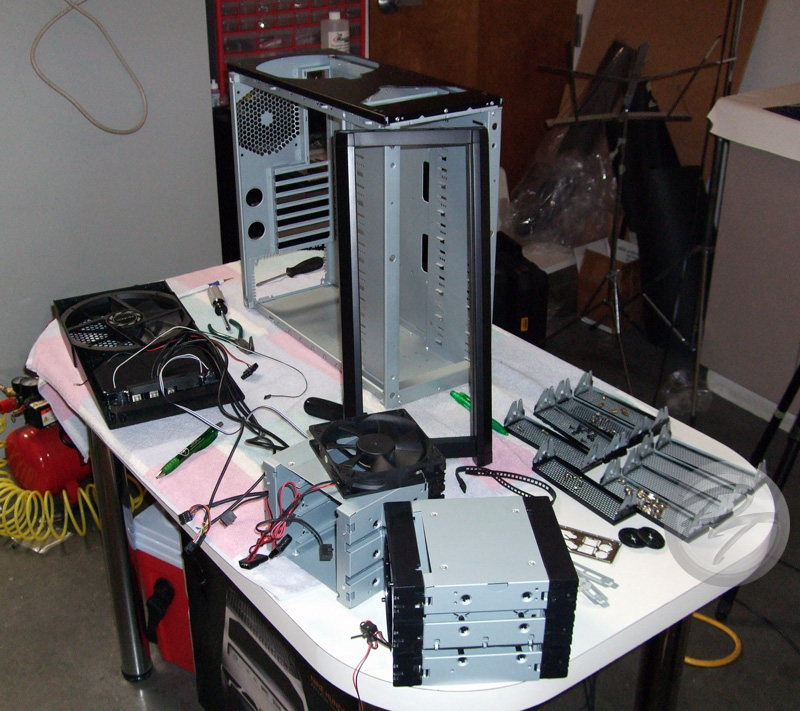
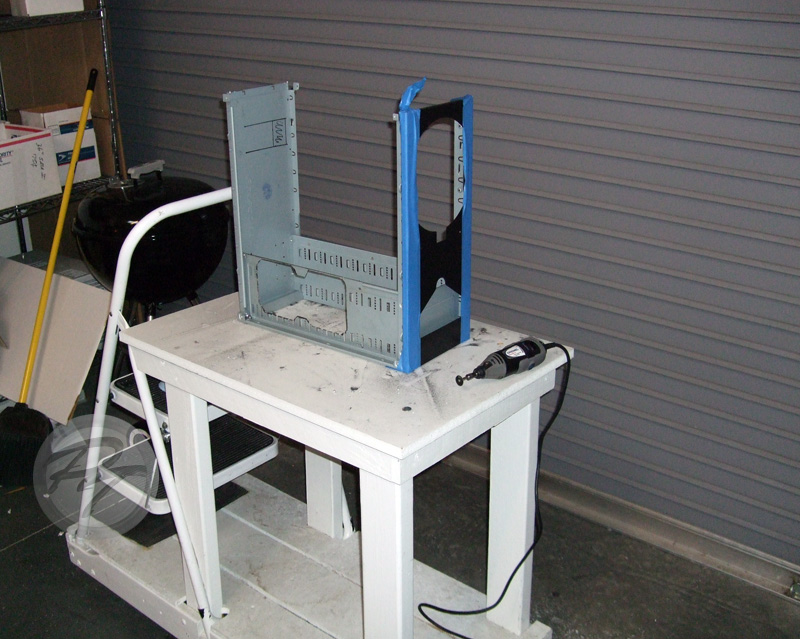
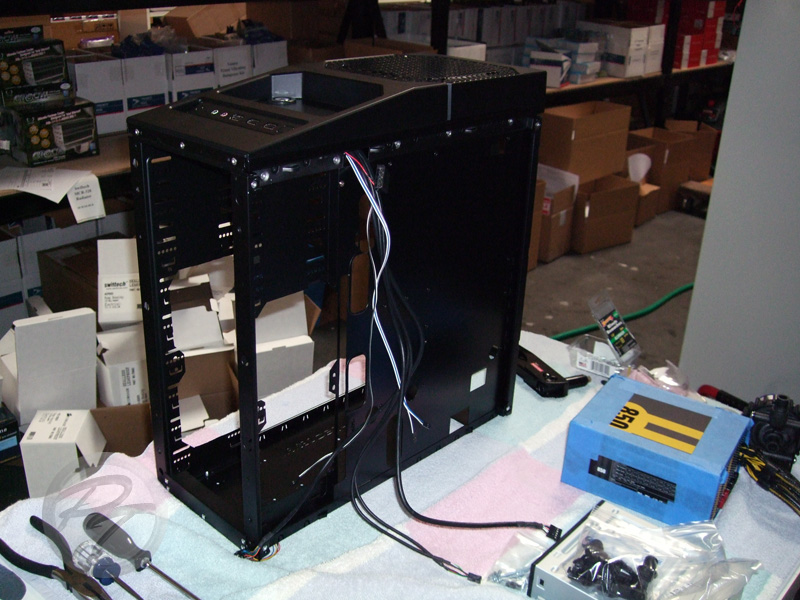
Started by stripping the case (pulling all the cages, covers, and other crap out).

A little blue painter's tape on the PSU so as not to scratch it up while test fitting stuff.
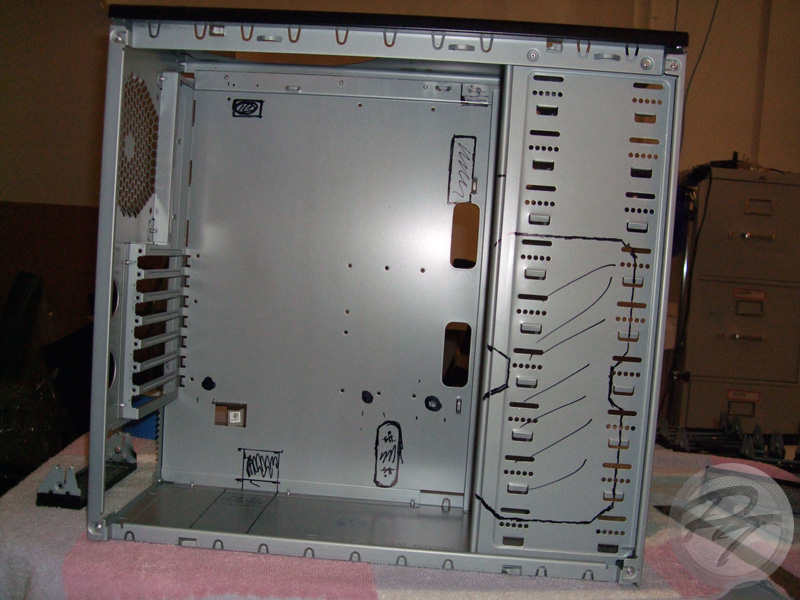
Marking up the case to act as a guide for the primary cuts. I'm very much a hands-on, throw stuff in, figure out where to cut, go crazy with Sharpie kind of modder who's projects tend to change as I move through them--it's fun!
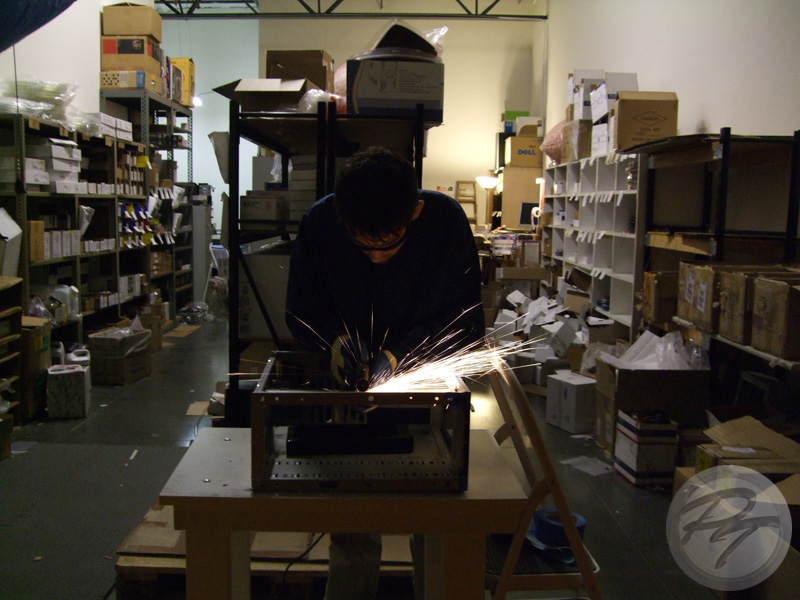
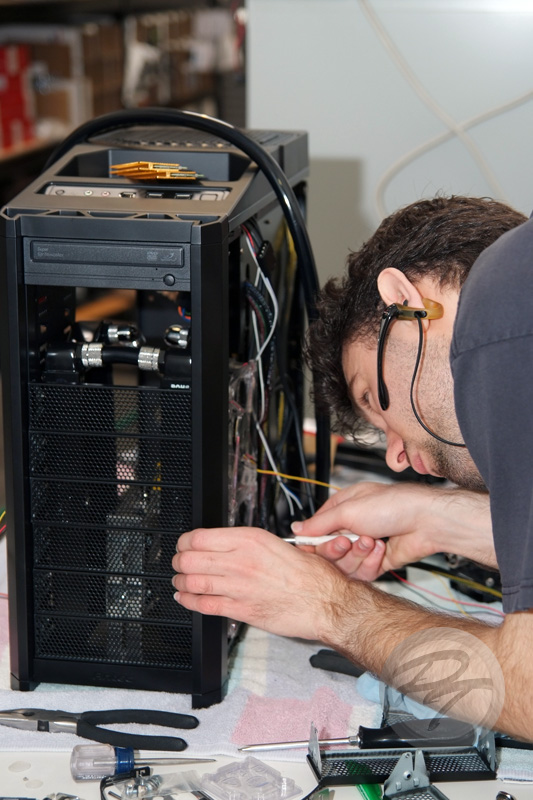
...and the carnage begins! Before anyone asks, yes, I'm wearing both safety glasses and earplugs (otherwise, I would have become blind and deaf long ago). What the picture can't show you, though, are my poor Logitech Z-2300's blasting away in the background (a mix of Muse, Led Zeppelin, and Audioslave, in case anyone is curious).
By this point, I'm starting to drill the rivets out of the case to take it apart so that I can finish most of the cutting.
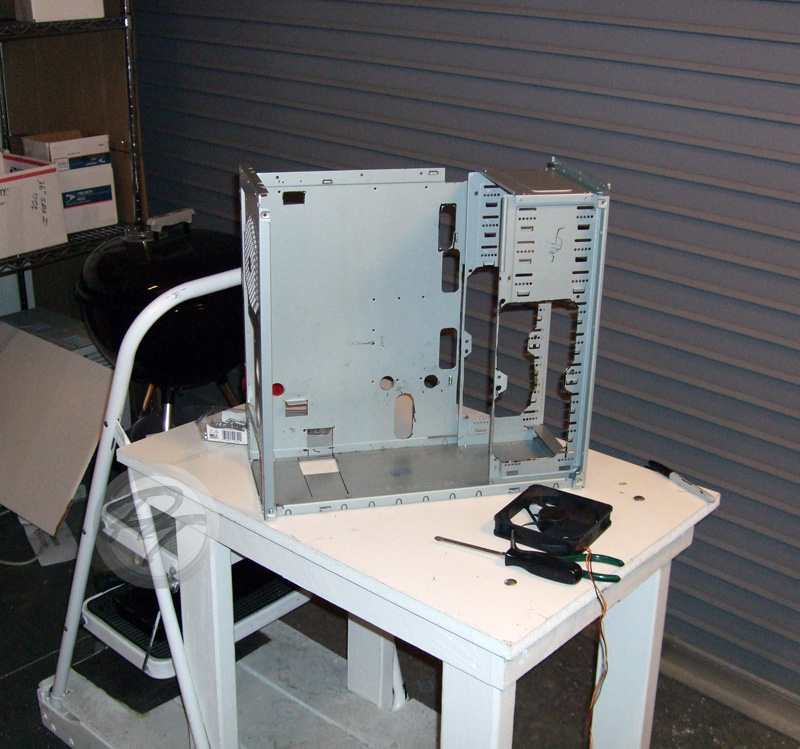
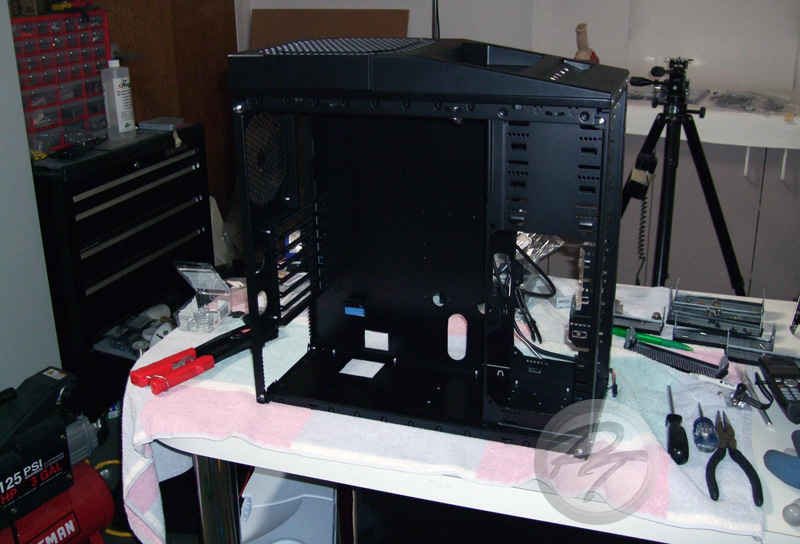
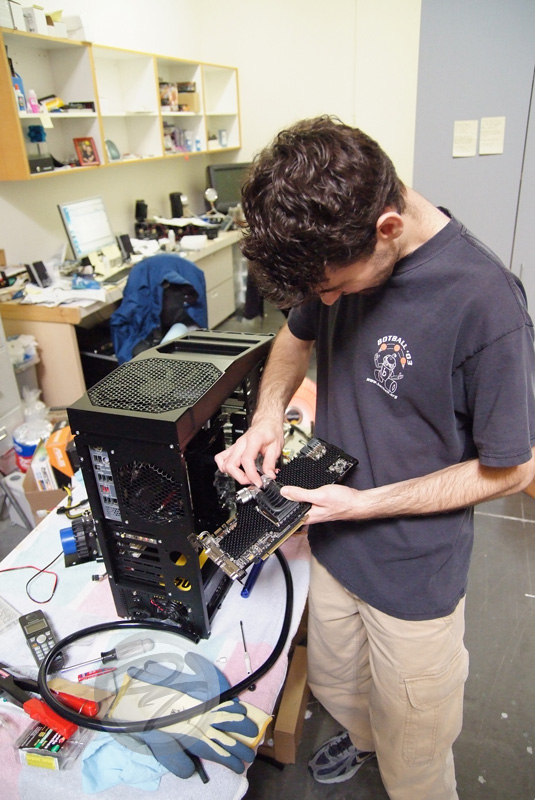
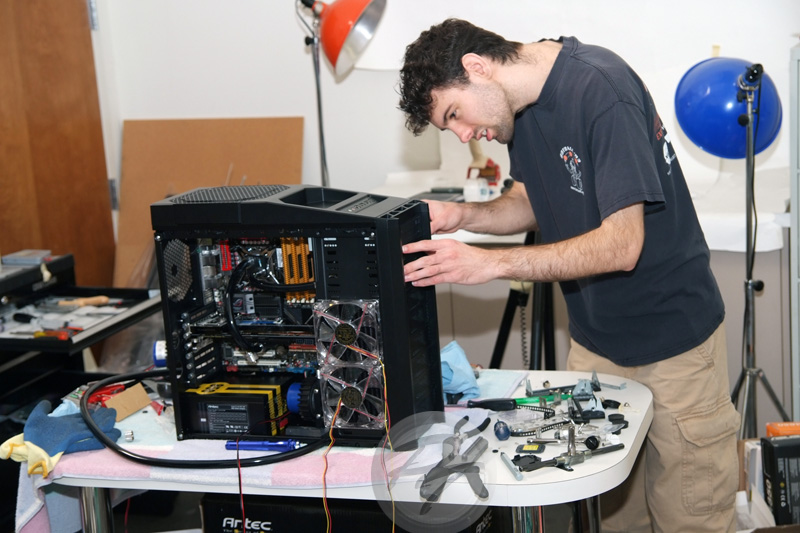
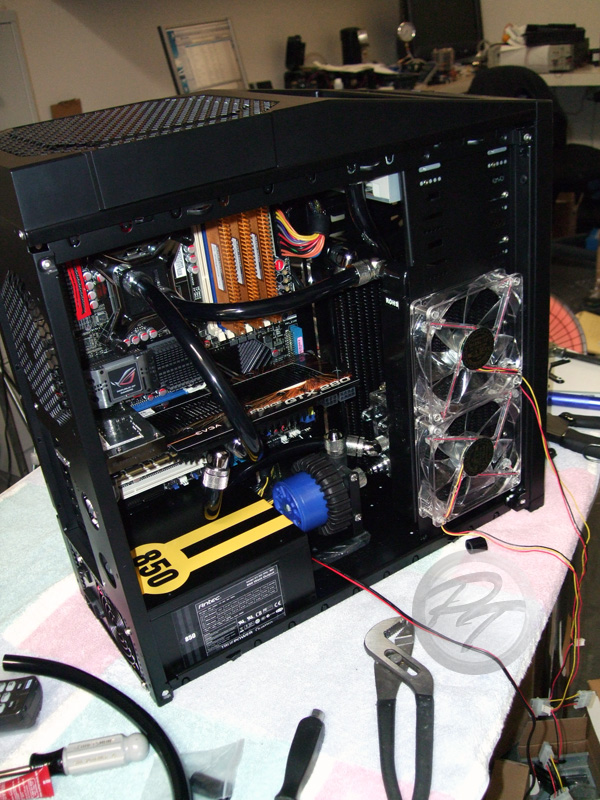
Whadda 'ya know... it's back together again. After pulling the case entirely apart and cutting it up some more, I partially reassembled it so that I could test fit some of the components and check for any additional modifications that it needed. All that excess Sharpie really makes the cuts look a lot worse than they actually are...
Looking familiar?
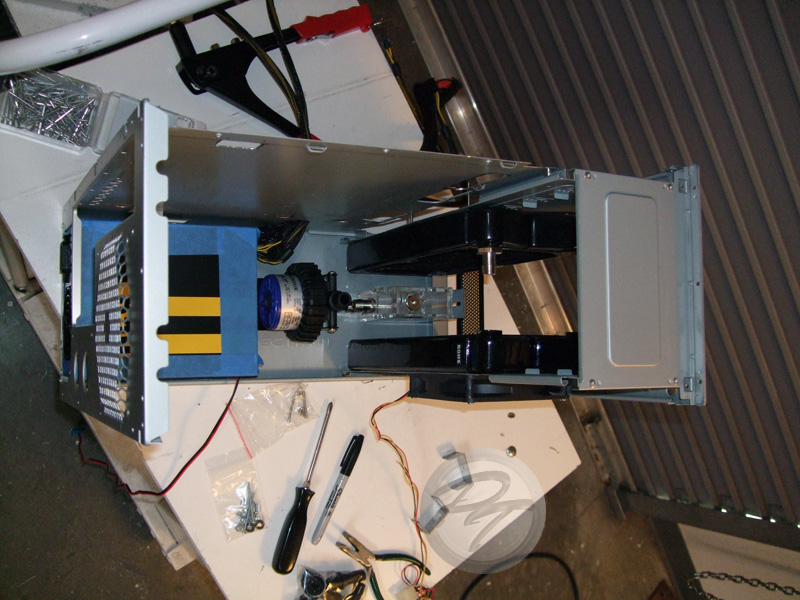
I'm also using the opportunity to mark spots where mounting holes will be needed and figure out the SSD mount (not shown).
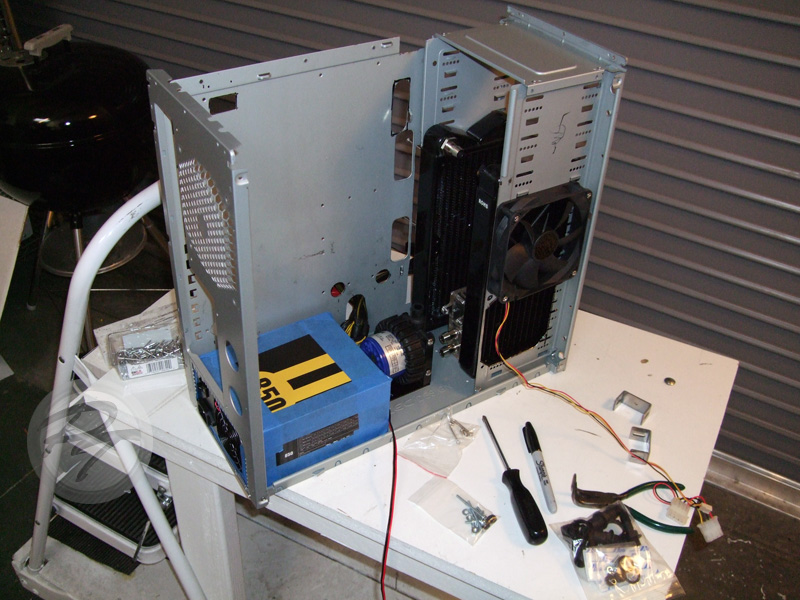
Turns out that a few more mm had to be trimmed from the motherboard tray so that I could mount fans up to the radiator on the right... Eh, at least I was close on the first go.
Which brings us to today...
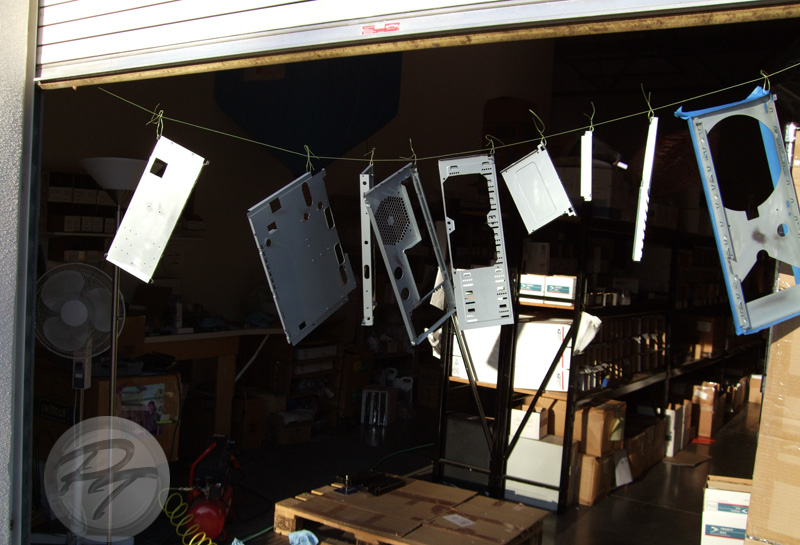
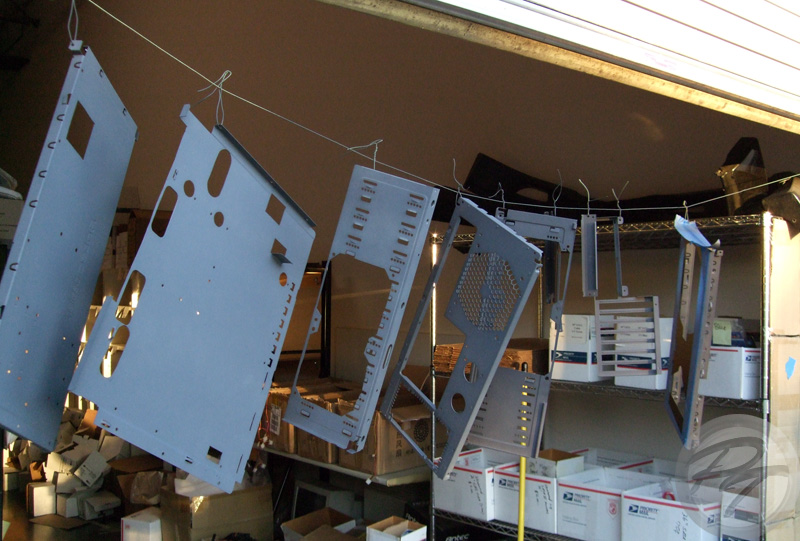
Here the case has been disassembled again, each panel deburred, filed, wet sanded, thoroughly cleaned, and hung for priming.
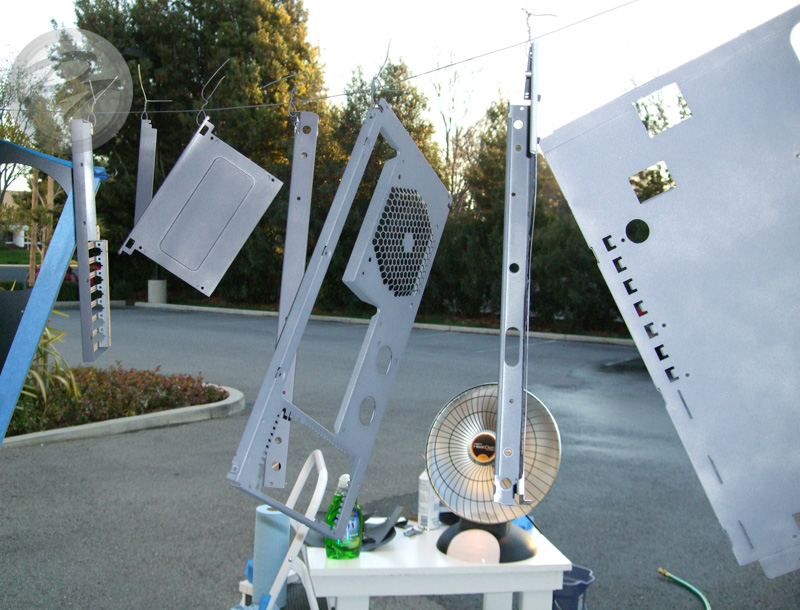
It started getting quite cold, so out came the dish heater to keep the panels warm (paint was stored in the front office, so I didn't have to worry about warming it).
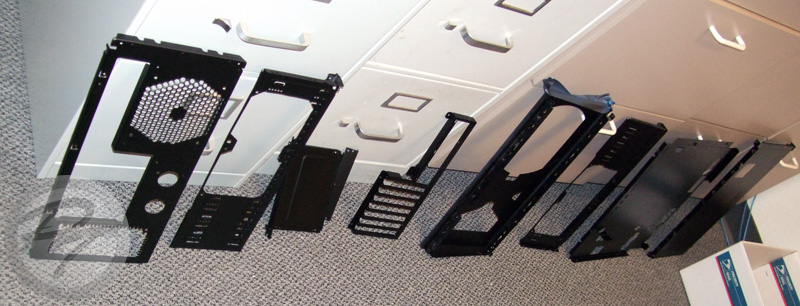
Finished priming and allowing things to dry for an hour before rushing into a color coat. I really don't like rushing paint because it's just one of those things that, if you take the time to do it right, can make the difference between an amazing mod and a mediocre mod... but, with so little time to work with, I obviously can't spend weeks on paint (which is why I'm not even considering external paint).
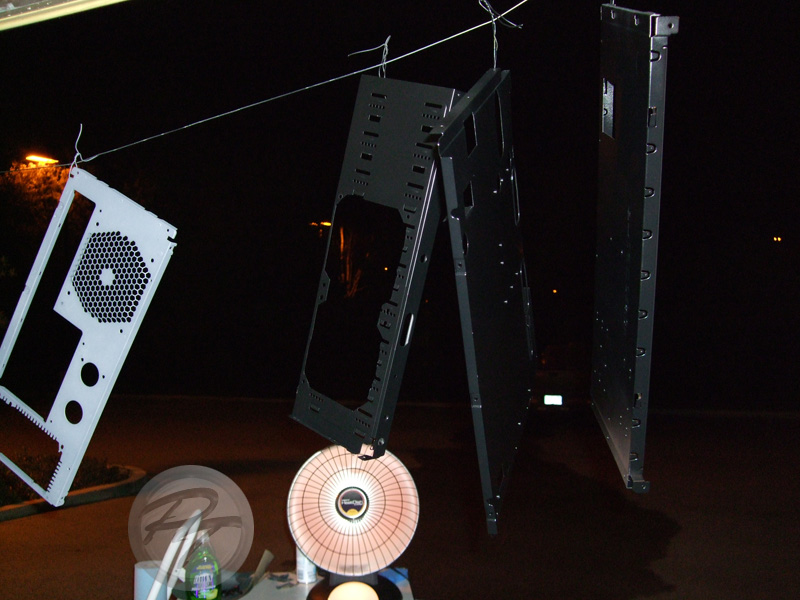
Applying color coats to the panels... in the dark.... with only the dish to keep the parts warm and cure the paint (probably about 45°F out by this point).
After things cured enough to be carefully handled, I moved all of the panels into the office and programmed the thermostat to hold the temperature at 75°F all night to help the paint cure (by the time I left, the temperature in the warehouse was lingering around 40°F... not a great environment for paint to cure quickly). The sad part is that it takes a full week for this paint to completely cure, so it won't actually be done until after CES is over... but that won't stop me from finishing the case anyway!
So, my 'to do' list for tomorrow (Monday) consists of the following:
- Cut the side panels (window for the left panel and one 'radgrill' hole for each side).
- Deburr, wet sand, clean, prime, and paint the insides of the side panels.
- Pop rivet the chassis back together.
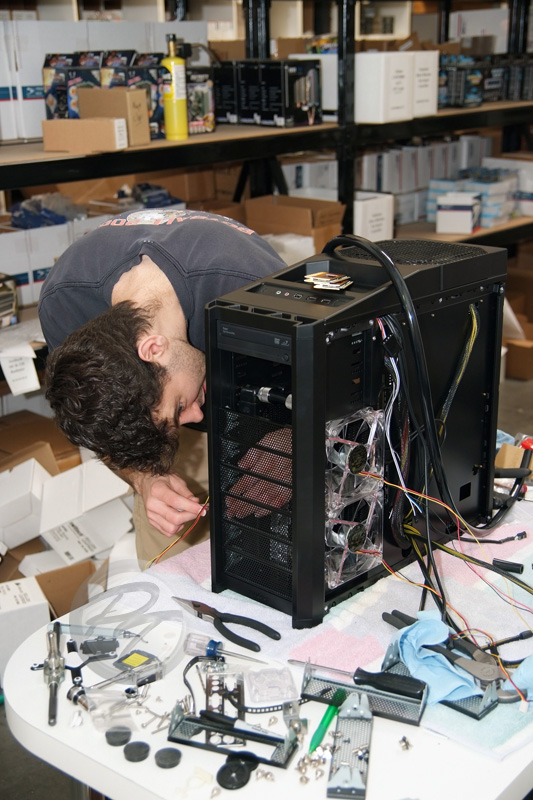
- Start assembling computer.
- Pray all of the parts work (I haven't had time to test any of the components that Super Talent dropped off).
Tuesday's list should go like this:
- Finish assembling computer.
- Fill water cooling system.
- Install Windows.
- Apply the custom Appliqués which should arrive on Monday (despite a few setbacks, Terry over at Shatteredweb has been great to work with, as always).
- Box the system up, stuff it into the 328i (since there's no way it's fitting in the roadster), and start the first leg of my drive to Vegas (breaking it into two days because I have to drop by SLO to deliver a TV).
Time for sleep....
[/Entry 2]
[Entry 3]
Well, I worked late into the night last night (like every night for nearly the past week) and am almost done... should be able to finish everything up today. Sadly, there's no way I'll be able to make it to Vegas for the opening day of CES (because I'm driving, the best I'll be able to do is Thursday evening). I've had to take a lot of shortcuts and make a lot of compromises to get this thing done and I'm not very happy about that, but it'll still look pretty cool (just not up to my usual standards).
Pictures will be posted if I have time... otherwise you'll either have to go to Sands Convention Center booth #72421 or wait 'till Sunday to see it.
As a side note... Dave, your pump brackets are too damn strong ;-)
[/Entry 3]
[Entry 4]
Okay, okay... I just finished sifting through photos and resizing stuff last night, so here we go!
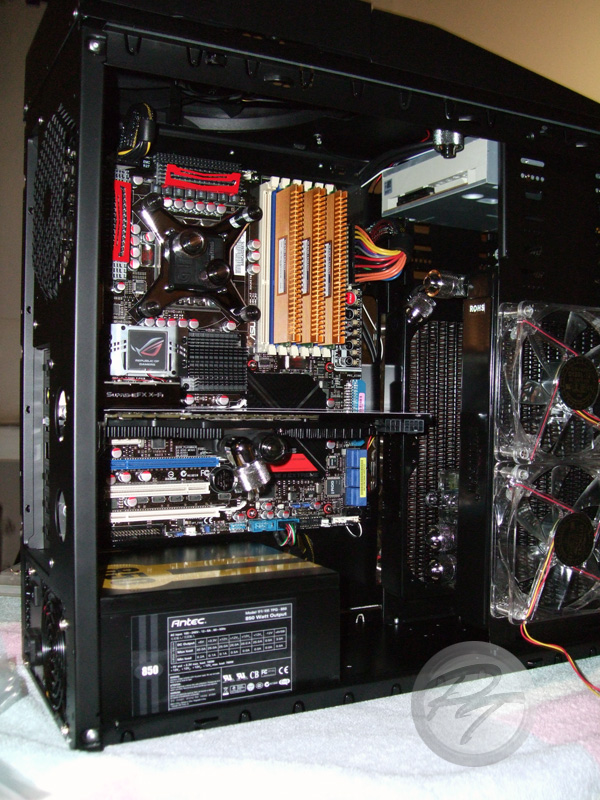
After getting the chassis riveted back together...
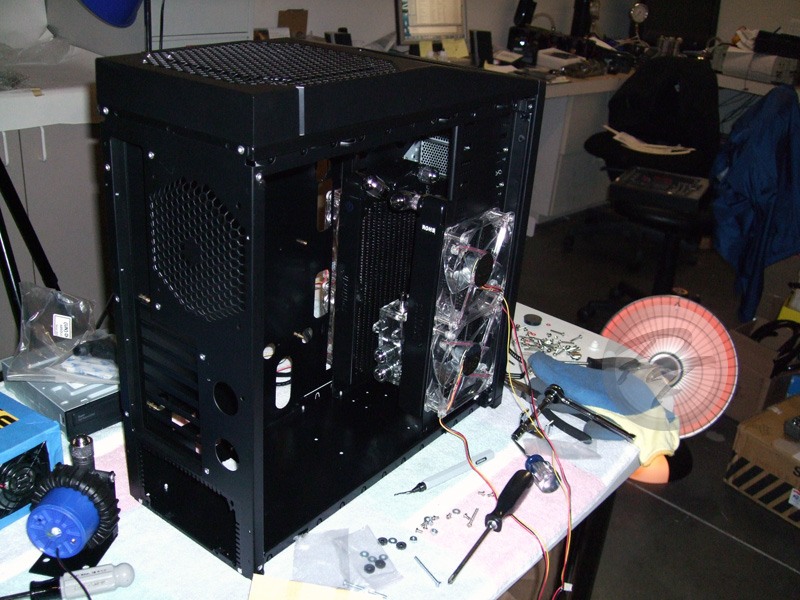
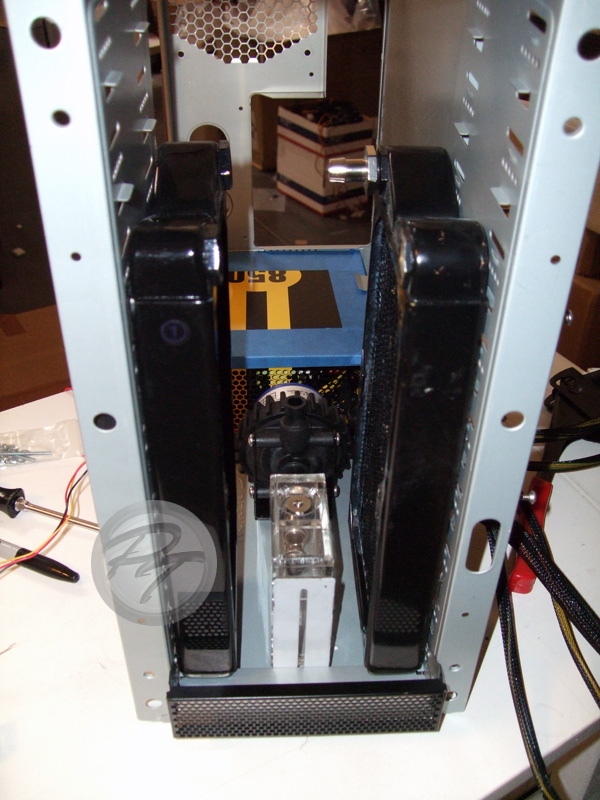
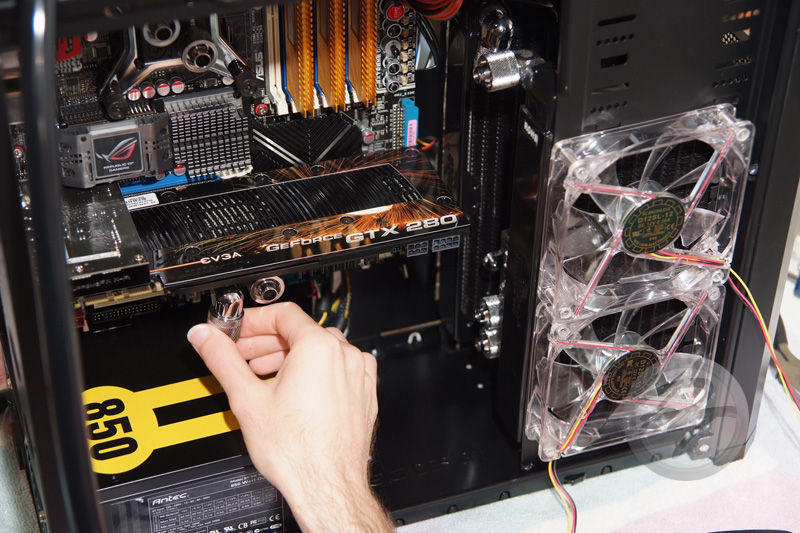
Checking radiator and reservoir fitment...
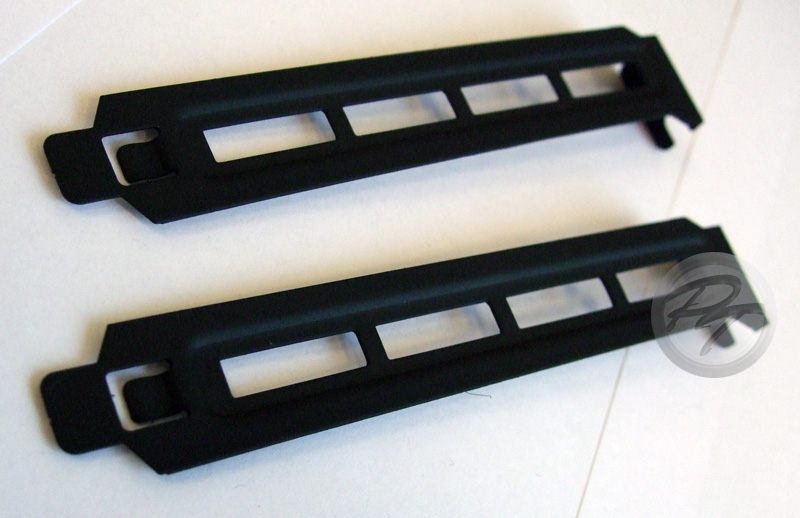
A quick spray and cook of the PCI bracket covers... That dish heater really comes in handy (even if the color and finish are a little different as a result.
A little cutting, filing, sanding, tapping and... voila! Compression fitting equipped, G1/4 tapped D4.
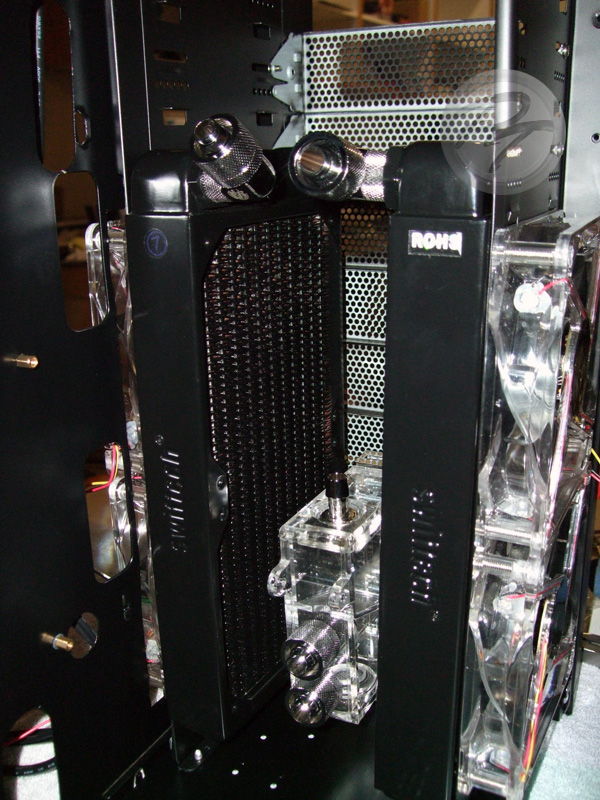
Prior to the fitting of tubing.

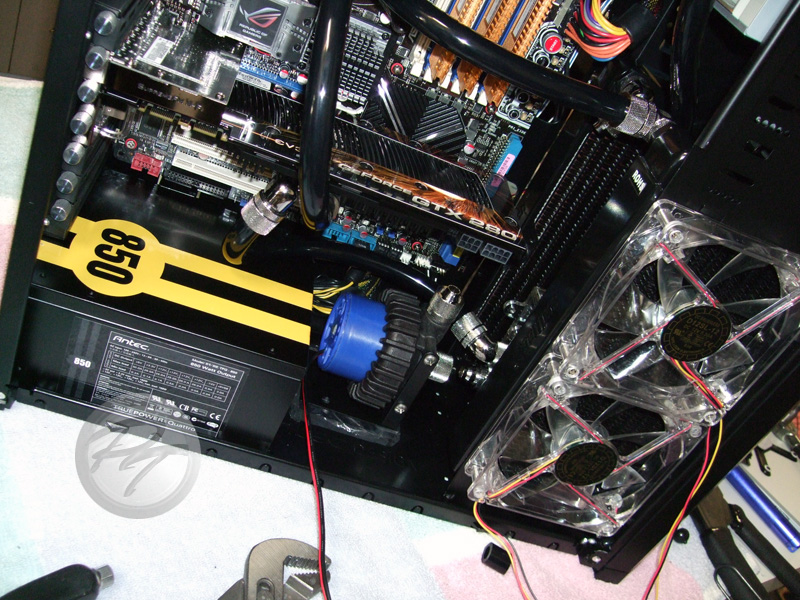

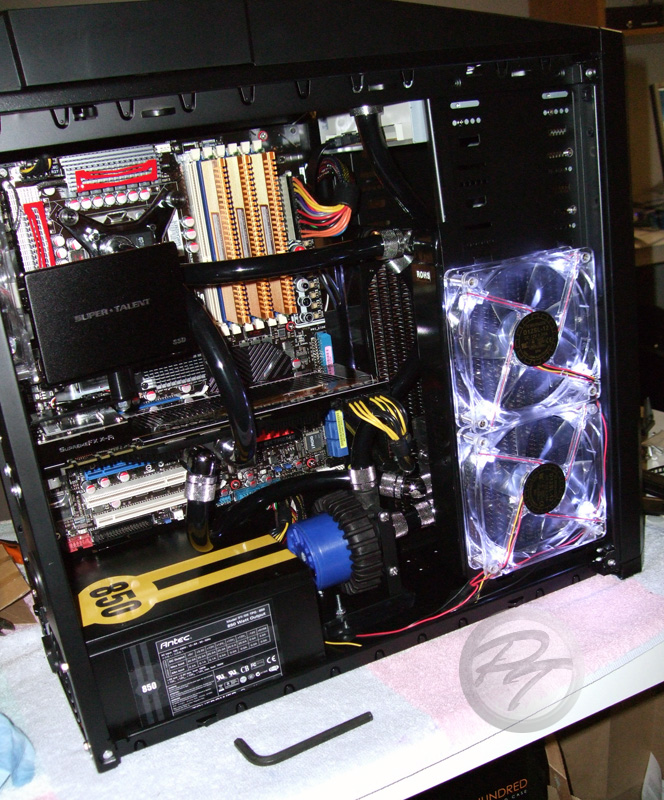
Bleeding the loop...
Installing Windows
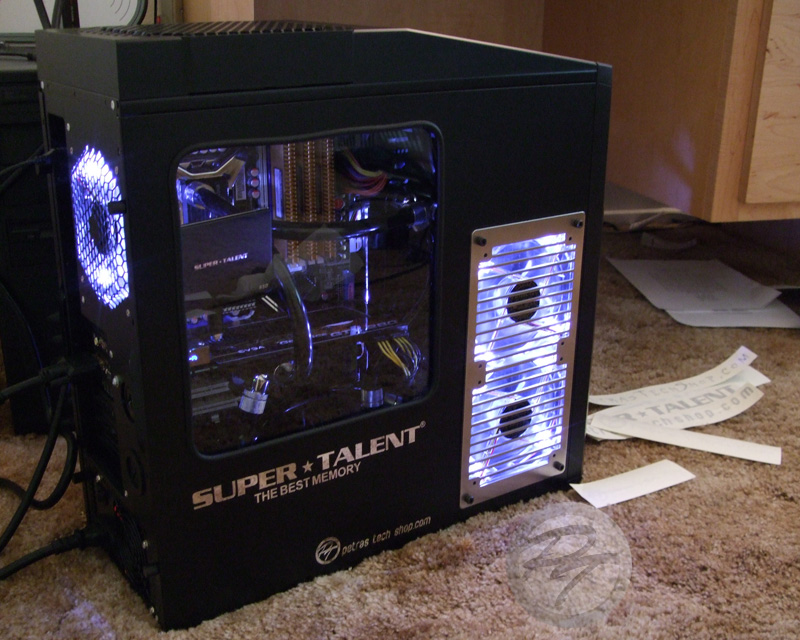
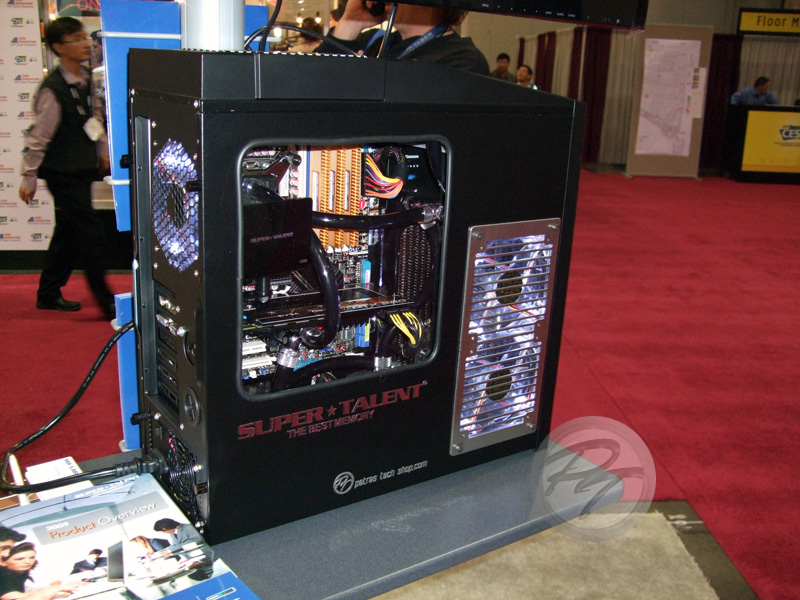
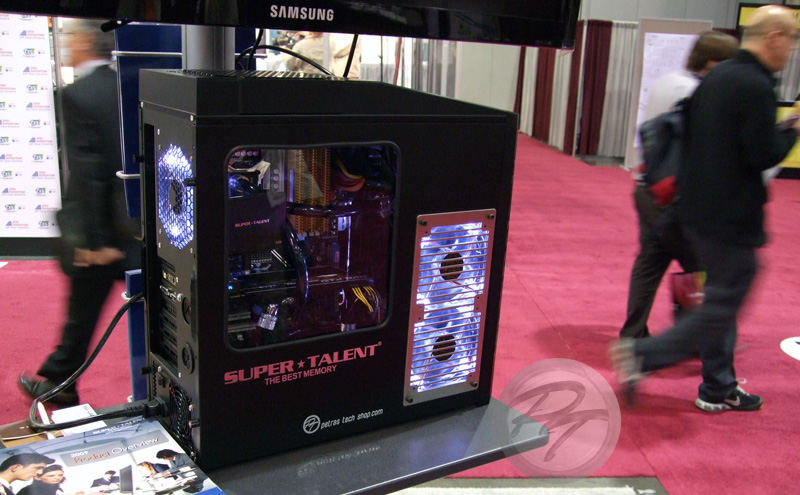
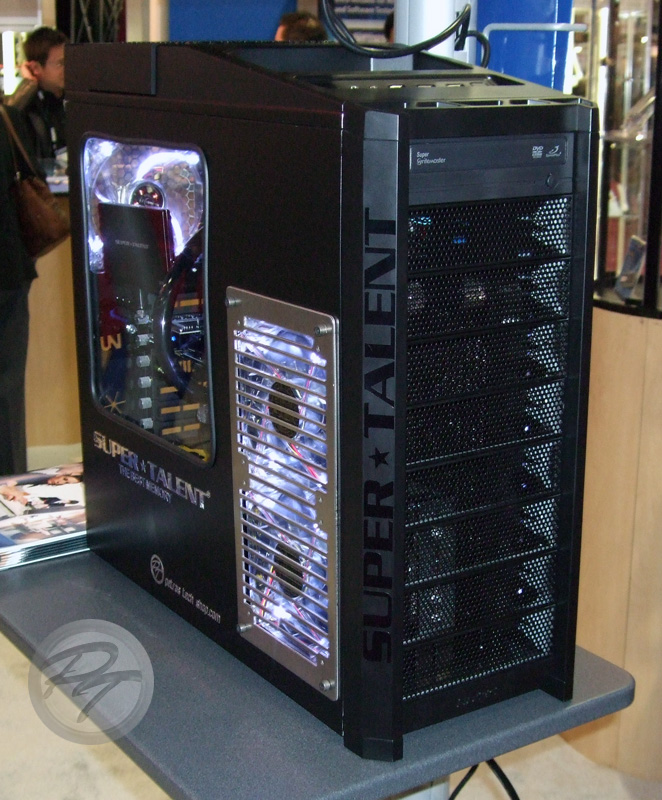
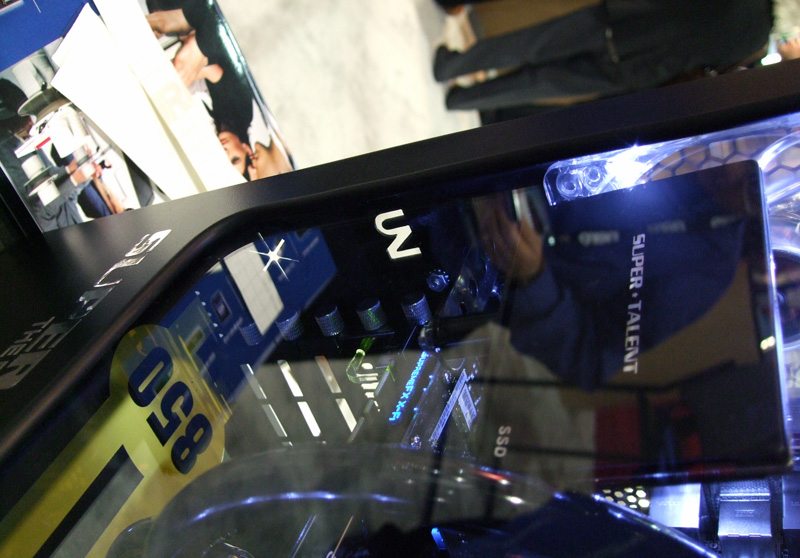
Now some shots from the Super Talent booth at CES... as you can tell, I kept having problems with sagging window molding through the show because I just didn't have time to tack the molding down before leaving for Vegas. Heck, I was still applying appliqués on the show floor.

...and this one's just for you, Dave:
Oliver ( Fr3ak ) has some more photos from the CES floor.
[/Entry 4]
[Entry 5]
"Very nice and clean look. Only 1 thing i don't like :P Paint that Dvd-rom inside of case :P" -Borys
Oh, there are a ton of little things that bother me about this build... the unpainted DVD-ROM, unpainted internals of the 5.25" bay covers, didn't have time to paint the insides of the two side panels (not that you really see them), the window molding (and the fact that I had to use it), not having time to paint the exterior (deep, gloss black with lots of clear would have been nice), wiring could have been nicer, didn't have time to sleeve stuff, the cuts could have been better and could have used more clean-up... the list goes on and on... I'm my own worst critic.
Still looks good, though :-)
"How are the actual temps on the system? I am thinking of doing this on my TT armor with a 3x120 on one side and 2x120 in the top." -Camaroz06
Ya know, I can't really recall... Honestly, I put it together, checked the temps to make sure that everything was working alright, and moved on to more assembly. As for what you're planning, a triple and a dual fan radiator should be more than enough to handle an i7 system with a couple video cards.
"Excellent build. Sorry I did not make it to the Sands and sorry I did not see you at the XS party." -DarthBeavis
Thanks :-)
I wasn't able to get away from everyone at CES early enough to meet up with many at the XS party (I think that I got there at like 8:30 or 9:00pm... but was there until like 3:00am). There's always next year!
"Very nice! It'd be nice to get to build rigs for free." -atomic ferret
Free? Hah... I ended up putting over $100 in fittings alone into that case (not to mention all of the cooling gear, paint, appliqués, and modding supplies)... and I didn't even get to keep it :-(
"In a more productive note petra do is there a version of the Antec 900 without a case window because all the ones I'm seeing have a case window already built in that funky shape." -silverphoenix
Nope but the side panels are interchangeable and Antec sells the blank panel on their website. I ended up stealing a panel from some guy's home system (has a 900, works for Super Talent, offered it up so that I could finish in time for the show).
[/Entry 5]
!--End of Archive--!
!--Start of Archive--!
I usually don't post worklogs... mostly because I'm too busy actually modding but I figure that I probably should for this one (even though it isn't really a "major" mod at all).
Anyway, last week (or perhaps the week before... I really can't remember) I was contacted by Super Talent Technologies (they do memory) to put together a display machine for their CES booth. Frankly, it's a little late in the year to be asking for custom display machines but, whatever, I'm game.
They dropped off the goodies on some Friday (was either last Friday or the Friday prior) and I've spent time collecting other parts, getting custom appliqués on order, and prepping stuff. Now, the catch with this build is that I get to foot the bill for all modding-related stuffs, water cooling, and appliqués. In exchange, I can put our logo and stuff on the case.
What Super Talent dropped off:
Aside from the Antec 900, not too shabby.
The two main items that I need to focus on 'showcasing' are the solid state drive and the 3GB DDR3 kit. I'm thinking that I'll work up some sort of bracket to mount the SSD up near a case window or something. Aside from that, I've mostly just been thinking about cooling (then again, when am I not?) and mucking about in Sketchup to see what'll fit and what won't.
Dual MCR220's, modded drive cages, some flat black interior paint, white LED fans, a custom cut window, black tubing, compressions, and stainless radgrilles on the side panels acting as exhausts for the radiators is the current plan... with the two main issues being mounting the radiators and getting ahold of an extra right-side (blank) panel for the 900. I can't get particularly wild with this build not only because I don't have the time to do so, but also because they want the case easily transportable/shippable (so, no external craziness).
Cutting should commence tomorrow.
Would anyone in the bay area happen to have a spare Antec 900 side panel?
Sorry for the lack of updates, but I've been busy juggling this project, the store, and personal stuff.
Anyway, I leave for CES in two days... and, boy, do I have my work cut out for me.
Here's a quick summary of where I'm at and how I got there:
Started by stripping the case (pulling all the cages, covers, and other crap out).
A little blue painter's tape on the PSU so as not to scratch it up while test fitting stuff.
Marking up the case to act as a guide for the primary cuts. I'm very much a hands-on, throw stuff in, figure out where to cut, go crazy with Sharpie kind of modder who's projects tend to change as I move through them--it's fun!
...and the carnage begins! Before anyone asks, yes, I'm wearing both safety glasses and earplugs (otherwise, I would have become blind and deaf long ago). What the picture can't show you, though, are my poor Logitech Z-2300's blasting away in the background (a mix of Muse, Led Zeppelin, and Audioslave, in case anyone is curious).
By this point, I'm starting to drill the rivets out of the case to take it apart so that I can finish most of the cutting.
Whadda 'ya know... it's back together again. After pulling the case entirely apart and cutting it up some more, I partially reassembled it so that I could test fit some of the components and check for any additional modifications that it needed. All that excess Sharpie really makes the cuts look a lot worse than they actually are...
Looking familiar?
I'm also using the opportunity to mark spots where mounting holes will be needed and figure out the SSD mount (not shown).
Turns out that a few more mm had to be trimmed from the motherboard tray so that I could mount fans up to the radiator on the right... Eh, at least I was close on the first go.
Which brings us to today...
Here the case has been disassembled again, each panel deburred, filed, wet sanded, thoroughly cleaned, and hung for priming.
It started getting quite cold, so out came the dish heater to keep the panels warm (paint was stored in the front office, so I didn't have to worry about warming it).
Finished priming and allowing things to dry for an hour before rushing into a color coat. I really don't like rushing paint because it's just one of those things that, if you take the time to do it right, can make the difference between an amazing mod and a mediocre mod... but, with so little time to work with, I obviously can't spend weeks on paint (which is why I'm not even considering external paint).
Applying color coats to the panels... in the dark.... with only the dish to keep the parts warm and cure the paint (probably about 45°F out by this point).
After things cured enough to be carefully handled, I moved all of the panels into the office and programmed the thermostat to hold the temperature at 75°F all night to help the paint cure (by the time I left, the temperature in the warehouse was lingering around 40°F... not a great environment for paint to cure quickly). The sad part is that it takes a full week for this paint to completely cure, so it won't actually be done until after CES is over... but that won't stop me from finishing the case anyway!
So, my 'to do' list for tomorrow (Monday) consists of the following:
- Cut the side panels (window for the left panel and one 'radgrill' hole for each side).
- Deburr, wet sand, clean, prime, and paint the insides of the side panels.
- Pop rivet the chassis back together.
- Start assembling computer.
- Pray all of the parts work (I haven't had time to test any of the components that Super Talent dropped off).
Tuesday's list should go like this:
- Finish assembling computer.
- Fill water cooling system.
- Install Windows.
- Apply the custom Appliqués which should arrive on Monday (despite a few setbacks, Terry over at Shatteredweb has been great to work with, as always).
- Box the system up, stuff it into the 328i (since there's no way it's fitting in the roadster), and start the first leg of my drive to Vegas (breaking it into two days because I have to drop by SLO to deliver a TV).
Time for sleep....
Well, I worked late into the night last night (like every night for nearly the past week) and am almost done... should be able to finish everything up today. Sadly, there's no way I'll be able to make it to Vegas for the opening day of CES (because I'm driving, the best I'll be able to do is Thursday evening). I've had to take a lot of shortcuts and make a lot of compromises to get this thing done and I'm not very happy about that, but it'll still look pretty cool (just not up to my usual standards).
Pictures will be posted if I have time... otherwise you'll either have to go to Sands Convention Center booth #72421 or wait 'till Sunday to see it.
As a side note... Dave, your pump brackets are too damn strong ;-)
Okay, okay... I just finished sifting through photos and resizing stuff last night, so here we go!
After getting the chassis riveted back together...
Checking radiator and reservoir fitment...
A quick spray and cook of the PCI bracket covers... That dish heater really comes in handy (even if the color and finish are a little different as a result.
A little cutting, filing, sanding, tapping and... voila! Compression fitting equipped, G1/4 tapped D4.
Prior to the fitting of tubing.
Bleeding the loop...
Installing Windows
Now some shots from the Super Talent booth at CES... as you can tell, I kept having problems with sagging window molding through the show because I just didn't have time to tack the molding down before leaving for Vegas. Heck, I was still applying appliqués on the show floor.
...and this one's just for you, Dave:
Oliver ( Fr3ak ) has some more photos from the CES floor.
"Very nice and clean look. Only 1 thing i don't like :P Paint that Dvd-rom inside of case :P" -Borys
Oh, there are a ton of little things that bother me about this build... the unpainted DVD-ROM, unpainted internals of the 5.25" bay covers, didn't have time to paint the insides of the two side panels (not that you really see them), the window molding (and the fact that I had to use it), not having time to paint the exterior (deep, gloss black with lots of clear would have been nice), wiring could have been nicer, didn't have time to sleeve stuff, the cuts could have been better and could have used more clean-up... the list goes on and on... I'm my own worst critic.
Still looks good, though :-)
"How are the actual temps on the system? I am thinking of doing this on my TT armor with a 3x120 on one side and 2x120 in the top." -Camaroz06
Ya know, I can't really recall... Honestly, I put it together, checked the temps to make sure that everything was working alright, and moved on to more assembly. As for what you're planning, a triple and a dual fan radiator should be more than enough to handle an i7 system with a couple video cards.
"Excellent build. Sorry I did not make it to the Sands and sorry I did not see you at the XS party." -DarthBeavis
Thanks :-)
I wasn't able to get away from everyone at CES early enough to meet up with many at the XS party (I think that I got there at like 8:30 or 9:00pm... but was there until like 3:00am). There's always next year!
"Very nice! It'd be nice to get to build rigs for free." -atomic ferret
Free? Hah... I ended up putting over $100 in fittings alone into that case (not to mention all of the cooling gear, paint, appliqués, and modding supplies)... and I didn't even get to keep it :-(
"In a more productive note petra do is there a version of the Antec 900 without a case window because all the ones I'm seeing have a case window already built in that funky shape." -silverphoenix
Nope but the side panels are interchangeable and Antec sells the blank panel on their website. I ended up stealing a panel from some guy's home system (has a 900, works for Super Talent, offered it up so that I could finish in time for the show).
!--End of Archive--!
[PT Archive '09] A Quick Camera Mount Test
This is an external/internal camera mount test that I put together in 2009 for a couple suction mounts that I purcahsed. The amusing detail is that the video is composed of four separate trips around a local neighborhood block (well, local when I lived in Saratoga) that were painstakingly assembled in iMovie (would have been a lot easier in Premiere or Final Cut). There's really only one point in the video where it's very obvious... stupid turn signals.
Anyway, let me know what you think... and, remember, it's a camera test so I'm not really supposed to be amusing or talking about anything meaningful. I did throw in a couple shots from a weekend outing at the end, including some sightings (Viper, F-430 Spyder, GT-R). The full-size version can be seen on YouTube.
Anyway, let me know what you think... and, remember, it's a camera test so I'm not really supposed to be amusing or talking about anything meaningful. I did throw in a couple shots from a weekend outing at the end, including some sightings (Viper, F-430 Spyder, GT-R). The full-size version can be seen on YouTube.
Monday, May 3, 2010
[Forum Archive '08] Fan Controller Analysis
Sometimes a bit of investigation must be done before a question can be answered...this is one of those times. In late 2008, a controversy erupted in XtremeSystems over whether or not certain fan controllers utilized some form of PWM (a debate stemming from the acoustic behavior of certain fans when used with different controllers). Below are a few of my posts from the thread documenting my look into the Sunbeam Rheobus fan controller. As a side note, all images have been re-sized via HTML, rather than my usual two image (preview & full image via link) approach, to speed along the archiving process. You can still right-click on the images and view them at full-size in a new tab/window. Also note that all vBulletin emoticons and their associated code have been removed from the archive entry.
!--Start of Archive--!
[Entry 1]
Well, the four channel Rheobus has a couple quad op-amps, along with some caps and resistors, smack dab in the center of the PCB and the only reason I can think to have those there would be to act as an oscillator (timing circuit) for PWM regulation. If you measured the output with a multimeter, it would indicate that the actual output voltage was changing when the knob is turned but all it's showing you is apparent voltage (since the DMM really doesn't refresh fast enough to know what's going on... you'd need an oscilloscope to see that).
I'll see if I can borrow an o-scope from someone either this weekend or next week and put together a little video showing the output of various fan controllers.
[/Entry 1]
[Entry 2]
Erm, as a bit of an update... I think that I'm going to have to re-evaluate my statements regarding the Sunbeam Rheobus...
Margaret came up to visit this weekend and we managed to pull an ancient oscilloscope outta her parent's attic to test a few fan controllers with. What we found was interesting but kinda confusing.
As I mentioned previously, I had assumed that the Sunbeam Rheobus was using some form of PWM due to the components which are on the PCB; however, when we hooked the controller up to the o-scope, we got something that looked like this:
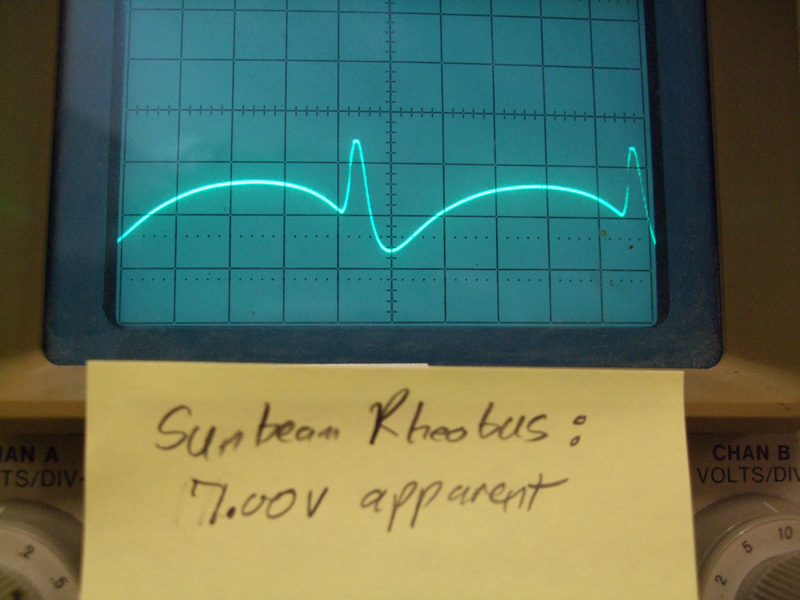
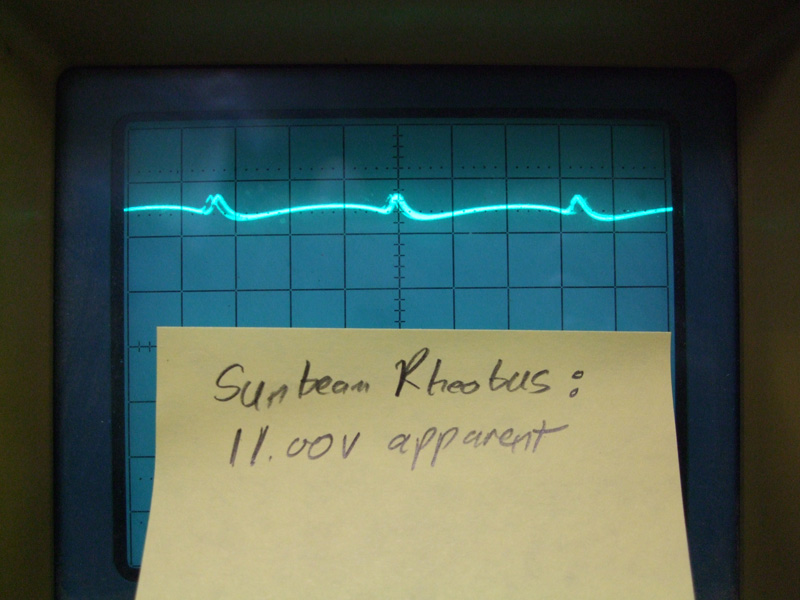
Hmmm, thought us... that doesn't look like any sort of PWM that we've seen before. Then we remembered that the fan which was hooked up to the channel we were testing would act as an inductive load and, therefore, what we were seeing was feedback from said fan. Hooking a pot up to the controller (resistive load) resulted in the output looking like a flat line (straight DC output).
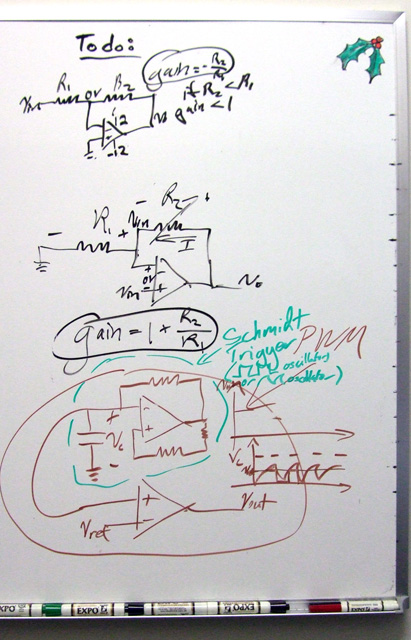
So, what does this mean? Well, it means that, assuming the old o-scope wasn't acting funky, the output from the Rheobus is not a PWM signal, it's just straight DC voltage. However, that still doesn't explain why we were able to start fans at lower voltages with my lab PSU (or a computer PSU and some resistors to give the desired voltage drop) than the Rheobus, it doesn't explain why they are using two op-aps per channel in the Rheobus (because, as Margaret demonstrated on my white board, you can create a PWM fan control circuit with just two op-amps), and it doesn't explain why it looked like they were using one of the op-amps as an integrator (which would imply some kind of PWM). Due to the unanswered questions, Margaret is taking a couple controllers back down to Cal Poly with her, where she has access to better equipment and will more easily be able to put together a circuit diagram for the controller.
As a side note, we got the same output from the Scythe Kaze Master.
[/Entry 2]
[Entry 3]
Sorry for the double post... but some of the lingering questions have been answered...
They're only using one op-amp per channel (which leaves 4 of the 8 op-amps unused), unlike what we had originally thought. The one op-amp that's being used per channel, which initially looked to be used as an integrator (causing confusion), turned out to be serving as a comparator with a capacitor shorting any high frequency noise. In the end, Sunbeam is using (or, as I would put it, wasting) the op-amps to trigger the LED's color change from blue to red at about 7V and below... and that's it. The mystery of the Sunbeam Rheobus has been solved.
I guess I forgot about those LEDs in my initial assessment of the circuit...
[/Entry 3]
!--End of Archive--!
!--Start of Archive--!
Well, the four channel Rheobus has a couple quad op-amps, along with some caps and resistors, smack dab in the center of the PCB and the only reason I can think to have those there would be to act as an oscillator (timing circuit) for PWM regulation. If you measured the output with a multimeter, it would indicate that the actual output voltage was changing when the knob is turned but all it's showing you is apparent voltage (since the DMM really doesn't refresh fast enough to know what's going on... you'd need an oscilloscope to see that).
I'll see if I can borrow an o-scope from someone either this weekend or next week and put together a little video showing the output of various fan controllers.
Erm, as a bit of an update... I think that I'm going to have to re-evaluate my statements regarding the Sunbeam Rheobus...
Margaret came up to visit this weekend and we managed to pull an ancient oscilloscope outta her parent's attic to test a few fan controllers with. What we found was interesting but kinda confusing.
As I mentioned previously, I had assumed that the Sunbeam Rheobus was using some form of PWM due to the components which are on the PCB; however, when we hooked the controller up to the o-scope, we got something that looked like this:
Hmmm, thought us... that doesn't look like any sort of PWM that we've seen before. Then we remembered that the fan which was hooked up to the channel we were testing would act as an inductive load and, therefore, what we were seeing was feedback from said fan. Hooking a pot up to the controller (resistive load) resulted in the output looking like a flat line (straight DC output).
So, what does this mean? Well, it means that, assuming the old o-scope wasn't acting funky, the output from the Rheobus is not a PWM signal, it's just straight DC voltage. However, that still doesn't explain why we were able to start fans at lower voltages with my lab PSU (or a computer PSU and some resistors to give the desired voltage drop) than the Rheobus, it doesn't explain why they are using two op-aps per channel in the Rheobus (because, as Margaret demonstrated on my white board, you can create a PWM fan control circuit with just two op-amps), and it doesn't explain why it looked like they were using one of the op-amps as an integrator (which would imply some kind of PWM). Due to the unanswered questions, Margaret is taking a couple controllers back down to Cal Poly with her, where she has access to better equipment and will more easily be able to put together a circuit diagram for the controller.
As a side note, we got the same output from the Scythe Kaze Master.
Sorry for the double post... but some of the lingering questions have been answered...
They're only using one op-amp per channel (which leaves 4 of the 8 op-amps unused), unlike what we had originally thought. The one op-amp that's being used per channel, which initially looked to be used as an integrator (causing confusion), turned out to be serving as a comparator with a capacitor shorting any high frequency noise. In the end, Sunbeam is using (or, as I would put it, wasting) the op-amps to trigger the LED's color change from blue to red at about 7V and below... and that's it. The mystery of the Sunbeam Rheobus has been solved.
I guess I forgot about those LEDs in my initial assessment of the circuit...
!--End of Archive--!
[Forum Archive '08] Quick Pump Test: Laing D4 vs. Laing D5-B
In late 2008, I was contacted by an employee of Corsair Memory and we worked out a deal for PTS to take some excess inventory off their hands for a very attractive price. The excess inventory in question consisted of 300 Laing D4 pumps which had been purchased by accident sometime in either late 2004 or 2005 as well as 350+ steel Rev. 1 Swiftech RadBoxes. Naturally, I had to run a quick performance comparison test against a pump that people were familiar with, since the D4 is old enough to where many had no experience with it. Total forum thread views: 1,574 (as of 5/03/2010). As a side note, all images have been re-sized via HTML, rather than my usual two image (preview & full image via link) approach, to speed along the archiving process. You can still right-click on the images and view them at full-size in a new tab/window. Also note that all vBulletin emoticons and their associated code have been removed from the archive entry.
!--Start of Archive--!
So, how many of you guys remember the Laing D4/MCP650? ...anybody?
Okay, well, anyway, I was curious as to how the 'ole D4 would stack up against the D5 Basic... so, onetwothreego!
Equipment and Methodology:
This time around, I'm using an Omega FL-1504A-B flow meter, borrowed from the waterblock test system, to monitor flow (0.628-6.28GPM, +/- 2% full scale accuracy, +/- 0.5% repeatability, graduated every 2% of scale) and a Sper Scientific 840081 manometer, also borrowed from the waterblock test system, hooked up to a computer for dynamic head pressure data logging (-15 to 15PSI, 0.01PSI resolution, +/- 0.3% full scale accuracy, +/- 0.2% repeatability, and combined linearity & hysteresis of +/- 0.2%). The pumps being tested were kept at 12.00V (measured at the pump's power connector) throughout testing with my trusty HP 6264B variable DC PSU.
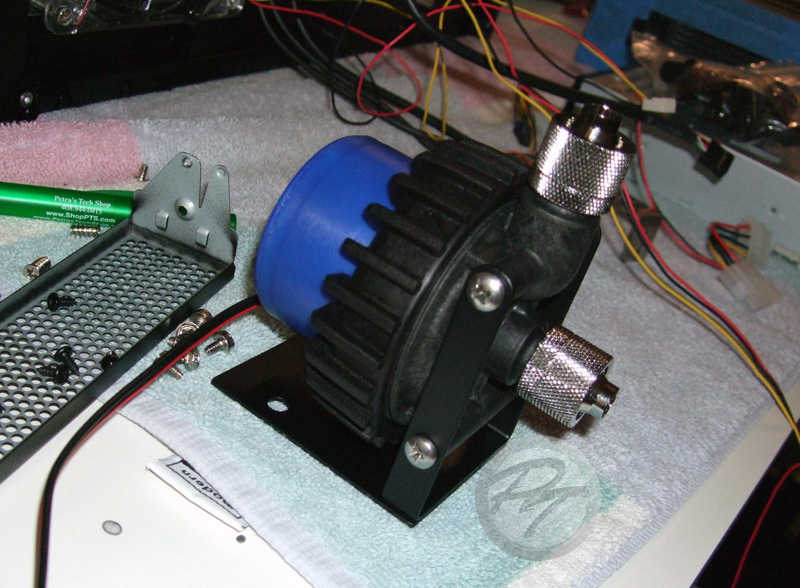
A quick photo of the test setup:
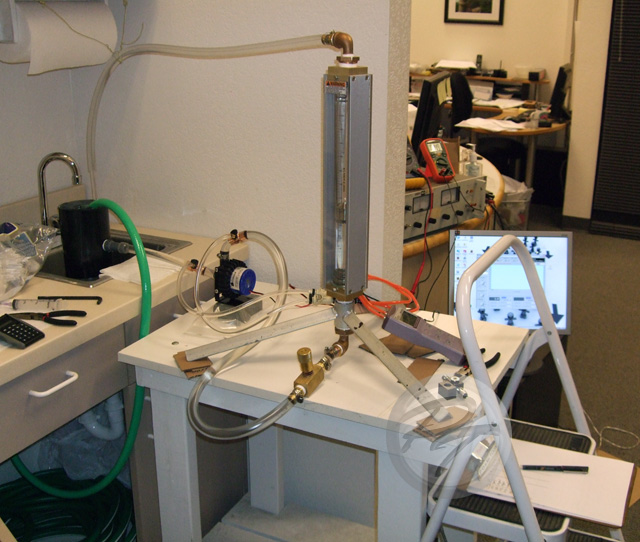
Each data point collected represents the mean of three trials, with 30 seconds of pressure data logged and averaged per trial (for a total of 90 samples per final data point). The reason for multiple trials and somewhat excessive data logging was to help mitigate any fluctuations in pump output and issues with the nut on the handlebars (e.g. anthropogenic flowmeter read error).
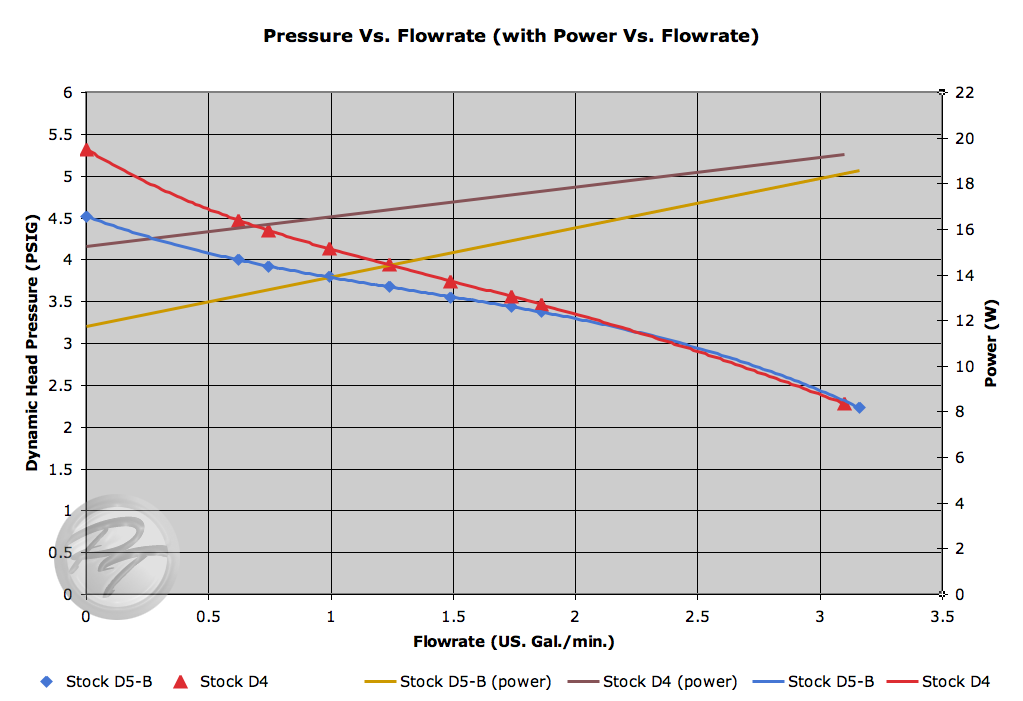
...and here's the resulting performance curve with power consumption:
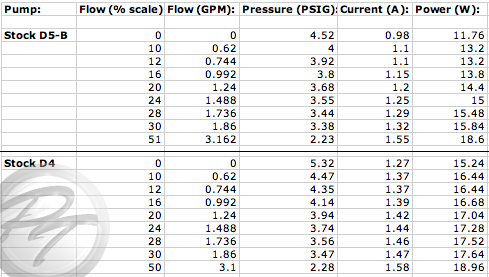
...the chart that the data for the graph was pulled from:
With Laing's & Swiftech's specs for the D4 putting it so close to the current D5 Vario, I can't say that I'm terribly surprised the D5 Basic got walked over. I did, however, note a noticeable difference in the acoustic quality of the two pumps--the D4 has a much more pronounced electronic 'buzz' and is a bit louder than the D5.
!--End of Archive--!
!--Start of Archive--!
So, how many of you guys remember the Laing D4/MCP650? ...anybody?
Okay, well, anyway, I was curious as to how the 'ole D4 would stack up against the D5 Basic... so, onetwothreego!
Equipment and Methodology:
This time around, I'm using an Omega FL-1504A-B flow meter, borrowed from the waterblock test system, to monitor flow (0.628-6.28GPM, +/- 2% full scale accuracy, +/- 0.5% repeatability, graduated every 2% of scale) and a Sper Scientific 840081 manometer, also borrowed from the waterblock test system, hooked up to a computer for dynamic head pressure data logging (-15 to 15PSI, 0.01PSI resolution, +/- 0.3% full scale accuracy, +/- 0.2% repeatability, and combined linearity & hysteresis of +/- 0.2%). The pumps being tested were kept at 12.00V (measured at the pump's power connector) throughout testing with my trusty HP 6264B variable DC PSU.
A quick photo of the test setup:
Each data point collected represents the mean of three trials, with 30 seconds of pressure data logged and averaged per trial (for a total of 90 samples per final data point). The reason for multiple trials and somewhat excessive data logging was to help mitigate any fluctuations in pump output and issues with the nut on the handlebars (e.g. anthropogenic flowmeter read error).
...and here's the resulting performance curve with power consumption:
...the chart that the data for the graph was pulled from:
With Laing's & Swiftech's specs for the D4 putting it so close to the current D5 Vario, I can't say that I'm terribly surprised the D5 Basic got walked over. I did, however, note a noticeable difference in the acoustic quality of the two pumps--the D4 has a much more pronounced electronic 'buzz' and is a bit louder than the D5.
!--End of Archive--!
Sunday, May 2, 2010
[Forum Archive '08] Quick Pump Test: Detroit Thermo D5 Top
I managed to scrape together the funds for some fresh test equipment in 2008 and, for the first couple of test runs, rather than fire up the CPU test system, I ran PQ curves for a couple pumps and an aftermarket top. Total forum thread views: 1,474 (as of 5/02/2010). As a side note, all images have been re-sized via HTML, rather than my usual two image (preview & full image via link) approach, to speed along the archiving process. You can still right-click on the images and view them at full-size in a new tab/window. Also note that all vBulletin emoticons and their associated code have been removed from the archive entry.
!--Start of Archive--!
Hey everybody... I know that it has been a while since I posted some actual test results (beyond that little stint with the fan controllers a couple days ago and a few other random things) but I felt like giving a new setup a try in preparation for some other testing that I should be moving onto somewhat soon. Anyway, I'm going to keep this short, so... onetwothree, go!
Equipment and Methodology:
This time around, I'm using an Omega FL-1504A-B flow meter, borrowed from the waterblock test system, to monitor flow (0.628-6.28GPM, +/- 2% full scale accuracy, +/- 0.5% repeatability, graduated every 2% of scale) and a Sper Scientific 840081 manometer, also borrowed from the waterblock test system, hooked up to a computer for dynamic head pressure data logging (-15 to 15PSI, 0.01PSI resolution, +/- 0.3% full scale accuracy, +/- 0.2% repeatability, and combined linearity & hysteresis of +/- 0.2%). The Laing D5-B pump being tested was kept at 12.00V (measured at the pump's power connector) throughout testing with my trusty HP 6264B variable DC PSU.
Now, all of the above equipment is going to be re-integrated into the most recent revision of the setup that I used for this roundup from a while ago--all that goodness together should provide for some interesting waterblock evaluations.
A quick photo of the test setup:
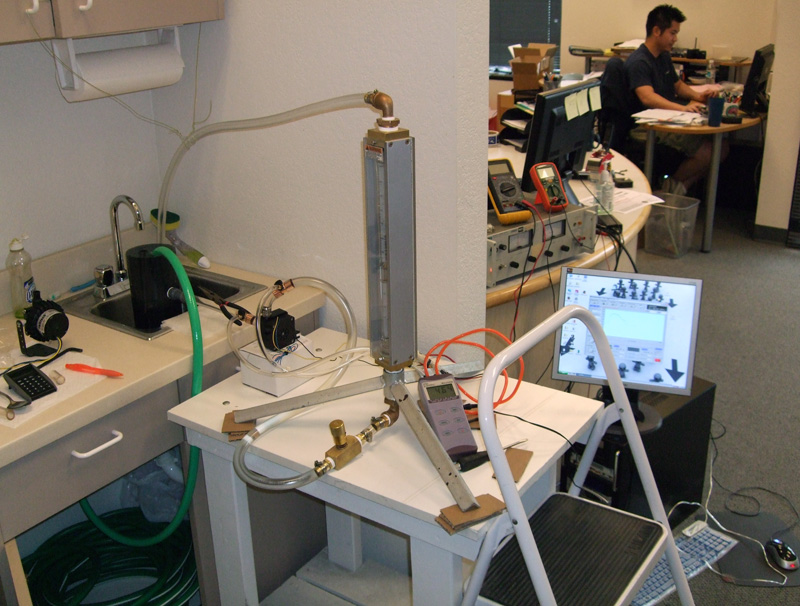
Note: the drain line configuration was changed after this photo was taken to eliminate the siphoning effect which occurred.
Each data point collected represents the mean of three trials, with 30 seconds of pressure data logged and averaged per trial (for a total of 90 samples per final data point). The reason for multiple trials and somewhat excessive data logging was to help mitigate any fluctuations in pump output and issues with the nut on the handlebars (e.g. anthropogenic flowmeter read error).
...and you guys are probably getting bored already... so here's the resulting performance curve with power consumption (yes, I changed from current draw in Amps to power consumption in Watts because people complained last time):
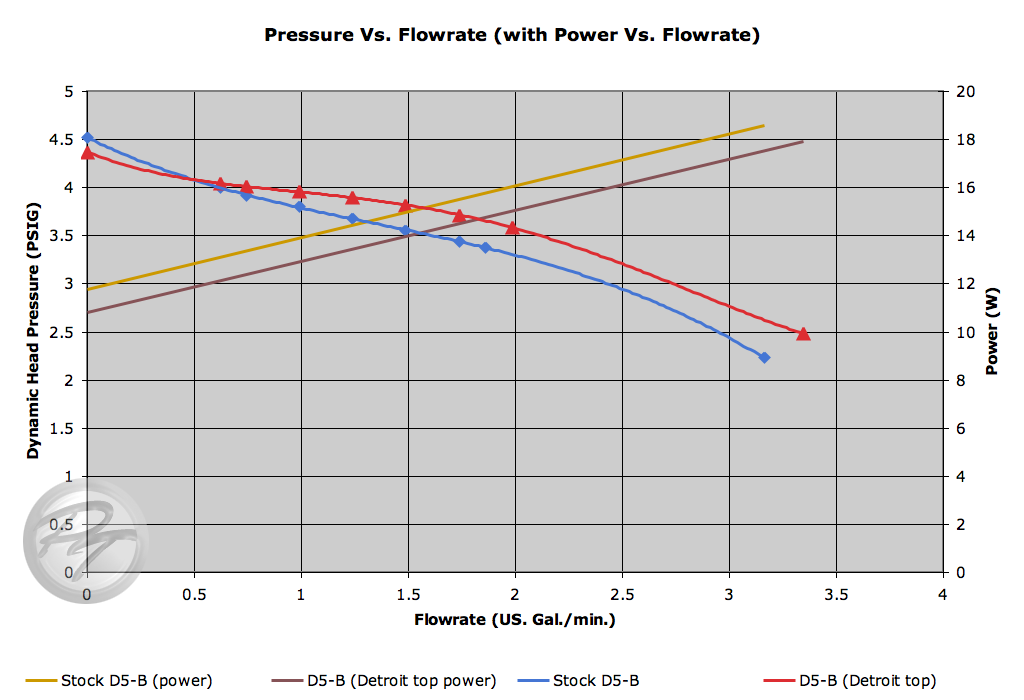
...the chart that the data for the graph was pulled from:
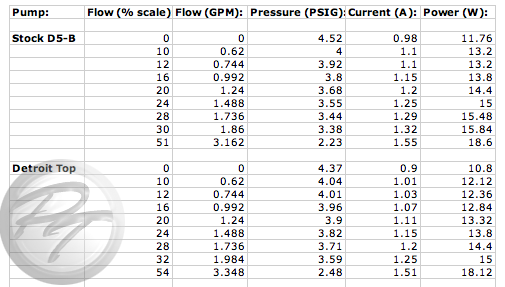
All in all, the Detroit Thermo top resulted in a slight increase in performance within a useful range for water cooling while, at the same time, causing a slight drop in power consumption. Not bad, but I'm still not really convinced that D5 tops, in general, are really worth purchasing based solely on performance. Would anyone happen to have an EK D5 top that I could borrow for a bit?
I think I'm gonna go home now...
!--End of Archive--!
!--Start of Archive--!
Hey everybody... I know that it has been a while since I posted some actual test results (beyond that little stint with the fan controllers a couple days ago and a few other random things) but I felt like giving a new setup a try in preparation for some other testing that I should be moving onto somewhat soon. Anyway, I'm going to keep this short, so... onetwothree, go!
Equipment and Methodology:
This time around, I'm using an Omega FL-1504A-B flow meter, borrowed from the waterblock test system, to monitor flow (0.628-6.28GPM, +/- 2% full scale accuracy, +/- 0.5% repeatability, graduated every 2% of scale) and a Sper Scientific 840081 manometer, also borrowed from the waterblock test system, hooked up to a computer for dynamic head pressure data logging (-15 to 15PSI, 0.01PSI resolution, +/- 0.3% full scale accuracy, +/- 0.2% repeatability, and combined linearity & hysteresis of +/- 0.2%). The Laing D5-B pump being tested was kept at 12.00V (measured at the pump's power connector) throughout testing with my trusty HP 6264B variable DC PSU.
Now, all of the above equipment is going to be re-integrated into the most recent revision of the setup that I used for this roundup from a while ago--all that goodness together should provide for some interesting waterblock evaluations.
A quick photo of the test setup:
Note: the drain line configuration was changed after this photo was taken to eliminate the siphoning effect which occurred.
Each data point collected represents the mean of three trials, with 30 seconds of pressure data logged and averaged per trial (for a total of 90 samples per final data point). The reason for multiple trials and somewhat excessive data logging was to help mitigate any fluctuations in pump output and issues with the nut on the handlebars (e.g. anthropogenic flowmeter read error).
...and you guys are probably getting bored already... so here's the resulting performance curve with power consumption (yes, I changed from current draw in Amps to power consumption in Watts because people complained last time):
...the chart that the data for the graph was pulled from:
All in all, the Detroit Thermo top resulted in a slight increase in performance within a useful range for water cooling while, at the same time, causing a slight drop in power consumption. Not bad, but I'm still not really convinced that D5 tops, in general, are really worth purchasing based solely on performance. Would anyone happen to have an EK D5 top that I could borrow for a bit?
I think I'm gonna go home now...
!--End of Archive--!
Subscribe to:
Posts (Atom)